


Of all the traditions my family cherishes when the air turns crisp and the nights grow long, none are met with more gleeful anticipation than our annual Mummy Hot Dog wrapping party. The moment I pull out that iconic blue tube of crescent roll dough, my kids know Halloween has officially begun. It’s more than just a recipe; it’s a craft, a memory-maker, and an edible art project all rolled into one. The sheer delight on their faces as they meticulously wrap their hot dogs, leaving a little space for a peeking face, is priceless. And the aroma that fills the kitchen as these golden-brown mummies bake to perfection—a comforting blend of savory hot dog and buttery pastry—is the official scent of our spooky season. They’re ridiculously easy, universally loved, and frankly, the cutest and most delicious ghouls you’ll ever invite to your dinner table. They disappear from the platter almost as fast as we can make them, dunked in “blood” (ketchup) and “guts” (mustard), a testament to their simple, spooky, and spectacular appeal.
The Ultimate Mummy Hot Dogs: A Complete Recipe
This recipe provides everything you need to create a batch of perfectly wrapped, ghoulishly good Mummy Hot Dogs. We’ve included options for adding cheese and suggestions for the best types of dough and hot dogs to ensure your mummies are the hit of the Halloween party.
Ingredients:
- Hot Dogs: 1 package (8-10 count) of your favorite hot dogs.
- Refrigerated Crescent Roll Dough: 1 can (8 oz). You can also use crescent dough sheets or puff pastry.
- Cheese (Optional): 4 slices of American cheese, cheddar, or provolone, cut into thin strips.
- Egg Wash (Optional, for a golden finish): 1 large egg, lightly beaten with 1 tablespoon of water.
- Eyes: Edible candy eyeballs. Alternatively, you can use dots of ketchup, mustard, or tiny pieces of black olive after baking.
Step-by-Step Instructions to Create Your Mummies
Follow these simple instructions to bring your spooky snacks to life. The process is so easy and fun, it’s the perfect kitchen activity to share with kids.
Step 1: Preheat and Prepare Your Workstation
First things first, preheat your oven to 375°F (190°C). This ensures the oven is at the perfect temperature to bake the dough evenly and give it that beautiful golden-brown color. Line a large baking sheet with parchment paper. This is a crucial step that prevents the mummies from sticking to the pan and makes cleanup an absolute breeze. No one wants to be scrubbing pans after a fun Halloween feast!
Step 2: Prepare the Hot Dogs and Dough
Open the package of hot dogs and pat each one dry with a paper towel. Removing the excess moisture from the surface of the hot dog helps the dough adhere better and prevents the “bandages” from becoming soggy from the inside out.
Next, unroll the can of crescent roll dough on a lightly floured surface or directly on another piece of parchment paper to prevent sticking. The dough will be perforated into triangles. Gently press down on the perforations to seal them together, creating one large rectangle of dough. This gives you a solid canvas to work with.
Step 3: Cut the Dough “Bandages”
Using a pizza cutter or a sharp knife, cut the rectangle of dough into long, thin strips. Don’t worry about making them perfectly uniform; in fact, a little variation in width makes the mummy bandages look more authentic and rustic. Aim for strips that are about 1/4 to 1/2 inch wide. A pizza cutter is highly recommended here as it glides through the soft dough without pulling or tearing it. You should get anywhere from 30 to 40 strips from one can of dough, which is plenty for your army of mummies.
Step 4: The Cheesy Surprise (Optional)
If you’re making Cheesy Mummies (and we highly recommend you do!), this is the time to add the cheese. Take one of your prepared hot dogs and make a shallow slit lengthwise, being careful not to cut all the way through. Tuck a thin strip of your chosen cheese into the slit. The cheese will melt into a gooey, delicious core as the mummy bakes.
Step 5: Wrap Your Mummies
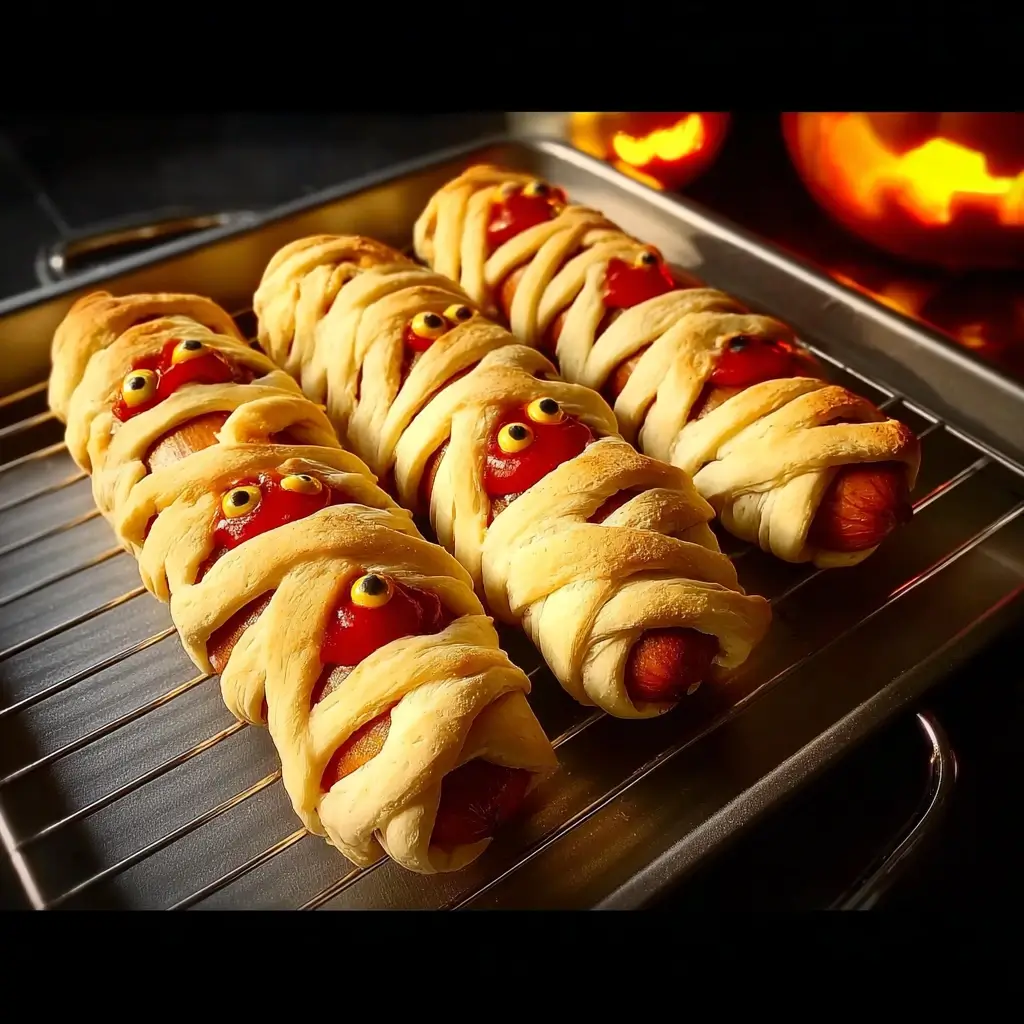
Now for the most fun part! Take one hot dog and begin wrapping it with the strips of dough. Start at one end and wind the dough strip around the hot dog, stretching it slightly as you go. Overlap the strips randomly, just like a real mummy’s bandages. Leave a small gap near one end of the hot dog where the mummy’s face will be. Use 2-4 strips per hot dog, depending on how “bandaged” you want them to look. Crisscross the strips and wrap them at different angles to create a more dynamic and spooky effect. Place each wrapped mummy on the prepared baking sheet, ensuring there is at least an inch of space between them to allow for even baking.
Step 6: The Golden Touch (Optional)
For mummies that have a beautiful, glossy, golden-brown finish, an egg wash is the secret weapon. In a small bowl, whisk together one egg and a tablespoon of water. Using a pastry brush, lightly brush this mixture over the dough bandages of each mummy. This step is optional, but it elevates the look of your mummies from homemade-fun to bakery-level-beautiful.
Step 7: Bake to Perfection
Place the baking sheet in your preheated oven. Bake for 12-17 minutes, or until the dough is a deep golden brown and puffed up. The exact time will depend on your oven and the type of dough you used. Keep a close eye on them during the last few minutes of baking to prevent them from getting too dark.
Step 8: Give Them a Face
Remove the mummies from the oven and let them cool on the baking sheet for a few minutes. While they are still warm, it’s time to give them eyes and bring them to life. Gently press two edible candy eyeballs into the gap you left in the bandages. If you don’t have candy eyeballs, no problem! Let the mummies cool completely, then use a toothpick to dot on eyes with ketchup or mustard. Small bits of black olive or capers also work wonderfully as spooky eyes.
Nutrition Facts
Please note that these nutritional values are an estimate and can vary based on the specific brands of hot dogs, dough, and cheese used.
- Servings: 8 Mummies
- Calories per serving (1 Mummy Hot Dog, no cheese): Approximately 250-300 kcal
- Calories per serving (1 Cheesy Mummy Hot Dog): Approximately 300-350 kcal
Preparation Time
This is a wonderfully quick and efficient recipe, perfect for a busy weeknight or as a last-minute party food.
- Prep Time: 15 minutes
- Cook Time: 15 minutes
- Total Time: 30 minutes
How to Serve Your Spooky Creations
The presentation and accompaniments can turn your delicious Mummy Hot Dogs into a full-blown Halloween experience. Here are some fun and festive ways to serve them.
- Create a “Graveyard” Platter:
- Arrange the baked Mummy Hot Dogs on a large black or dark-colored platter to make them stand out.
- Scatter fresh parsley or dill around the platter to simulate grass or moss.
- You can even “bury” a few of the mummies partially under a bed of spinach or arugula.
- Use a small bowl of dark dipping sauce like BBQ or black bean dip as a “cauldron” in the center.
- Offer a Dipping Sauce Bar:
- Dipping is non-negotiable! Set up a variety of sauces in small bowls with spooky labels.
- “Blood”: Classic ketchup.
- “Ghoul Guts”: A green-tinted relish or a spicy brown mustard.
- “Witches’ Brew”: A warm cheese sauce or queso.
- “Zombie Garnish”: A chunky marinara or pizza sauce.
- “Ghostly Glaze”: Ranch dressing or a garlic aioli.
- Perfect Side Dish Pairings:
- Witches’ Hair Pasta: Black squid ink pasta or regular pasta tossed in pesto makes a fantastic and spooky side.
- Cauldron Mac and Cheese: Serve a classic macaroni and cheese in a black bowl or a small cast-iron pot.
- Sweet Potato “Jack-O’-Lanterns”: Use a small cookie cutter to make jack-o’-lantern faces in slices of sweet potato before roasting them.
- Ghostly Tater Tots: Simply arrange a pile of crispy tater tots alongside your mummies for a kid-friendly favorite.
- “Blood Clot” Tomato Soup: A creamy tomato soup is the perfect warm and comforting dip or side for these mummies.
Additional Tips for Perfect Mummies Every Time
These five tips will help you troubleshoot common issues and take your Mummy Hot Dogs to the next level of deliciousness.
1. The No-Stick Dough Trick
Refrigerated dough can become sticky and difficult to work with as it warms up. To combat this, keep the dough in the refrigerator until the very moment you’re ready to use it. Work quickly and handle it as little as possible. If it starts to get sticky, lightly dust your hands and your work surface with flour. Using parchment paper to unroll and cut the dough is another pro-move that minimizes sticking and makes the whole process smoother.
2. Make-Ahead and Assembly Instructions
You can fully assemble the Mummy Hot Dogs up to 4 hours before you plan to bake them. Arrange the unbaked, wrapped mummies on your parchment-lined baking sheet, cover them tightly with plastic wrap, and store them in the refrigerator. When you’re ready to bake, remove the plastic wrap, apply the egg wash (if using), and pop them straight into the preheated oven. You may need to add 2-3 extra minutes to the baking time since they are starting from cold.
3. The Air Fryer Method for Extra Crispy Mummies
If you love your air fryer, you’ll be happy to know it makes fantastic Mummy Hot Dogs. They get exceptionally crispy! Preheat your air fryer to 350°F (175°C). Place the wrapped mummies in a single layer in the air fryer basket, making sure they aren’t touching. You’ll likely need to work in batches. Air fry for 6-8 minutes, or until the dough is golden brown and cooked through. The air circulation gives the “bandages” an incredible crunch.
4. Creative Variations to Try
Don’t be afraid to experiment! This recipe is a fantastic base for creativity.
- Sausage Mummies: Use precooked sausages like bratwurst, Italian sausage, or even breakfast sausage links for a different flavor profile.
- Pizza Mummies: Before wrapping, brush the dough with a thin layer of pizza sauce and sprinkle with Italian seasoning and mini pepperonis.
- Everything Bagel Mummies: After applying the egg wash, sprinkle the dough with everything bagel seasoning for a savory, crunchy crust.
5. Get the Kids Involved (The Right Way)
This is the ultimate recipe for involving little helpers. To make it a smooth and fun experience, set up an assembly line. An adult can be in charge of opening the dough and cutting the strips. Then, let the kids take over the wrapping. Embrace the imperfections! Some mummies might be fat, some skinny, some messy—that’s what gives them character. Giving kids a specific, fun job makes them feel empowered and excited to eat what they’ve created.
Frequently Asked Questions (FAQ)
Here are answers to some of the most common questions about making Mummy Hot Dogs.
1. Can I use a different type of dough?
Absolutely! While crescent roll dough is the classic choice for its buttery, flaky texture, other doughs work wonderfully. Puff pastry will give you a much flakier, lighter, and more sophisticated mummy. Canned pizza dough is also a great option, resulting in a chewier, more bread-like bandage. You can even use a simple homemade dough if you’re feeling ambitious. Just be aware that baking times may vary slightly depending on the dough’s thickness.
2. How can I make these vegetarian or vegan?
It’s very easy to adapt this recipe for different dietary needs. For a vegetarian version, simply substitute the hot dogs with your favorite brand of veggie dogs. For a fully vegan version, use veggie dogs and ensure your dough is vegan-friendly (many brands of crescent roll dough are “accidentally vegan,” but always check the ingredients for dairy or eggs). Instead of an egg wash, you can brush the dough with a little bit of melted vegan butter or olive oil for a golden finish.
3. How do I store and reheat leftovers?
If you have any leftover mummies, they store and reheat beautifully. Place them in an airtight container and store them in the refrigerator for up to 3 days. The best way to reheat them is in an oven or air fryer. Reheating in a 350°F (175°C) oven or air fryer for 5-7 minutes will crisp the dough back up and warm the hot dog through without making the bandages soggy, which is what tends to happen in a microwave.
4. My dough came out soggy on the bottom. What went wrong?
Soggy bottoms are usually caused by excess moisture. There are two main culprits. First, make sure you pat the hot dogs completely dry with a paper towel before wrapping them. Any moisture on the hot dog’s surface will turn to steam and get trapped by the dough. Second, always use parchment paper on your baking sheet. This not only prevents sticking but also helps to absorb a small amount of grease and promotes even browning on the bottom of the dough.
5. Can I use candy eyeballs before baking?
It’s best to add the candy eyeballs after baking. Most candy eyeballs are made of sugar and will melt, burn, or discolor in a 375°F oven, leaving you with monstrous-looking mummies for all the wrong reasons. For the best results, let the mummies cool for a minute or two after they come out of the oven, then gently press the eyeballs into the warm, soft dough. They will stick perfectly as the mummies cool.

Mummy Hot Dogs Recipe
Ingredients
- Hot Dogs: 1 package (8-10 count) of your favorite hot dogs.
- Refrigerated Crescent Roll Dough: 1 can (8 oz). You can also use crescent dough sheets or puff pastry.
- Cheese (Optional): 4 slices of American cheese, cheddar, or provolone, cut into thin strips.
- Egg Wash (Optional, for a golden finish): 1 large egg, lightly beaten with 1 tablespoon of water.
- Eyes: Edible candy eyeballs. Alternatively, you can use dots of ketchup, mustard, or tiny pieces of black olive after baking.
Instructions
Step 1: Preheat and Prepare Your Workstation
First things first, preheat your oven to 375°F (190°C). This ensures the oven is at the perfect temperature to bake the dough evenly and give it that beautiful golden-brown color. Line a large baking sheet with parchment paper. This is a crucial step that prevents the mummies from sticking to the pan and makes cleanup an absolute breeze. No one wants to be scrubbing pans after a fun Halloween feast!
Step 2: Prepare the Hot Dogs and Dough
Open the package of hot dogs and pat each one dry with a paper towel. Removing the excess moisture from the surface of the hot dog helps the dough adhere better and prevents the “bandages” from becoming soggy from the inside out.
Next, unroll the can of crescent roll dough on a lightly floured surface or directly on another piece of parchment paper to prevent sticking. The dough will be perforated into triangles. Gently press down on the perforations to seal them together, creating one large rectangle of dough. This gives you a solid canvas to work with.
Step 3: Cut the Dough “Bandages”
Using a pizza cutter or a sharp knife, cut the rectangle of dough into long, thin strips. Don’t worry about making them perfectly uniform; in fact, a little variation in width makes the mummy bandages look more authentic and rustic. Aim for strips that are about 1/4 to 1/2 inch wide. A pizza cutter is highly recommended here as it glides through the soft dough without pulling or tearing it. You should get anywhere from 30 to 40 strips from one can of dough, which is plenty for your army of mummies.
Step 4: The Cheesy Surprise (Optional)
If you’re making Cheesy Mummies (and we highly recommend you do!), this is the time to add the cheese. Take one of your prepared hot dogs and make a shallow slit lengthwise, being careful not to cut all the way through. Tuck a thin strip of your chosen cheese into the slit. The cheese will melt into a gooey, delicious core as the mummy bakes.
Step 5: Wrap Your Mummies
Now for the most fun part! Take one hot dog and begin wrapping it with the strips of dough. Start at one end and wind the dough strip around the hot dog, stretching it slightly as you go. Overlap the strips randomly, just like a real mummy’s bandages. Leave a small gap near one end of the hot dog where the mummy’s face will be. Use 2-4 strips per hot dog, depending on how “bandaged” you want them to look. Crisscross the strips and wrap them at different angles to create a more dynamic and spooky effect. Place each wrapped mummy on the prepared baking sheet, ensuring there is at least an inch of space between them to allow for even baking.
Step 6: The Golden Touch (Optional)
For mummies that have a beautiful, glossy, golden-brown finish, an egg wash is the secret weapon. In a small bowl, whisk together one egg and a tablespoon of water. Using a pastry brush, lightly brush this mixture over the dough bandages of each mummy. This step is optional, but it elevates the look of your mummies from homemade-fun to bakery-level-beautiful.
Step 7: Bake to Perfection
Place the baking sheet in your preheated oven. Bake for 12-17 minutes, or until the dough is a deep golden brown and puffed up. The exact time will depend on your oven and the type of dough you used. Keep a close eye on them during the last few minutes of baking to prevent them from getting too dark.
Step 8: Give Them a Face
Remove the mummies from the oven and let them cool on the baking sheet for a few minutes. While they are still warm, it’s time to give them eyes and bring them to life. Gently press two edible candy eyeballs into the gap you left in the bandages. If you don’t have candy eyeballs, no problem! Let the mummies cool completely, then use a toothpick to dot on eyes with ketchup or mustard. Small bits of black olive or capers also work wonderfully as spooky eyes.
Nutrition
- Serving Size: One Normal Portion
- Calories: 300-350


