I remember the first time I stumbled upon the idea of a no-oven Turkish bread. Skepticism was my initial reaction. Bread, especially one with the delightful chewiness and flavor I associate with Turkish cuisine, without an oven? And with only three ingredients? It sounded too good to be true. But a busy weeknight, a craving for fresh bread, and a distinct lack of desire to preheat my oven led me to give it a whirl. The result? Utterly transformative. My family, initially as dubious as I was, were converted at first bite. The aroma alone, a warm, toasty scent filling the kitchen, was enough to draw them in. Then came the texture – pillowy soft on the inside, with a slightly crisp, golden exterior achieved right on the stovetop. We devoured the entire batch with a simple spread of garlic butter and a side of lentil soup, and it instantly became a requested staple. This recipe isn’t just about convenience; it’s about discovering that incredible homemade bread can be accessible, quick, and astonishingly delicious, even with the most minimal of pantries. It’s a testament to the magic of simple ingredients handled with a little care, proving that you don’t need a bakery or complicated techniques to enjoy the profound satisfaction of freshly made bread.
No-Oven Turkish Bread: The Ultimate 3-Ingredient Recipe
This recipe unlocks the secret to delicious, soft, and slightly chewy Turkish-style flatbreads using just three basic ingredients and your stovetop. Perfect for beginners or anyone short on time, this bread is incredibly versatile and a joy to make.
Complete Recipe: Ingredients and Amounts
The beauty of this recipe lies in its simplicity. Here’s what you’ll need:
- All-Purpose Flour: 2 cups (approximately 250g), plus extra for dusting
- Plain Yogurt: 1 cup (approximately 245g), full-fat or low-fat will work (Greek yogurt can be used, but you might need a splash more or less yogurt/water to get the right consistency)
- Baking Powder: 2 teaspoons
- Optional but Highly Recommended: ½ to 1 teaspoon of salt (enhances flavor significantly)
While salt isn’t strictly one of the “core three” for leavening and structure, its impact on taste is undeniable. For the best flavor, we strongly encourage its addition.
Step-by-Step Instructions: Crafting Your Stovetop Turkish Bread
Follow these simple steps for perfect, fluffy Turkish bread every time. The process is straightforward, making it an ideal recipe for even novice bakers.
- Combine Dry Ingredients:
In a large mixing bowl, whisk together the 2 cups of all-purpose flour, 2 teaspoons of baking powder, and the optional ½ to 1 teaspoon of salt (if using). Whisking helps to evenly distribute the baking powder, ensuring a consistent rise in your bread. This step is crucial for achieving that light, airy texture. - Add the Yogurt:
Create a well in the center of your dry ingredients. Add the 1 cup of plain yogurt to the well. Yogurt is the magic ingredient here, providing moisture, a slight tang, and reacting with the baking powder to help the bread puff up. - Mix to Form a Shaggy Dough:
Using a fork or a sturdy spatula, begin to incorporate the flour into the yogurt, starting from the center and working your way outwards. Continue mixing until a shaggy, slightly sticky dough forms. Don’t worry if it looks a bit messy at this stage; it will come together. - Knead Briefly:
Lightly flour your work surface. Turn the shaggy dough out onto the floured surface. Knead the dough for about 3-5 minutes. You’re not looking for intense gluten development like in traditional yeast breads; you just want the dough to become smooth, elastic, and no longer overly sticky. Add a tiny bit more flour if it’s sticking too much, but try to use as little as possible to keep the bread tender. The dough should feel soft and pliable. - Rest the Dough (Crucial!):
Place the kneaded dough back into the mixing bowl (you can lightly oil the bowl if you wish, but it’s not strictly necessary for this short rest). Cover the bowl with a clean kitchen towel or plastic wrap. Let the dough rest at room temperature for at least 15-20 minutes. This resting period allows the gluten to relax, making the dough much easier to roll out. It also gives the baking powder a little time to start working its magic. Don’t skip this step! - Divide and Shape:
After resting, gently punch down the dough and transfer it back to your lightly floured work surface. Divide the dough into 6 or 8 equal pieces, depending on how large you want your flatbreads. Roll each piece into a smooth ball. - Roll Out the Bread:
Working with one ball of dough at a time (keep the others covered with the towel to prevent them from drying out), use a rolling pin to roll it out into a thin circle, about 6-8 inches (15-20 cm) in diameter and roughly ⅛ to ¼ inch thick. Don’t worry about perfect circles; rustic shapes add to the charm! Lightly flour your rolling pin and surface as needed to prevent sticking. - Cook the Bread:
Heat a dry, heavy-bottomed skillet (cast iron works best, but a non-stick pan is also fine) over medium to medium-high heat. The pan needs to be hot enough to cook the bread quickly and create those lovely golden spots, but not so hot that it burns before cooking through. You’ll know it’s ready when a drop of water flicked onto the surface sizzles and evaporates quickly.
Carefully place one rolled-out dough circle onto the hot, dry skillet. Do not add any oil or butter to the pan for cooking. - Cook Until Puffy and Golden:
Cook for about 1-2 minutes on the first side, or until you see bubbles forming on the surface and the underside has golden brown spots. Use tongs or a spatula to flip the bread. - Cook the Other Side:
Cook the second side for another 1-2 minutes, until it’s also golden brown in spots and the bread is cooked through. It might puff up beautifully like a pillow – this is a great sign! If it doesn’t puff dramatically, don’t worry; it will still be delicious. - Keep Warm and Soft:
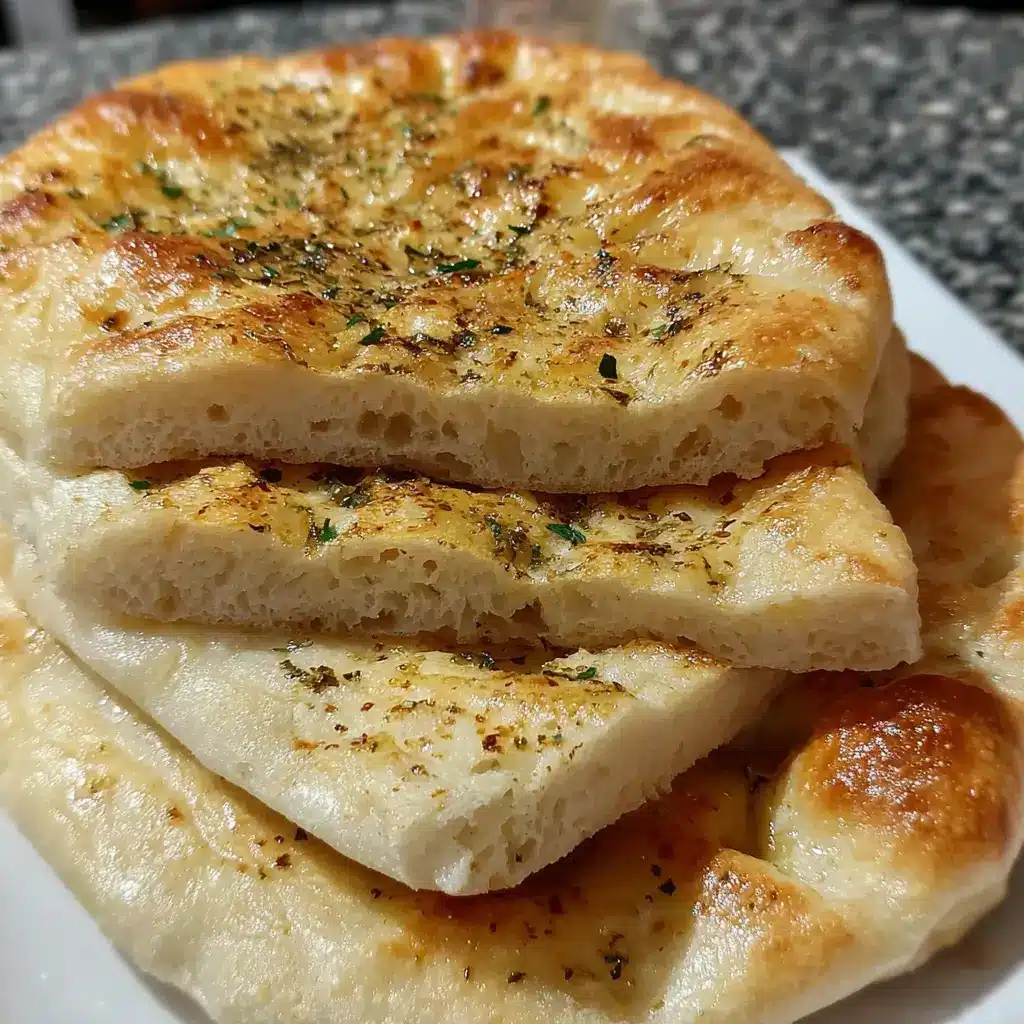
As soon as each bread is cooked, remove it from the skillet. If desired, you can lightly brush the hot bread with melted butter or olive oil and sprinkle with fresh herbs like parsley or a pinch of sumac. Immediately wrap the cooked breads in a clean kitchen towel or place them in a bread basket lined with a towel and cover them. This traps the steam and keeps them wonderfully soft and pliable. - Repeat:
Continue rolling out and cooking the remaining dough balls, stacking them in the towel as they’re done.
Enjoy your fresh, homemade No-Oven Turkish Bread warm!
Nutrition Facts (Approximate)
Understanding the nutritional profile of what we eat is increasingly important. Here’s an estimated breakdown for this No-Oven Turkish Bread:
- Servings: This recipe yields approximately 6-8 individual flatbreads, depending on the size you make them.
- Calories per serving (assuming 8 servings): Approximately 130-160 calories per flatbread.
Please note: This is an approximation. The exact caloric and nutritional content can vary based on the specific brands of ingredients used (especially the type of yogurt and flour) and the precise size of your servings. If you add salt, the sodium content will increase slightly. Brushing with butter or oil after cooking will also add to the calorie and fat content.
This bread is relatively low in fat (if not brushed with extra fat post-cooking) and provides carbohydrates for energy. The yogurt contributes a small amount of protein and calcium.
Preparation Time
One of the most appealing aspects of this No-Oven Turkish Bread is its speed and simplicity.
- Active Preparation Time (Mixing, Kneading, Rolling, Cooking): Approximately 25-35 minutes.
- Mixing and Kneading: 5-7 minutes
- Rolling and Cooking (per bread): 3-5 minutes (this will happen concurrently for later breads as first ones cook)
- Resting Time: 15-20 minutes (this is passive time where you can prepare other parts of your meal or clean up).
- Total Time: Approximately 40-55 minutes from start to finish.
This makes it an incredibly feasible option for a weeknight meal or a quick snack when cravings hit. The minimal active time means you’re not slaving away in the kitchen for hours, yet you get the incredible reward of fresh, homemade bread.
How to Serve Your Delicious No-Oven Turkish Bread
This versatile Turkish bread is more than just a side; it can be the star or the perfect companion to a vast array of dishes. Its soft texture and subtle flavor make it incredibly adaptable. Here are some delightful ways to serve it:
- As a Dipping Vessel: This is perhaps its most classic role.
- Hummus: The creamy texture of hummus is a perfect match.
- Baba Ghanoush: The smoky eggplant dip is heavenly with this bread.
- Tzatziki or Haydari: Cool, creamy yogurt-based dips with garlic and herbs.
- Ezme: A spicy Turkish salsa made with tomatoes, peppers, and pomegranate molasses.
- Olive Oil: A simple dip of high-quality extra virgin olive oil, perhaps infused with herbs or balsamic vinegar.
- Red Pepper and Feta Dip (Muhammara): A rich, nutty, and slightly spicy dip.
- With Spreads:
- Garlic Butter: Melted butter mixed with minced garlic and a pinch of parsley.
- Herb Butter: Softened butter mixed with your favorite fresh herbs like chives, dill, or thyme.
- Cream Cheese: Plain or flavored.
- Labneh: Strained yogurt, thicker than regular yogurt, often drizzled with olive oil and za’atar.
- Alongside Main Courses:
- Soups and Stews: Perfect for soaking up flavorful broths, like lentil soup (mercimek çorbası), chicken stew, or vegetable tagine.
- Curries: An excellent alternative to naan for mopping up rich curry sauces.
- Grilled Meats and Kebabs: Serve alongside shish kebabs, kofta, or grilled chicken.
- Salads: Use it to scoop up fresh, vibrant salads like a Shepherd’s Salad (Çoban Salatası).
- For Wraps or Sandwiches:
- Mini Wraps: Fill with falafel, grilled halloumi, leftover roasted vegetables, or chicken salad.
- Breakfast Wraps: Scrambled eggs, cheese, and spinach.
- Doner Kebab Style: If you have leftover roast meat, slice it thinly and wrap it up with salad and sauce.
- As a Quick Pizza Base:
- Spread with tomato sauce, sprinkle with cheese and your favorite toppings, and pop under a broiler/grill for a few minutes for a super-fast mini pizza.
- With Breakfast:
- Serve with fried or scrambled eggs, olives, feta cheese, sliced tomatoes, and cucumbers for a traditional Turkish-style breakfast spread.
- Drizzle with honey or spread with fruit preserves.
- Simply on its Own:
- Honestly, fresh out of the pan, warm and soft, this bread is delicious enough to be enjoyed as is, perhaps with just a tiny sprinkle of flaky sea salt.
The possibilities are truly endless! Its neutral yet pleasant flavor profile allows it to complement both savory and slightly sweet accompaniments.
Additional Tips for Perfecting Your Turkish Bread
While this recipe is incredibly straightforward, these five tips will help you elevate your No-Oven Turkish Bread from great to absolutely exceptional:
- Don’t Overwork the Dough: Unlike some yeast breads that require extensive kneading to develop gluten, this quick bread benefits from a lighter touch. Mix until the ingredients just come together, then knead for only 3-5 minutes until smooth. Over-kneading can make the bread tough rather than tender and pillowy. The yogurt and baking powder do most of the leavening work.
- Master Pan Temperature and Avoid Oil: Getting your pan to the right temperature is key. Medium to medium-high heat is ideal. If the pan is too cool, the bread will take longer to cook, might absorb too much ambient moisture (if any), and won’t develop those characteristic golden-brown spots or puff up nicely. If it’s too hot, the outside will burn before the inside is cooked through. Test with a drop of water – it should sizzle and evaporate quickly. Crucially, cook on a dry pan. Adding oil will fry the bread, giving it a different, greasier texture rather than the soft, slightly charred finish we’re aiming for.
- The Magic of Resting: The 15-20 minute rest after kneading is non-negotiable for best results. This period allows the gluten strands in the dough to relax, making it significantly easier to roll out thinly and evenly without the dough constantly springing back. It also gives the baking powder a head start in creating tiny air pockets, contributing to a lighter texture.
- Keep Them Soft – The Towel Trick: As soon as each flatbread comes off the hot pan, immediately wrap it in a clean kitchen towel or stack them in a covered container. The residual heat and steam trapped within the towel will keep the breads exceptionally soft and pliable. If left uncovered, they can dry out and become brittle, especially around the edges.
- Embrace Flavor Customization: While delicious plain, this bread is a fantastic canvas for additional flavors.
- In the Dough: Mix in finely chopped fresh herbs (like parsley, dill, or chives), a pinch of dried oregano or thyme, a sprinkle of garlic powder, onion powder, or even a teaspoon of nigella seeds (çörek otu) or sesame seeds directly into the flour mixture.
- Brushed On Top: After cooking, while still hot, brush with melted garlic butter, olive oil infused with rosemary, or sprinkle with za’atar, sumac, or red pepper flakes for an extra layer of flavor and visual appeal.
By keeping these tips in mind, you’ll consistently produce Turkish bread that is soft, flavorful, and a delight to eat.
FAQ: Your No-Oven Turkish Bread Questions Answered
Here are answers to some frequently asked questions about making this simple and delicious No-Oven Turkish Bread:
- Q: Can I use whole wheat flour instead of all-purpose flour?
- A: Yes, you can substitute whole wheat flour, or use a mix of whole wheat and all-purpose flour (e.g., 50/50). However, whole wheat flour absorbs more liquid than all-purpose flour. You will likely need to add a bit more yogurt or a splash of water (1-2 tablespoons at a time) to achieve the right dough consistency – it should be soft and slightly tacky, but not overly sticky. Whole wheat versions will also be denser and have a nuttier flavor.
- Q: My bread isn’t puffing up much. What am I doing wrong?
- A: Several factors can affect puffing:
- Pan Temperature: The most common culprit. If the pan isn’t hot enough, the steam won’t build up quickly inside the bread to make it puff. Ensure your skillet is preheated to medium-high.
- Dough Thickness: If the dough is rolled too thick, it might be too heavy to puff significantly. Aim for about ⅛ to ¼ inch thickness. Conversely, if it’s paper-thin, there might not be enough dough to trap steam.
- Baking Powder: Ensure your baking powder is fresh and not expired. Old baking powder loses its leavening power.
- Sealing: Sometimes, tiny holes or tears in the dough can let steam escape.
Even if it doesn’t puff dramatically like a pita, it will still be a delicious, soft flatbread.
- A: Several factors can affect puffing:
- Q: Can I use Greek yogurt or a dairy-free yogurt?
- A: Yes, Greek yogurt works well. Since it’s thicker than regular plain yogurt, you might need to add a little less of it initially, or add a tablespoon or two of water to get the dough to the right consistency. Start with about ¾ cup of Greek yogurt and add more if needed. For dairy-free options, a plain, unsweetened plant-based yogurt (like almond, soy, or coconut) can be used. The flavor and texture might be slightly different, and you may need to adjust the quantity slightly, similar to using Greek yogurt, depending on its thickness.
- Q: How do I store leftover Turkish bread, and how long does it last?
- A: Cool the bread completely. Store leftovers in an airtight container or a zip-top bag at room temperature for up to 2-3 days. If you’ve brushed them with butter, it’s best to store them in the refrigerator, where they’ll last for 3-4 days. To refresh, you can sprinkle them lightly with water and warm them in a dry skillet over low heat for a minute per side, or microwave them for 10-15 seconds until soft.
- Q: Can I freeze this Turkish bread?
- A: Absolutely! This bread freezes beautifully. Once completely cooled, stack the flatbreads with a piece of parchment paper or wax paper between each one to prevent sticking. Place the stack in a freezer-safe zip-top bag or airtight container. They can be frozen for up to 2-3 months. To serve, thaw them at room temperature or reheat directly from frozen in a warm skillet, microwave, or even a toaster oven until warmed through and soft.

No-Oven Turkish Bread Recipe
Ingredients
- All-Purpose Flour: 2 cups (approximately 250g), plus extra for dusting
- Plain Yogurt: 1 cup (approximately 245g), full-fat or low-fat will work (Greek yogurt can be used, but you might need a splash more or less yogurt/water to get the right consistency)
- Baking Powder: 2 teaspoons
- Optional but Highly Recommended: ½ to 1 teaspoon of salt (enhances flavor significantly)
Instructions
- Combine Dry Ingredients:
In a large mixing bowl, whisk together the 2 cups of all-purpose flour, 2 teaspoons of baking powder, and the optional ½ to 1 teaspoon of salt (if using). Whisking helps to evenly distribute the baking powder, ensuring a consistent rise in your bread. This step is crucial for achieving that light, airy texture. - Add the Yogurt:
Create a well in the center of your dry ingredients. Add the 1 cup of plain yogurt to the well. Yogurt is the magic ingredient here, providing moisture, a slight tang, and reacting with the baking powder to help the bread puff up. - Mix to Form a Shaggy Dough:
Using a fork or a sturdy spatula, begin to incorporate the flour into the yogurt, starting from the center and working your way outwards. Continue mixing until a shaggy, slightly sticky dough forms. Don’t worry if it looks a bit messy at this stage; it will come together. - Knead Briefly:
Lightly flour your work surface. Turn the shaggy dough out onto the floured surface. Knead the dough for about 3-5 minutes. You’re not looking for intense gluten development like in traditional yeast breads; you just want the dough to become smooth, elastic, and no longer overly sticky. Add a tiny bit more flour if it’s sticking too much, but try to use as little as possible to keep the bread tender. The dough should feel soft and pliable. - Rest the Dough (Crucial!):
Place the kneaded dough back into the mixing bowl (you can lightly oil the bowl if you wish, but it’s not strictly necessary for this short rest). Cover the bowl with a clean kitchen towel or plastic wrap. Let the dough rest at room temperature for at least 15-20 minutes. This resting period allows the gluten to relax, making the dough much easier to roll out. It also gives the baking powder a little time to start working its magic. Don’t skip this step! - Divide and Shape:
After resting, gently punch down the dough and transfer it back to your lightly floured work surface. Divide the dough into 6 or 8 equal pieces, depending on how large you want your flatbreads. Roll each piece into a smooth ball. - Roll Out the Bread:
Working with one ball of dough at a time (keep the others covered with the towel to prevent them from drying out), use a rolling pin to roll it out into a thin circle, about 6-8 inches (15-20 cm) in diameter and roughly ⅛ to ¼ inch thick. Don’t worry about perfect circles; rustic shapes add to the charm! Lightly flour your rolling pin and surface as needed to prevent sticking. - Cook the Bread:
Heat a dry, heavy-bottomed skillet (cast iron works best, but a non-stick pan is also fine) over medium to medium-high heat. The pan needs to be hot enough to cook the bread quickly and create those lovely golden spots, but not so hot that it burns before cooking through. You’ll know it’s ready when a drop of water flicked onto the surface sizzles and evaporates quickly.
Carefully place one rolled-out dough circle onto the hot, dry skillet. Do not add any oil or butter to the pan for cooking. - Cook Until Puffy and Golden:
Cook for about 1-2 minutes on the first side, or until you see bubbles forming on the surface and the underside has golden brown spots. Use tongs or a spatula to flip the bread. - Cook the Other Side:
Cook the second side for another 1-2 minutes, until it’s also golden brown in spots and the bread is cooked through. It might puff up beautifully like a pillow – this is a great sign! If it doesn’t puff dramatically, don’t worry; it will still be delicious. - Keep Warm and Soft:
As soon as each bread is cooked, remove it from the skillet. If desired, you can lightly brush the hot bread with melted butter or olive oil and sprinkle with fresh herbs like parsley or a pinch of sumac. Immediately wrap the cooked breads in a clean kitchen towel or place them in a bread basket lined with a towel and cover them. This traps the steam and keeps them wonderfully soft and pliable. - Repeat:
Continue rolling out and cooking the remaining dough balls, stacking them in the towel as they’re done.
Nutrition
- Serving Size: One Normal Portion
- Calories: 130-160