Ingredients
- Walleye Fillets: 1.5 – 2 lbs, skin-on or skin-off, about 4-6 fillets. The star of the show! Fresh walleye fillets are ideal, but frozen and thawed fillets work perfectly well too. When choosing your walleye, look for fillets that are firm to the touch, with a pearly white to slightly pinkish hue. Avoid fillets that appear dull, slimy, or have a strong fishy odor. Skin-on fillets offer extra flavor and crispiness when pan-fried, but skin-off are equally delicious and easier to eat for some. The size of the fillets will impact cooking time, so aim for fillets of a similar thickness for even cooking. If using frozen walleye, ensure it is completely thawed before cooking to prevent steaming in the pan and ensure a crispy crust. Patting the fillets dry with paper towels after thawing is crucial to remove excess moisture and promote browning.
- All-Purpose Flour: 1 cup. The foundation of our crispy coating. All-purpose flour provides the perfect base for dredging the walleye. It creates a light yet substantial crust that browns beautifully in the hot oil. For a slightly lighter and crispier crust, you can substitute half of the all-purpose flour with cornstarch. Cornstarch helps to inhibit gluten development, resulting in a more delicate and shatteringly crisp exterior. You can also experiment with gluten-free flour blends if you have dietary restrictions. Make sure to measure your flour correctly by spooning it into the measuring cup and leveling it off, rather than scooping it directly from the bag, which can lead to using too much flour.
- Cornmeal (Optional, for extra crunch): 1/4 cup. For those who crave an extra layer of texture, a touch of cornmeal adds a delightful crunch to the coating. Fine or medium grind cornmeal will work best. The cornmeal adds a subtle nutty flavor and enhances the crispy texture, creating a more rustic and robust crust. If you prefer a smoother coating, you can omit the cornmeal entirely. Experimenting with different ratios of flour and cornmeal can help you find your perfect balance of crispiness and texture.
- Seasoning Blend: This is where you can truly customize the flavor profile of your pan-fried walleye. A well-balanced seasoning blend is essential to elevate the dish beyond just fried fish. Here’s a suggested combination:
- Salt: 1.5 teaspoons. Essential for enhancing the natural flavors of the walleye and seasoning the coating. Use kosher salt or sea salt for best results.
- Black Pepper: 1 teaspoon. Freshly ground black pepper adds a warm, pungent note.
- Paprika: 1 teaspoon. Sweet paprika contributes a subtle sweetness and vibrant color to the coating. Smoked paprika can be used for a smoky depth of flavor.
- Garlic Powder: 1 teaspoon. Garlic powder provides a savory, aromatic base.
- Onion Powder: 1 teaspoon. Onion powder adds a subtle sweetness and complexity.
- Dried Herbs (Optional): 1 teaspoon total (such as dried thyme, oregano, or parsley). Dried herbs add a layer of herbaceousness and freshness. Thyme and oregano pair particularly well with fish. You can also experiment with other dried herbs like dill, rosemary, or marjoram based on your preference.
- Vegetable Oil or Canola Oil: 1/2 cup. For frying. Choose a neutral-flavored oil with a high smoke point, such as vegetable oil, canola oil, or peanut oil. These oils can withstand high temperatures without breaking down or imparting unwanted flavors to the walleye. Avoid using olive oil for pan-frying at high heat, as it has a lower smoke point and can become bitter. The amount of oil needed may vary slightly depending on the size of your pan. You want enough oil to create a shallow layer for frying, typically about 1/4 to 1/2 inch deep.
- Butter (Optional, for flavor and browning): 2 tablespoons. Adding butter to the oil enhances the flavor and browning of the walleye. The butter adds richness and a nutty aroma to the pan drippings, which can be used to drizzle over the finished fish. Butter also contributes to a more golden-brown and flavorful crust. If you are using butter, be mindful of the oil temperature, as butter can burn more easily than oil. Combining butter with oil helps to raise the smoke point and prevent burning.
- Lemon Wedges: For serving. Fresh lemon wedges are an absolute must-have for serving with pan-fried walleye. The bright, acidic lemon juice cuts through the richness of the fried fish and adds a refreshing zest that complements the flavors perfectly.
Instructions
Step 1: Prepare the Walleye Fillets
- Pat Dry: Begin by thoroughly patting the walleye fillets dry with paper towels. This is a crucial step to remove excess moisture from the surface of the fish. Dry fillets will brown much better and develop a crispier crust. Excess moisture can cause steaming rather than frying, resulting in a soggy coating. Press gently but firmly with the paper towels to absorb as much moisture as possible from both sides of the fillets.
- Season the Fillets: Lightly season both sides of the walleye fillets with a pinch of salt and pepper. This pre-seasoning step helps to enhance the natural flavor of the fish from within. Don’t over-season at this stage, as the main seasoning will come from the flour mixture. A simple sprinkle of salt and pepper is sufficient to bring out the best in the walleye.
Step 2: Prepare the Dredging Station
- Combine Dry Ingredients: In a shallow dish or pie plate, whisk together the all-purpose flour, cornmeal (if using), salt, black pepper, paprika, garlic powder, onion powder, and any dried herbs you are using. Whisk the dry ingredients thoroughly to ensure they are evenly distributed. This creates a uniform seasoning blend for coating the walleye. Using a shallow dish makes dredging easier and more efficient.
- Set Up Your Station: Have your seasoned walleye fillets ready, the dish of flour mixture, and a clean plate or wire rack ready to receive the dredged fillets. Setting up your dredging station in an organized manner will streamline the process and prevent mess.
Step 3: Dredge the Walleye Fillets
- Coat Evenly: One fillet at a time, dredge each walleye fillet in the flour mixture, ensuring it is completely coated on all sides. Press gently to help the flour adhere to the fish. Shake off any excess flour. A light, even coating is key. Too much flour can create a thick, gummy crust, while too little flour may not provide enough crispiness. Shake off the excess flour to prevent it from burning in the hot oil and creating a gritty texture.
- Rest (Optional): For an extra crispy crust, you can let the dredged fillets rest on a wire rack for about 10-15 minutes before frying. This allows the flour coating to adhere more firmly to the fish and dry out slightly, resulting in a crispier crust. This step is optional but can make a noticeable difference in the final texture.
Step 4: Heat the Oil and Butter
- Heat Oil in Pan: In a large, heavy-bottomed skillet (cast iron is excellent for even heat distribution), heat the vegetable oil or canola oil over medium-high heat. You want enough oil to create a shallow layer, about 1/4 to 1/2 inch deep. Allow the oil to heat up slowly and evenly.
- Add Butter (Optional): Once the oil is hot, add the butter to the pan. Let the butter melt completely and foam slightly. The combination of oil and butter creates a flavorful and browning-enhancing frying medium.
- Test the Oil Temperature: To check if the oil is hot enough, you can drop a small pinch of flour into the pan. If it sizzles immediately and browns lightly within seconds, the oil is ready. Alternatively, you can use a thermometer to ensure the oil reaches a temperature of around 350-375°F (175-190°C). Maintaining the correct oil temperature is crucial for achieving crispy and evenly cooked walleye. If the oil is too cold, the fish will absorb too much oil and become greasy. If the oil is too hot, the coating may burn before the fish is cooked through.
Step 5: Pan-Fry the Walleye Fillets
- Carefully Add Fillets: Gently place the dredged walleye fillets into the hot oil, being careful not to overcrowd the pan. Overcrowding will lower the oil temperature and lead to steaming rather than frying. Work in batches if necessary to ensure the fillets have enough space to cook properly.
- Cook Time: Fry the walleye fillets for about 3-5 minutes per side, or until golden brown and cooked through. The exact cooking time will depend on the thickness of the fillets and the heat of your pan. Monitor the fillets closely and adjust the heat as needed to prevent burning.
- Golden Brown and Flaky: Look for a deep golden-brown crust on both sides. The fish is cooked through when it is opaque and flakes easily with a fork. You can gently flake the fish with a fork to check for doneness. The internal temperature of the walleye should reach 145°F (63°C).
Step 6: Drain and Serve
- Remove and Drain: Once the walleye fillets are cooked through and golden brown, carefully remove them from the pan using a slotted spatula or tongs. Place the cooked fillets on a wire rack lined with paper towels to drain excess oil. This helps to maintain the crispiness of the crust.
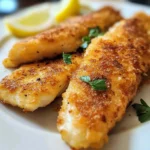
- Serve Immediately: Serve the pan-fried walleye immediately while it is hot and crispy. Garnish with fresh lemon wedges and your favorite sides. The best way to enjoy pan-fried walleye is fresh off the pan, while the crust is at its peak crispiness.
Nutrition
- Serving Size: One Normal Portion
- Calories: 400-550
- Sugar: <1g
- Sodium: 400-600mg
- Fat: 25-40g
- Saturated Fat: 5-8g
- Carbohydrates: 10-15g
- Fiber: <1g
- Protein: 30-40g
- Cholesterol: 100-150mg