
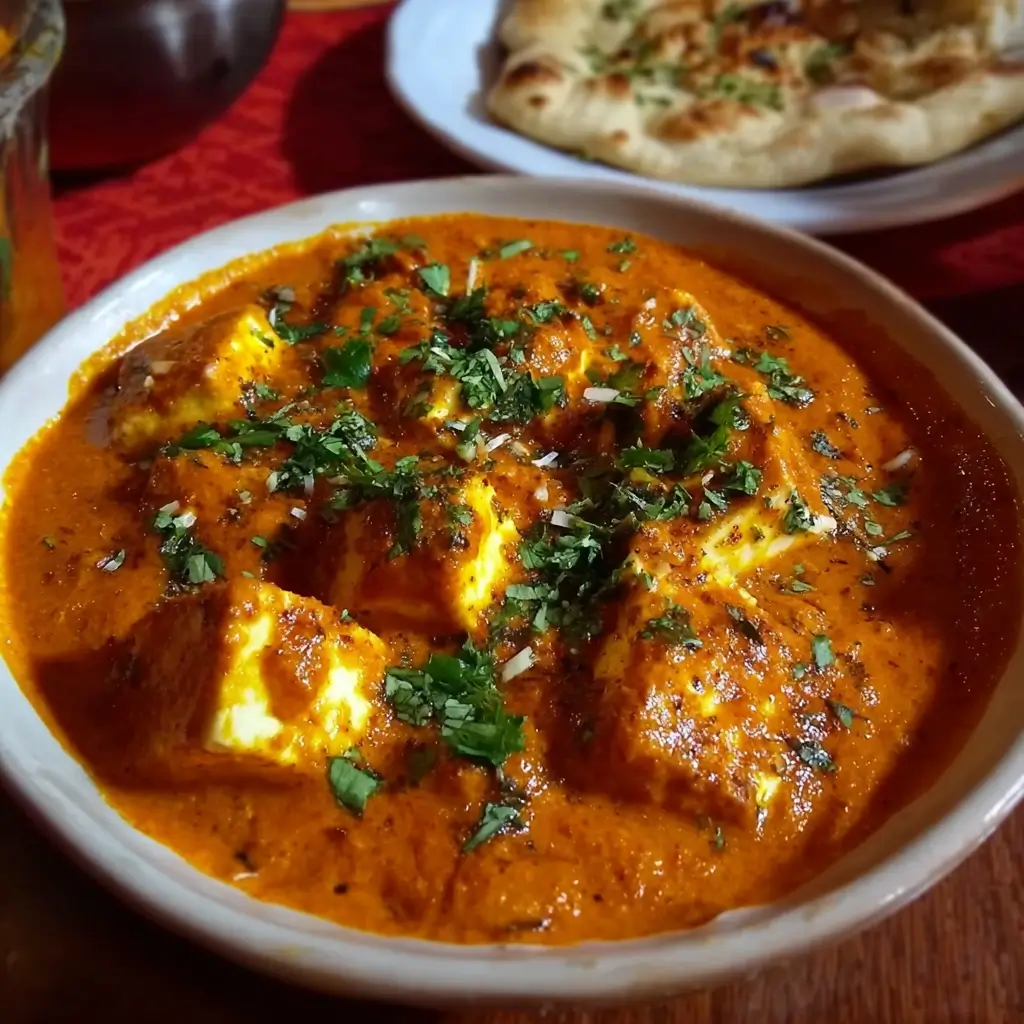

There are some dishes that just scream comfort, luxury, and pure, unadulterated joy. For my family, and I suspect for many others, Paneer Butter Masala sits right at the top of that list. I remember the first time I truly nailed this recipe at home; the aroma alone had everyone drifting into the kitchen, eyes wide with anticipation. My kids, usually picky eaters, devoured their portions, mopping up every last bit of the creamy, tangy, and subtly sweet gravy with pieces of naan. My partner, a discerning critic of Indian cuisine, declared it “restaurant-quality, maybe even better!” That, right there, was the ultimate validation. This isn’t just a recipe; it’s a celebration on a plate, a hug in a bowl. The beauty of this version is its balanced flavors – not too sweet, not overly spicy, but a harmonious blend where the tender paneer and the luscious makhani gravy sing together. It’s become our go-to for special occasions, weekend treats, or whenever we need a culinary pick-me-up. I’ve tweaked and perfected it over time, and I’m thrilled to share the version that consistently brings smiles and satisfied sighs to our dinner table.
**Ingredients for The Ultimate Paneer Butter Masala (Paneer Makhani)**
This recipe aims for a rich, authentic flavor profile. The quality of your ingredients, especially the tomatoes and paneer, will significantly impact the final dish.
For the Paneer:
- Paneer (Indian Cottage Cheese): 400 grams, cut into 1-inch cubes
- Hot Water: 2 cups (for soaking paneer, optional but recommended)
- Salt: ½ teaspoon (for soaking water)
For the Makhani Gravy (Butter Gravy):
- Ripe Tomatoes: 6-7 large (about 700-800 grams), roughly chopped (use good quality, red, ripe tomatoes for best color and flavor)
- Onions: 2 medium (about 200 grams), roughly chopped
- Ginger: 2-inch piece, roughly chopped
- Garlic Cloves: 8-10 large, roughly chopped
- Green Chilies: 2-3, slit lengthwise (adjust to your spice preference)
- Cashews (Kaju): ¼ cup (about 15-20 whole cashews), soaked in ¼ cup hot water for at least 30 minutes
- Melon Seeds (Magaz): 2 tablespoons (optional, but adds to creaminess; can be soaked with cashews)
- Water: 1 cup (for cooking the tomato-onion base)
Whole Spices (for tempering and flavor base):
- Bay Leaves (Tej Patta): 2 medium
- Green Cardamom Pods (Elaichi): 4-5, lightly bruised
- Cloves (Laung): 4-5
- Cinnamon Stick (Dalchini): 1-inch piece
- Black Cardamom (Badi Elaichi): 1 (optional, for a deeper smoky flavor)
Ground Spices:
- Kashmiri Red Chili Powder: 1.5 – 2 teaspoons (provides excellent color with mild heat; adjust to preference)
- Turmeric Powder (Haldi): ½ teaspoon
- Coriander Powder (Dhania Powder): 1 teaspoon
- Garam Masala: 1 teaspoon (add towards the end for best aroma)
- Kasuri Methi (Dried Fenugreek Leaves): 1 tablespoon, crushed
Fats and Dairy:
- Butter (preferably unsalted): 3-4 tablespoons, divided
- Oil (neutral flavor like sunflower or canola): 2 tablespoons
- Fresh Cream (Heavy Cream or Amul Fresh Cream): ¼ to ½ cup (adjust for desired richness)
- Milk (Full Fat): ¼ cup (optional, to adjust consistency and add creaminess)
Sweetener and Acidity:
- Sugar or Honey: 1-2 teaspoons (or to taste, balances the tanginess of tomatoes)
- Lemon Juice: 1 teaspoon (optional, for a final touch of brightness)
- Salt: To taste (approximately 1.5 – 2 teaspoons for the entire dish, adjust gradually)
For Garnish (Optional):
- Fresh Coriander Leaves (Cilantro): 2 tablespoons, chopped
- Swirl of Fresh Cream: For presentation
- Julienned Ginger: A few strands
**Step-by-Step Instructions: Crafting Your Perfect Paneer Butter Masala**
Follow these detailed steps to achieve a restaurant-style Paneer Butter Masala that will impress everyone.
Phase 1: Preparing the Paneer
- Soak the Paneer (Optional but Recommended): If your paneer isn’t super soft, cut it into 1-inch cubes. Bring 2 cups of water to a boil, add ½ teaspoon of salt, and turn off the heat. Gently add the paneer cubes to this hot salted water and let them soak for 15-20 minutes. This makes the paneer incredibly soft and spongy. After soaking, drain the paneer and set aside. This step prevents the paneer from becoming rubbery when cooked.
- Lightly Sauté Paneer (Optional): For a slightly firmer texture and golden hue, you can lightly sauté the paneer. Heat 1 teaspoon of oil or butter in a non-stick pan. Add the drained paneer cubes and sauté on low-medium heat for 2-3 minutes until very lightly golden on a few sides. Do not overcook or brown them, as they will become tough. Remove and set aside. Many prefer to add paneer directly without sautéing to maintain maximum softness.
Phase 2: Creating the Makhani Gravy Base
- Sauté Aromatics and Whole Spices: Heat 2 tablespoons of oil and 1 tablespoon of butter in a heavy-bottomed pan or Dutch oven over medium heat. Once the butter melts and is fragrant (don’t let it burn), add the bay leaves, green cardamom, cloves, cinnamon stick, and black cardamom (if using). Sauté for 30-40 seconds until the spices release their aroma.
- Cook Onions, Ginger, Garlic: Add the chopped onions, ginger, and garlic to the pan. Sauté for 5-7 minutes, stirring occasionally, until the onions turn translucent and slightly pinkish. They don’t need to be deeply browned for this gravy.
- Add Tomatoes and Green Chilies: Add the roughly chopped tomatoes and slit green chilies. Stir well.
- Incorporate Cashews and Melon Seeds: Add the soaked cashews (along with their soaking water) and melon seeds (if using) to the pan.
- Add Initial Spices and Salt: Stir in ½ teaspoon of turmeric powder and 1 teaspoon of Kashmiri red chili powder. Add about 1 teaspoon of salt at this stage (this helps the tomatoes break down). Mix everything thoroughly.
- Simmer the Base: Add 1 cup of water. Bring the mixture to a gentle boil. Then, reduce the heat to low, cover the pan, and let it simmer for 20-25 minutes, or until the tomatoes are very soft and mushy, and the raw smell of ginger and garlic has disappeared. Stir occasionally to prevent sticking. The mixture should look pulpy, and oil might start to separate slightly at the edges.
Phase 3: Blending and Straining the Gravy
- Cool the Mixture: Turn off the heat and let the tomato-onion mixture cool down considerably. This is important for safety when blending. Remove the bay leaves, cinnamon stick, and black cardamom pod (if you can easily find them; it’s okay if some small pieces remain, but larger whole spices are best removed).
- Blend to a Smooth Puree: Transfer the cooled mixture to a high-speed blender. Blend until you get an incredibly smooth and fine puree. If needed, add a couple of tablespoons of water to help the blending process, but aim for a thick puree.
- Strain the Puree (Crucial for Restaurant Texture): For that signature silky-smooth, restaurant-style gravy, straining is essential. Place a fine-mesh sieve over a clean bowl or back into the same cooking pan (after rinsing it). Pour the blended puree through the sieve, using the back of a ladle or spatula to press the puree through. Discard the fibrous residue left in the sieve. This step removes any tomato skins, seeds, or unblended bits of spices, resulting in a velvety texture.
Phase 4: Finishing the Paneer Butter Masala
- Simmer the Strained Gravy: Place the pan with the strained gravy back on the stove over low-medium heat. Add the remaining 1 teaspoon of Kashmiri red chili powder (for color and mild heat) and 1 teaspoon of coriander powder. Stir well and bring the gravy to a gentle simmer.
- Add Butter and Adjust Consistency: Add 2 tablespoons of butter to the simmering gravy. Stir until it melts and incorporates. If the gravy seems too thick, you can add a little hot water or milk (about ¼ cup at a time) to reach your desired consistency. Remember, it will thicken slightly more as it cools.
- Balance Flavors: Stir in 1-2 teaspoons of sugar (or honey) to balance the tanginess of the tomatoes. Taste the gravy. Add more salt if needed. The flavor profile should be a harmonious blend of tangy, slightly sweet, and savory.
- Incorporate Paneer: Gently add the soaked (and optionally sautéed) paneer cubes to the gravy. Stir very gently to coat the paneer without breaking it.
- Add Finishing Spices and Cream: Simmer for just 2-3 minutes to allow the paneer to absorb the flavors. Do not overcook at this stage, as it can make the paneer chewy. Stir in 1 teaspoon of garam masala and 1 tablespoon of crushed Kasuri Methi (rub it between your palms before adding to release its aroma).
- Final Creaminess: Turn off the heat. Stir in ¼ to ½ cup of fresh cream. Mix gently until well combined. The cream adds richness and mellows the flavors. If using, add the optional 1 teaspoon of lemon juice now for a final bright note.
- Rest and Serve: Cover the pan and let the Paneer Butter Masala rest for at least 10-15 minutes before serving. This allows the flavors to meld beautifully.
**Nutrition Facts (Approximate)**
- Servings: This recipe serves approximately 4-5 people.
- Calories per serving: Approximately 450-550 calories.
Disclaimer: Nutritional information is an estimate and can vary based on specific ingredients used, portion sizes, and optional additions. This calculation assumes moderate use of cream and butter.
**Preparation and Cooking Time**
- Preparation Time:
- Soaking Paneer & Cashews: 20-30 minutes (can be done concurrently)
- Chopping Vegetables: 15-20 minutes
- Total Active Prep: ~30-40 minutes
- Cooking Time:
- Sautéing Aromatics & Cooking Tomato Base: 30-35 minutes
- Blending & Straining: 10-15 minutes (plus cooling time for the base)
- Simmering Final Gravy & Paneer: 10-15 minutes
- Total Cooking Time: ~50-65 minutes
- Total Time (including inactive soaking/cooling): Approximately 1 hour 30 minutes to 2 hours. This can be reduced if you multitask efficiently.
**How to Serve Your Delicious Paneer Butter Masala**
Paneer Butter Masala is a versatile dish that pairs wonderfully with various Indian breads and rice. Here are some serving suggestions to create a complete and delightful meal:
- With Indian Breads:
- Butter Naan: The classic and most popular choice. The soft, slightly chewy texture of naan is perfect for scooping up the creamy gravy.
- Garlic Naan: Adds an extra layer of aromatic flavor.
- Roti/Chapati: A healthier, whole wheat option for everyday meals.
- Laccha Paratha: Flaky, layered paratha that offers a delightful textural contrast.
- Tandoori Roti: If you have access to a tandoor or a good oven method, this is another excellent pairing.
- With Rice:
- Steamed Basmati Rice: Simple, fragrant, and allows the flavors of the curry to shine.
- Jeera Rice (Cumin Rice): The subtle aroma of cumin complements the rich gravy beautifully.
- Peas Pulao or Vegetable Pulao: Adds more substance and vegetables to the meal.
- Accompaniments & Side Dishes:
- Kachumber Salad: A simple salad of chopped onions, tomatoes, cucumbers, and coriander with a squeeze of lemon juice. Provides a fresh, crunchy contrast.
- Onion Rings or Sliced Onions with Lemon: Often served in Indian restaurants.
- Plain Yogurt or Raita: A cooling cucumber raita or boondi raita can balance the richness of the curry.
- Indian Pickles (Achaar): A small amount of mango or lime pickle can add a tangy, spicy kick.
- Garnishing:
- Sprinkle generously with freshly chopped coriander leaves (cilantro).
- Drizzle a swirl of fresh cream on top just before serving for an elegant presentation.
- A few strands of julienned ginger can add a fresh, zesty note.
- Presentation:
- Serve hot in a traditional Indian serving bowl (karahi or handi) for an authentic touch.
Meal Ideas:
- Weekend Feast: Paneer Butter Masala, Dal Makhani, Garlic Naan, Jeera Rice, Kachumber Salad, and Gulab Jamun for dessert.
- Simple Weeknight Treat: Paneer Butter Masala with Roti or Steamed Rice and a side of sliced onions.
**Additional Tips for Paneer Butter Masala Perfection**
- Quality of Tomatoes is Key: Use ripe, red, and slightly tangy tomatoes. If good quality fresh tomatoes are unavailable, you can substitute with a good quality canned crushed tomato or tomato puree (about 400-500g), but you might need to adjust sugar and acidity slightly. The color of your gravy heavily depends on your tomatoes and Kashmiri chili powder.
- Don’t Skip Straining: For that truly restaurant-like, ultra-smooth, velvety gravy, straining the blended tomato-onion puree is non-negotiable. It removes tomato skins, seeds, and any fibrous bits of spices, making a world of difference to the texture.
- Mastering Kasuri Methi: Always crush Kasuri Methi (dried fenugreek leaves) between your palms before adding it to the gravy. This releases its characteristic aroma and flavor. For an even more intense flavor, lightly toast the Kasuri Methi in a dry pan for a few seconds before crushing. Add it towards the end of cooking to preserve its fragrance.
- Balancing Flavors – The Taste Test: Constantly taste and adjust. The perfect Paneer Butter Masala has a balance of tanginess (from tomatoes), sweetness (from sugar/honey and onions/cashews), richness (from butter/cream), and mild spice. If it’s too tangy, add a bit more sugar or cream. If it’s too flat, a tiny splash of lemon juice or a pinch more salt might be needed.
- Gentle on the Paneer: Add paneer cubes towards the end and simmer very gently for only 2-3 minutes. Overcooking paneer makes it rubbery and hard. Soaking it in hot salted water beforehand, as mentioned in the recipe, helps keep it soft and succulent.
**Frequently Asked Questions (FAQ) about Paneer Butter Masala**
- Q: Can I make Paneer Butter Masala vegan?
- A: Yes, absolutely!
- Paneer: Replace dairy paneer with firm or extra-firm tofu (pressed and cubed) or a good quality store-bought vegan paneer alternative. You can lightly pan-fry the tofu cubes.
- Butter: Use vegan butter or a neutral-flavored oil.
- Cream: Substitute with full-fat coconut cream/milk (use the thick part from a can of coconut milk), cashew cream (blend soaked cashews with water until smooth), or almond cream. Coconut cream will impart a slight coconut flavor, which many find pleasant.
- Milk (if using): Use any unsweetened plant-based milk like almond, soy, or oat milk.
- A: Yes, absolutely!
- Q: My gravy isn’t as red/orange as the restaurant’s. What did I do wrong?
- A: Several factors contribute to the color:
- Tomatoes: Use very red, ripe tomatoes. Pale or unripe tomatoes will result in a paler gravy.
- Kashmiri Red Chili Powder: This is primarily for color, not intense heat. Ensure you’re using good quality Kashmiri chili powder. Some brands are more vibrant than others.
- Turmeric: Use turmeric sparingly. Too much can give an overly yellow hue.
- Browning Onions: Do not brown the onions too much; cook them until just translucent or light pink. Over-browning can darken the gravy.
- Artificial Colors: Some restaurants might use a touch of food-grade orange or red food color, which is not recommended for home cooking if you prefer natural ingredients.
- A: Several factors contribute to the color:
- Q: Can I make Paneer Butter Masala ahead of time?
- A: Yes, it’s a great make-ahead dish. You can prepare the gravy (up to the point before adding paneer and final cream) 1-2 days in advance and store it in an airtight container in the refrigerator. When ready to serve, gently reheat the gravy, add the fresh paneer cubes and cream, simmer for a few minutes, and serve. This actually allows the flavors of the gravy to develop even further.
- Q: How can I store leftover Paneer Butter Masala, and can it be frozen?
- A: Store leftovers in an airtight container in the refrigerator for up to 3-4 days. Reheat gently on the stovetop or in the microwave.
Yes, you can freeze Paneer Butter Masala. Cool it completely, transfer to a freezer-safe container, and freeze for up to 1-2 months. Thaw overnight in the refrigerator. Note that the texture of paneer might change slightly upon thawing (it can become a bit more crumbly or spongy), but the taste will still be good. The cream might also separate a little upon reheating; stirring well usually helps. For best results, you could freeze the gravy separately and add freshly prepared/soaked paneer and cream when reheating.
- A: Store leftovers in an airtight container in the refrigerator for up to 3-4 days. Reheat gently on the stovetop or in the microwave.
- Q: I don’t have cashews or melon seeds. Are there any substitutes?
- A: Cashews and melon seeds are used for creaminess and to thicken the gravy.
- Almonds: Blanched almonds (skins removed), soaked in hot water, can be used as a substitute for cashews.
- Poppy Seeds (Khus Khus): Soaked poppy seeds can also be ground to a paste and used, though they have a distinct flavor.
- More Cream: You can simply increase the amount of fresh cream added at the end.
- Thick Yogurt/Greek Yogurt: Whisked full-fat plain yogurt can be added (off heat, or temper it to prevent curdling), but it will add more tanginess.
- Cornstarch Slurry (as a last resort): If you need to thicken the gravy and have no other options, a very small amount of cornstarch mixed with cold water can be stirred in, but this can alter the authentic texture and taste slightly. It’s generally better to rely on the natural thickening from the tomato-onion-nut base.
- A: Cashews and melon seeds are used for creaminess and to thicken the gravy.

Paneer Butter Masala Recipe
Ingredients
For the Paneer:
- Paneer (Indian Cottage Cheese): 400 grams, cut into 1-inch cubes
- Hot Water: 2 cups (for soaking paneer, optional but recommended)
- Salt: ½ teaspoon (for soaking water)
For the Makhani Gravy (Butter Gravy):
- Ripe Tomatoes: 6-7 large (about 700-800 grams), roughly chopped (use good quality, red, ripe tomatoes for best color and flavor)
- Onions: 2 medium (about 200 grams), roughly chopped
- Ginger: 2-inch piece, roughly chopped
- Garlic Cloves: 8-10 large, roughly chopped
- Green Chilies: 2-3, slit lengthwise (adjust to your spice preference)
- Cashews (Kaju): ¼ cup (about 15-20 whole cashews), soaked in ¼ cup hot water for at least 30 minutes
- Melon Seeds (Magaz): 2 tablespoons (optional, but adds to creaminess; can be soaked with cashews)
- Water: 1 cup (for cooking the tomato-onion base)
Whole Spices (for tempering and flavor base):
- Bay Leaves (Tej Patta): 2 medium
- Green Cardamom Pods (Elaichi): 4-5, lightly bruised
- Cloves (Laung): 4-5
- Cinnamon Stick (Dalchini): 1-inch piece
- Black Cardamom (Badi Elaichi): 1 (optional, for a deeper smoky flavor)
Ground Spices:
- Kashmiri Red Chili Powder: 1.5 – 2 teaspoons (provides excellent color with mild heat; adjust to preference)
- Turmeric Powder (Haldi): ½ teaspoon
- Coriander Powder (Dhania Powder): 1 teaspoon
- Garam Masala: 1 teaspoon (add towards the end for best aroma)
- Kasuri Methi (Dried Fenugreek Leaves): 1 tablespoon, crushed
Fats and Dairy:
- Butter (preferably unsalted): 3-4 tablespoons, divided
- Oil (neutral flavor like sunflower or canola): 2 tablespoons
- Fresh Cream (Heavy Cream or Amul Fresh Cream): ¼ to ½ cup (adjust for desired richness)
- Milk (Full Fat): ¼ cup (optional, to adjust consistency and add creaminess)
Sweetener and Acidity:
- Sugar or Honey: 1-2 teaspoons (or to taste, balances the tanginess of tomatoes)
- Lemon Juice: 1 teaspoon (optional, for a final touch of brightness)
- Salt: To taste (approximately 1.5 – 2 teaspoons for the entire dish, adjust gradually)
Instructions
Phase 1: Preparing the Paneer
- Soak the Paneer (Optional but Recommended): If your paneer isn’t super soft, cut it into 1-inch cubes. Bring 2 cups of water to a boil, add ½ teaspoon of salt, and turn off the heat. Gently add the paneer cubes to this hot salted water and let them soak for 15-20 minutes. This makes the paneer incredibly soft and spongy. After soaking, drain the paneer and set aside. This step prevents the paneer from becoming rubbery when cooked.
- Lightly Sauté Paneer (Optional): For a slightly firmer texture and golden hue, you can lightly sauté the paneer. Heat 1 teaspoon of oil or butter in a non-stick pan. Add the drained paneer cubes and sauté on low-medium heat for 2-3 minutes until very lightly golden on a few sides. Do not overcook or brown them, as they will become tough. Remove and set aside. Many prefer to add paneer directly without sautéing to maintain maximum softness.
Phase 2: Creating the Makhani Gravy Base
- Sauté Aromatics and Whole Spices: Heat 2 tablespoons of oil and 1 tablespoon of butter in a heavy-bottomed pan or Dutch oven over medium heat. Once the butter melts and is fragrant (don’t let it burn), add the bay leaves, green cardamom, cloves, cinnamon stick, and black cardamom (if using). Sauté for 30-40 seconds until the spices release their aroma.
- Cook Onions, Ginger, Garlic: Add the chopped onions, ginger, and garlic to the pan. Sauté for 5-7 minutes, stirring occasionally, until the onions turn translucent and slightly pinkish. They don’t need to be deeply browned for this gravy.
- Add Tomatoes and Green Chilies: Add the roughly chopped tomatoes and slit green chilies. Stir well.
- Incorporate Cashews and Melon Seeds: Add the soaked cashews (along with their soaking water) and melon seeds (if using) to the pan.
- Add Initial Spices and Salt: Stir in ½ teaspoon of turmeric powder and 1 teaspoon of Kashmiri red chili powder. Add about 1 teaspoon of salt at this stage (this helps the tomatoes break down). Mix everything thoroughly.
- Simmer the Base: Add 1 cup of water. Bring the mixture to a gentle boil. Then, reduce the heat to low, cover the pan, and let it simmer for 20-25 minutes, or until the tomatoes are very soft and mushy, and the raw smell of ginger and garlic has disappeared. Stir occasionally to prevent sticking. The mixture should look pulpy, and oil might start to separate slightly at the edges.
Phase 3: Blending and Straining the Gravy
- Cool the Mixture: Turn off the heat and let the tomato-onion mixture cool down considerably. This is important for safety when blending. Remove the bay leaves, cinnamon stick, and black cardamom pod (if you can easily find them; it’s okay if some small pieces remain, but larger whole spices are best removed).
- Blend to a Smooth Puree: Transfer the cooled mixture to a high-speed blender. Blend until you get an incredibly smooth and fine puree. If needed, add a couple of tablespoons of water to help the blending process, but aim for a thick puree.
- Strain the Puree (Crucial for Restaurant Texture): For that signature silky-smooth, restaurant-style gravy, straining is essential. Place a fine-mesh sieve over a clean bowl or back into the same cooking pan (after rinsing it). Pour the blended puree through the sieve, using the back of a ladle or spatula to press the puree through. Discard the fibrous residue left in the sieve. This step removes any tomato skins, seeds, or unblended bits of spices, resulting in a velvety texture.
Phase 4: Finishing the Paneer Butter Masala
- Simmer the Strained Gravy: Place the pan with the strained gravy back on the stove over low-medium heat. Add the remaining 1 teaspoon of Kashmiri red chili powder (for color and mild heat) and 1 teaspoon of coriander powder. Stir well and bring the gravy to a gentle simmer.
- Add Butter and Adjust Consistency: Add 2 tablespoons of butter to the simmering gravy. Stir until it melts and incorporates. If the gravy seems too thick, you can add a little hot water or milk (about ¼ cup at a time) to reach your desired consistency. Remember, it will thicken slightly more as it cools.
- Balance Flavors: Stir in 1-2 teaspoons of sugar (or honey) to balance the tanginess of the tomatoes. Taste the gravy. Add more salt if needed. The flavor profile should be a harmonious blend of tangy, slightly sweet, and savory.
- Incorporate Paneer: Gently add the soaked (and optionally sautéed) paneer cubes to the gravy. Stir very gently to coat the paneer without breaking it.
- Add Finishing Spices and Cream: Simmer for just 2-3 minutes to allow the paneer to absorb the flavors. Do not overcook at this stage, as it can make the paneer chewy. Stir in 1 teaspoon of garam masala and 1 tablespoon of crushed Kasuri Methi (rub it between your palms before adding to release its aroma).
- Final Creaminess: Turn off the heat. Stir in ¼ to ½ cup of fresh cream. Mix gently until well combined. The cream adds richness and mellows the flavors. If using, add the optional 1 teaspoon of lemon juice now for a final bright note.
- Rest and Serve: Cover the pan and let the Paneer Butter Masala rest for at least 10-15 minutes before serving. This allows the flavors to meld beautifully.
Nutrition
- Serving Size: One Normal Portion
- Calories: 450-550