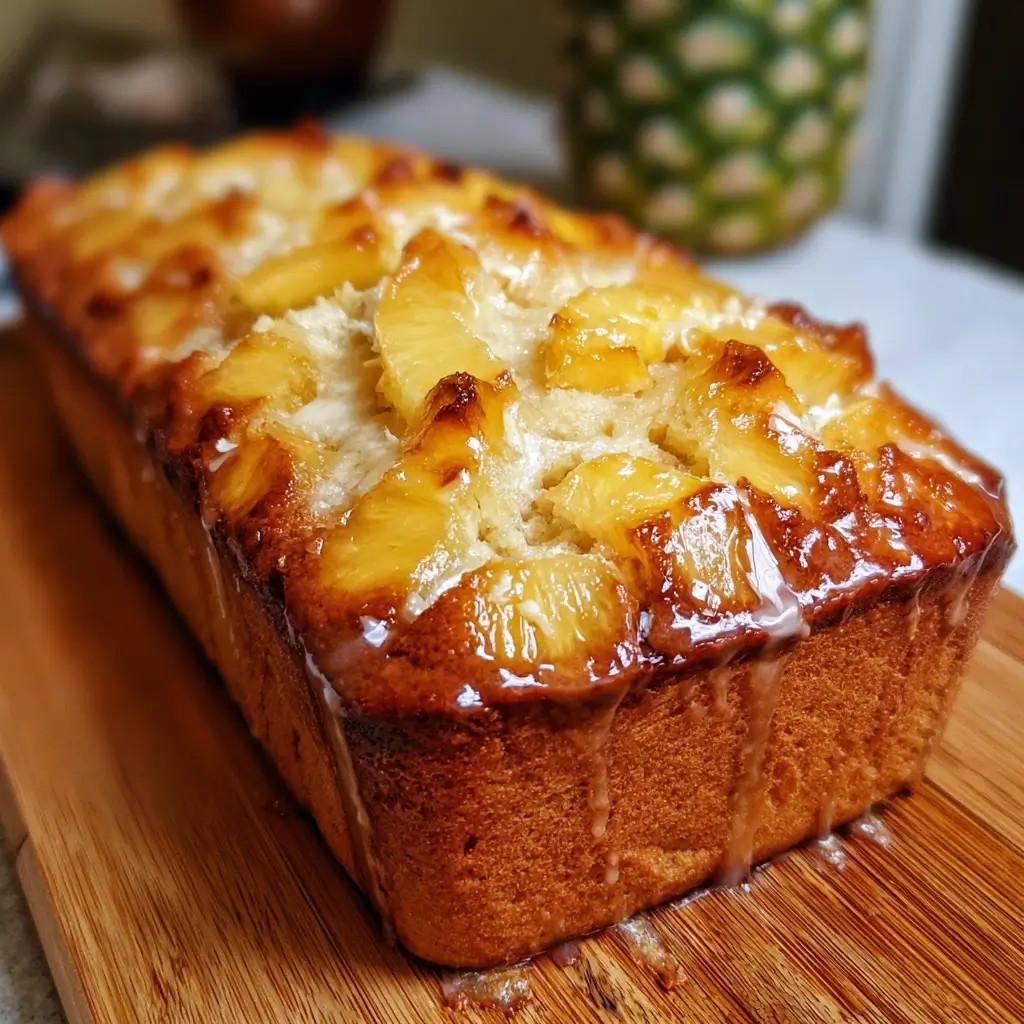
Of all the quick breads that have graced my kitchen counter, none have brought such a consistent ray of tropical sunshine as this Pineapple Bread. The first time I baked it was on a particularly grey and drizzly afternoon, the kind that seeps into your bones and calls for something comforting. I wanted more than just warmth; I wanted a taste of sunshine, a mini-vacation in a loaf pan. Skeptical at first, my family watched as I mixed the simple batter, their interest piqued by the sweet, tangy aroma of pineapple filling the air. The moment of truth came an hour later when I pulled a stunningly golden-brown loaf from the oven. The first slice was a revelation. It was unbelievably moist, dense yet tender, and bursting with sweet pineapple in every single bite. It wasn’t just bread; it was an experience. My kids, who are often my toughest critics, devoured their slices and immediately asked for more. Since that day, this has become our official “cheer-up” bread, our go-to for potlucks, and our favorite weekend brunch treat. It’s the recipe friends always ask for, and the one I’m most excited to share. It’s forgiving for novice bakers, yet it delivers a result so delicious and professional-tasting that it will make you feel like a baking champion. Prepare to fall in love with the moistest, most flavorful pineapple bread you’ve ever had.
Ingredients
This recipe relies on simple, accessible pantry staples to create its signature moist crumb and tropical flavor. The magic lies in the specific combination and, most importantly, the use of undrained crushed pineapple. Below is everything you’ll need to create this perfect loaf.
For the Pineapple Bread:
- All-Purpose Flour: 2 ½ cups (300g)
- Granulated Sugar: 1 cup (200g)
- Light Brown Sugar: ½ cup, packed (100g)
- Baking Soda: 1 teaspoon
- Salt: ½ teaspoon
- Ground Cinnamon: 1 teaspoon
- Ground Nutmeg: ¼ teaspoon (optional, for warmth)
- Large Eggs: 2, at room temperature
- Vegetable Oil: ½ cup (120ml) (or other neutral oil like canola)
- Vanilla Extract: 1 ½ teaspoons
- Crushed Pineapple: 1 can (20 ounces or 567g), undrained
For the Optional Simple Pineapple Glaze:
- Powdered Sugar: 1 cup (120g)
- Pineapple Juice: 2-3 tablespoons (reserved from the can or separate)
- Vanilla Extract: ¼ teaspoon
Ingredient Notes and Substitutions
To ensure your success and allow for flexibility, let’s break down the role of each key ingredient:
- The Flour: Standard all-purpose flour provides the perfect structure for this bread. It’s strong enough to hold the moist ingredients but tender enough for a soft crumb. While you could substitute up to half of the all-purpose flour with whole wheat flour for a nuttier flavor and added fiber, be aware that this will result in a slightly denser loaf.
- The Sugars: This recipe uses a combination of granulated and brown sugar for a reason. The granulated sugar provides clean sweetness, while the molasses in the packed brown sugar contributes deep, caramel-like notes and, crucially, a significant amount of moisture. This duo is key to the bread’s tender texture and complex flavor.
- The Leavening: Baking soda is the chemical leavener here. It reacts with the acid from the pineapple and brown sugar to create carbon dioxide bubbles, which lift the bread and make it rise. Ensure your baking soda is fresh for the best results! An easy test is to drop a pinch into some vinegar; if it fizzes vigorously, it’s good to go.
- The Oil: While many quick breads use melted butter, this recipe specifically calls for oil. Why? Oil is 100% fat, whereas butter contains water and milk solids. This means oil-based cakes and breads stay moister for much longer. A neutral-flavored oil like vegetable, canola, or grapeseed is ideal as it won’t compete with the pineapple flavor.
- The Pineapple: This is the star of the show. Using a 20-ounce can of crushed pineapple in its own juice is non-negotiable for the ultimate moistness. Do not drain the can! The juice is the secret ingredient that hydrates the flour and infuses the entire loaf with its signature tropical taste.
Instructions
Follow these step-by-step instructions carefully to bake a perfect loaf of pineapple bread every time. The key to success in quick breads is proper preparation and avoiding overmixing the batter.
Step 1: Prepare Your Oven and Pan
First things first, position a rack in the center of your oven and preheat it to 350°F (175°C). Proper oven temperature is crucial for an even bake and a good rise. While the oven heats, prepare your loaf pan. You will need a standard 9×5 inch loaf pan. Grease the pan thoroughly with butter or non-stick baking spray. For extra insurance against sticking, lightly flour the greased pan, tapping out any excess flour.
Pro-Tip: For foolproof removal, create a parchment paper “sling.” Cut a piece of parchment paper to fit the bottom and long sides of the pan, leaving an overhang on the two long sides. Grease the pan, place the sling inside, and then grease the parchment paper as well. This will allow you to easily lift the entire loaf out of the pan after baking.
Step 2: Whisk the Dry Ingredients
In a large mixing bowl, add the all-purpose flour, granulated sugar, packed light brown sugar, baking soda, salt, ground cinnamon, and optional nutmeg. Use a whisk to combine these ingredients thoroughly for at least 30 seconds. Whisking is more effective than stirring with a spoon because it aerates the mixture and ensures the baking soda and spices are evenly distributed throughout the flour. This small step prevents pockets of salt or leavener in your finished bread.
Step 3: Combine the Wet Ingredients
In a separate, medium-sized bowl, crack the two room-temperature eggs. Lightly beat them with a fork. To the eggs, add the vegetable oil, vanilla extract, and the entire can of undrained crushed pineapple, juice and all. Stir these wet ingredients together until they are just combined. Mixing the wet ingredients separately helps prevent over-developing the gluten in the flour later on.
Step 4: Combine Wet and Dry Mixtures
Pour the entire bowl of wet pineapple mixture into the large bowl containing the dry ingredients. Using a rubber spatula or a wooden spoon, gently fold the ingredients together. Scrape the bottom and sides of the bowl as you fold to ensure everything is incorporated. It is absolutely critical to mix only until the last streaks of dry flour have disappeared. The batter will be thick and lumpy, and that is exactly what you want. Overmixing will develop the gluten in the flour, resulting in a tough, dense, and rubbery bread instead of a tender, moist one.
Step 5: Bake the Bread
Carefully pour the thick batter into your prepared 9×5 inch loaf pan and use your spatula to spread it evenly. Place the pan on the center rack of your preheated oven. Bake for 55 to 65 minutes. Baking times can vary depending on your oven, so start checking for doneness around the 55-minute mark. The bread is done when it is a deep golden-brown on top and a wooden skewer or toothpick inserted into the center comes out clean or with a few moist crumbs attached. If it comes out with wet batter, it needs more time. If the top is browning too quickly before the center is cooked, you can loosely tent a piece of aluminum foil over the top of the pan for the last 10-15 minutes of baking.
Step 6: Cool the Bread Completely
Once baked, remove the loaf pan from the oven and place it on a wire cooling rack. Let the bread cool in the pan for 15-20 minutes. This initial cooling period allows the bread to set its structure, making it easier to remove without breaking. After 20 minutes, use a knife to gently loosen the edges if needed, and then carefully invert the pan to release the loaf onto the wire rack. If you used a parchment sling, simply lift it out. Turn the loaf upright and let it cool completely on the wire rack, which will take at least 1 to 2 hours. Do not slice into the bread while it is still warm, as tempting as it may be! Slicing a warm quick bread can cause it to be gummy and fall apart. Patience is key for the perfect texture.
Step 7: (Optional) Prepare and Apply the Glaze
If you desire an extra touch of sweetness and beauty, prepare the simple pineapple glaze once the bread is completely cool. In a small bowl, whisk together the powdered sugar, vanilla extract, and 2 tablespoons of pineapple juice. If the glaze is too thick, add more juice, one teaspoon at a time, until you reach your desired drizzling consistency. If it’s too thin, add a bit more powdered sugar. Drizzle the glaze over the top of the cooled loaf and let it set for about 15-20 minutes before slicing and serving.
Nutrition Facts
- Servings: 12 slices
- Calories Per Serving: Approximately 295 kcal (without glaze)
Disclaimer: The nutritional information provided is an estimate and will vary based on the specific ingredients and brands used. This calculation is for the bread only and does not include the optional glaze.
Preparation Time
- Prep Time: 15 minutes
- Cook Time: 55-65 minutes
- Cooling Time: 2 hours
- Total Time: Approximately 3 hours 15 minutes
How to Serve
This versatile pineapple bread can be enjoyed in many ways, transitioning effortlessly from a simple breakfast to a decadent dessert. Here are some of our favorite ways to serve it:
- For a Simple Breakfast:
- Serve a thick slice as is, at room temperature. Its inherent moistness needs no accompaniment.
- Lightly toast a slice and spread it with a thin layer of salted butter. The warmth will enhance the pineapple flavor, and the salt will balance the sweetness.
- Serve alongside a bowl of Greek yogurt and fresh berries for a balanced and satisfying morning meal.
- As an Afternoon Snack:
- Enjoy a slice with a hot cup of coffee, black tea, or a chai latte. The warm spices in the bread pair beautifully with these beverages.
- Spread a thin layer of tangy cream cheese on a slice for a delightful sweet and savory combination, reminiscent of carrot cake.
- For a Crowd-Pleasing Dessert:
- Gently warm a slice in the microwave for 15-20 seconds.
- Top the warm slice with a generous scoop of vanilla bean or coconut ice cream.
- Drizzle with a high-quality caramel sauce for an extra-decadent treat.
- Sprinkle with toasted shredded coconut or chopped macadamia nuts for a textural contrast and enhanced tropical flair.
- On a Brunch or Potluck Platter:
- Slice the entire loaf and arrange it beautifully on a platter.
- If using the glaze, let it set completely before arranging the slices to avoid a mess.
- This bread is a fantastic addition to any brunch spread, potluck, or bake sale, as it holds up well at room temperature and is always a crowd-pleaser.
Additional Tips
Master this recipe and make it your own with these five essential tips for pineapple bread perfection.
- Embrace Room Temperature Ingredients: The instruction to use room-temperature eggs isn’t just a suggestion; it’s based on science. Cold eggs don’t emulsify as well with the oil and sugar, which can lead to a dense, heavy texture. Room temperature ingredients blend together more smoothly and uniformly, creating a lighter, more even crumb. To quickly bring eggs to room temperature, place them in a bowl of warm (not hot) tap water for 5-10 minutes.
- Go Nuts (or Get Tropical!): This bread is a fantastic canvas for additions. For extra texture and nutty flavor, consider folding in ¾ cup of chopped walnuts or pecans along with the wet ingredients. For an even more tropical vibe, add ¾ cup of sweetened shredded coconut. You can even add ½ cup of finely chopped maraschino cherries (patted dry) for a retro, pineapple-upside-down-cake flavor.
- The No-Peek Rule: Quick breads are sensitive to temperature fluctuations during the first two-thirds of the baking process. Opening the oven door to peek can cause the temperature to drop suddenly, leading to the dreaded sunken center. Trust the process and your timer. Only open the oven to test for doneness when you are near the end of the specified baking time (around the 55-minute mark).
- Know Your Loaf Pan: The material of your loaf pan can affect baking time. Dark metal pans absorb more heat and tend to cook faster, potentially leading to darker, thicker crusts. Glass or ceramic pans are insulators and may require a longer baking time. Light-colored metal pans are generally the most reliable for even baking. Pay attention to how your specific pan performs and adjust your timing accordingly.
- Master the Art of Storage: To keep your pineapple bread as moist as the day it was baked, proper storage is key. Once completely cool, wrap the loaf tightly in plastic wrap, or place it in an airtight container. It will keep at room temperature for up to 3 days. For longer storage, you can refrigerate the wrapped loaf for up to a week. This bread also freezes beautifully. Wrap the whole loaf (or individual slices) in plastic wrap, then a layer of aluminum foil, and place it in a freezer-safe bag. It can be frozen for up to 3 months. Thaw at room temperature before enjoying.
FAQ Section (Frequently Asked Questions)
Here are answers to some of the most common questions about making this delicious pineapple bread.
1. Can I use fresh or frozen pineapple instead of canned?
Yes, you can, but it requires a bit of adjustment.
- Fresh Pineapple: You’ll need about 2 ½ cups of finely diced fresh pineapple. Fresh pineapple is often less juicy than the canned variety, so you may need to add about ¼ cup of pineapple juice, orange juice, or even water to the wet ingredients to ensure the batter has enough moisture.
- Frozen Pineapple: Thaw the frozen pineapple completely before using it. Once thawed, measure out the required amount (around 20 ounces, or 2 ½ cups) and, most importantly, use all the juice that was released during the thawing process. Do not drain it. This will mimic the effect of the undrained canned pineapple.
2. My bread turned out dry. What did I do wrong?
Dryness in this bread is rare but can happen for a few reasons. The most likely culprit is an error in measuring the flour. Scooping flour directly from the bag with a measuring cup compacts it, leading you to use more flour than the recipe calls for. For best results, use the “spoon and level” method: use a spoon to fill your measuring cup, then level off the top with the back of a knife. Alternatively, using a kitchen scale for an exact 300g is foolproof. Another possibility is overbaking. Every oven is different, so start checking for doneness early. The moment a toothpick comes out with moist crumbs (not wet batter), it’s done.
3. Can I make this recipe into pineapple muffins?
Absolutely! This recipe adapts wonderfully to muffins. Simply prepare the batter as directed and line a standard 12-cup muffin tin with paper liners. Fill each liner about ¾ full with batter. The baking time will be much shorter than for a loaf. Bake at 350°F (175°C) for 18-22 minutes, or until a toothpick inserted into the center of a muffin comes out clean. This recipe should yield approximately 16-18 standard-sized muffins.
4. Why did my quick bread sink in the middle?
A sunken middle is a common quick bread frustration and usually points to one of three issues. First, as mentioned in the tips, opening the oven door too early can cause the delicate structure to collapse. Second, underbaking is a frequent cause. The bread might look done on the outside, but the center hasn’t had time to set. Always rely on the toothpick test in the very center of the loaf. Third, check the freshness of your baking soda. If it’s old or expired, it won’t have enough power to lift the heavy, wet batter, causing it to rise and then fall.
5. Can I reduce the amount of sugar in this recipe?
You can, but with caution. Sugar does more than just add sweetness in baking; it’s a “wet” ingredient that contributes significantly to the moisture, tenderness, and browning of the bread. If you wish to reduce it, I recommend cutting back on the granulated (white) sugar first, as the brown sugar is more critical for moisture. You could reduce the granulated sugar by up to ¼ cup without a dramatic change in texture. Reducing it further may result in a drier, more crumbly bread.
Print
Pineapple Bread Recipe
Ingredients
For the Pineapple Bread:
- All-Purpose Flour: 2 ½ cups (300g)
- Granulated Sugar: 1 cup (200g)
- Light Brown Sugar: ½ cup, packed (100g)
- Baking Soda: 1 teaspoon
- Salt: ½ teaspoon
- Ground Cinnamon: 1 teaspoon
- Ground Nutmeg: ¼ teaspoon (optional, for warmth)
- Large Eggs: 2, at room temperature
- Vegetable Oil: ½ cup (120ml) (or other neutral oil like canola)
- Vanilla Extract: 1 ½ teaspoons
- Crushed Pineapple: 1 can (20 ounces or 567g), undrained
For the Optional Simple Pineapple Glaze:
- Powdered Sugar: 1 cup (120g)
- Pineapple Juice: 2-3 tablespoons (reserved from the can or separate)
- Vanilla Extract: ¼ teaspoon
Instructions
Step 1: Prepare Your Oven and Pan
First things first, position a rack in the center of your oven and preheat it to 350°F (175°C). Proper oven temperature is crucial for an even bake and a good rise. While the oven heats, prepare your loaf pan. You will need a standard 9×5 inch loaf pan. Grease the pan thoroughly with butter or non-stick baking spray. For extra insurance against sticking, lightly flour the greased pan, tapping out any excess flour.
Pro-Tip: For foolproof removal, create a parchment paper “sling.” Cut a piece of parchment paper to fit the bottom and long sides of the pan, leaving an overhang on the two long sides. Grease the pan, place the sling inside, and then grease the parchment paper as well. This will allow you to easily lift the entire loaf out of the pan after baking.
Step 2: Whisk the Dry Ingredients
In a large mixing bowl, add the all-purpose flour, granulated sugar, packed light brown sugar, baking soda, salt, ground cinnamon, and optional nutmeg. Use a whisk to combine these ingredients thoroughly for at least 30 seconds. Whisking is more effective than stirring with a spoon because it aerates the mixture and ensures the baking soda and spices are evenly distributed throughout the flour. This small step prevents pockets of salt or leavener in your finished bread.
Step 3: Combine the Wet Ingredients
In a separate, medium-sized bowl, crack the two room-temperature eggs. Lightly beat them with a fork. To the eggs, add the vegetable oil, vanilla extract, and the entire can of undrained crushed pineapple, juice and all. Stir these wet ingredients together until they are just combined. Mixing the wet ingredients separately helps prevent over-developing the gluten in the flour later on.
Step 4: Combine Wet and Dry Mixtures
Pour the entire bowl of wet pineapple mixture into the large bowl containing the dry ingredients. Using a rubber spatula or a wooden spoon, gently fold the ingredients together. Scrape the bottom and sides of the bowl as you fold to ensure everything is incorporated. It is absolutely critical to mix only until the last streaks of dry flour have disappeared. The batter will be thick and lumpy, and that is exactly what you want. Overmixing will develop the gluten in the flour, resulting in a tough, dense, and rubbery bread instead of a tender, moist one.
Step 5: Bake the Bread
Carefully pour the thick batter into your prepared 9×5 inch loaf pan and use your spatula to spread it evenly. Place the pan on the center rack of your preheated oven. Bake for 55 to 65 minutes. Baking times can vary depending on your oven, so start checking for doneness around the 55-minute mark. The bread is done when it is a deep golden-brown on top and a wooden skewer or toothpick inserted into the center comes out clean or with a few moist crumbs attached. If it comes out with wet batter, it needs more time. If the top is browning too quickly before the center is cooked, you can loosely tent a piece of aluminum foil over the top of the pan for the last 10-15 minutes of baking.
Step 6: Cool the Bread Completely
Once baked, remove the loaf pan from the oven and place it on a wire cooling rack. Let the bread cool in the pan for 15-20 minutes. This initial cooling period allows the bread to set its structure, making it easier to remove without breaking. After 20 minutes, use a knife to gently loosen the edges if needed, and then carefully invert the pan to release the loaf onto the wire rack. If you used a parchment sling, simply lift it out. Turn the loaf upright and let it cool completely on the wire rack, which will take at least 1 to 2 hours. Do not slice into the bread while it is still warm, as tempting as it may be! Slicing a warm quick bread can cause it to be gummy and fall apart. Patience is key for the perfect texture.
Step 7: (Optional) Prepare and Apply the Glaze
If you desire an extra touch of sweetness and beauty, prepare the simple pineapple glaze once the bread is completely cool. In a small bowl, whisk together the powdered sugar, vanilla extract, and 2 tablespoons of pineapple juice. If the glaze is too thick, add more juice, one teaspoon at a time, until you reach your desired drizzling consistency. If it’s too thin, add a bit more powdered sugar. Drizzle the glaze over the top of the cooled loaf and let it set for about 15-20 minutes before slicing and serving.
Nutrition
- Serving Size: One Normal Portion
- Calories: 295 kcal