

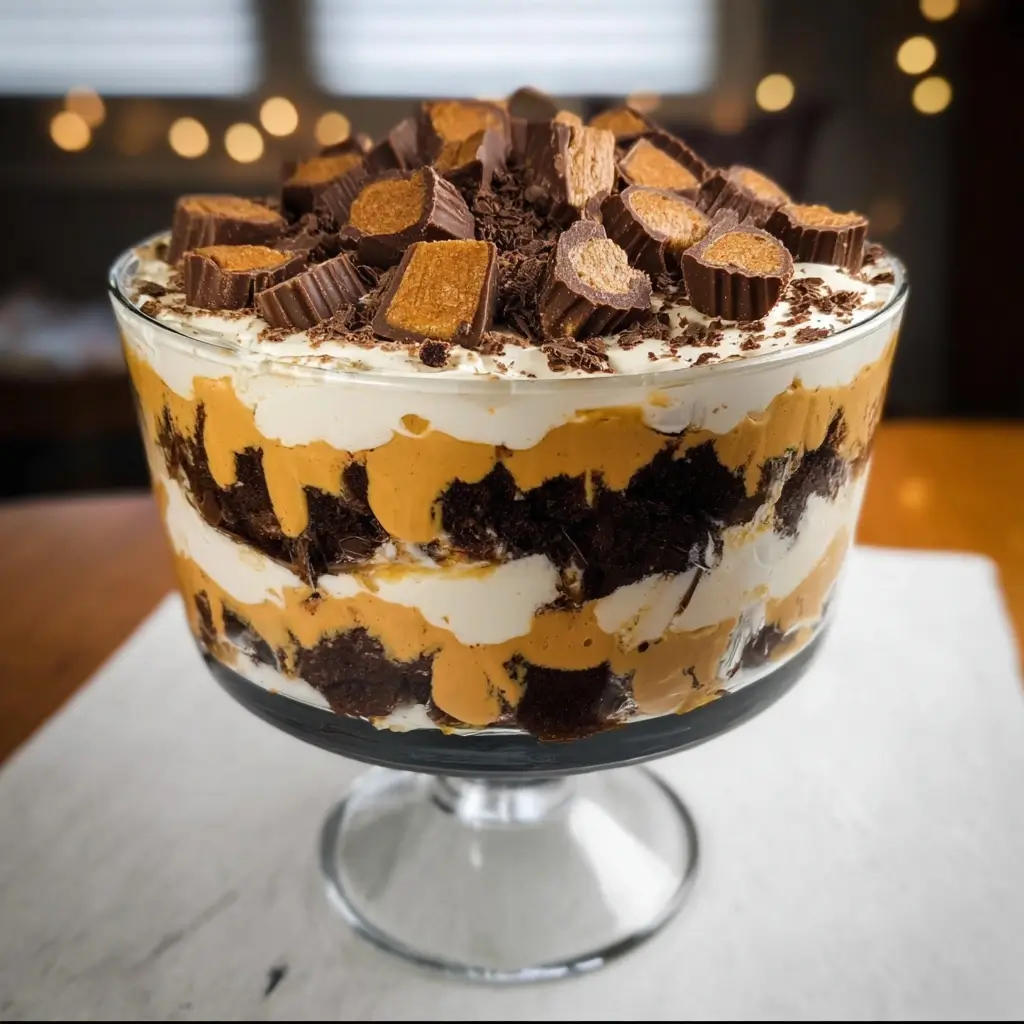

Of all the desserts I’ve made over the years—and believe me, the list is long and storied—none has ever received the same jaw-on-the-floor, eyes-wide-open reaction as this Reese’s Peanut Butter Trifle. The first time I brought it to a family holiday gathering, a hush fell over the room as I placed the towering glass bowl on the dessert table. It’s a showstopper, a true centerpiece that promises pure indulgence. My nephew, a notoriously picky eater who usually sticks to plain vanilla ice cream, took one look at the distinct layers of dark brownie, creamy peanut butter mousse, and drifts of whipped cream, all studded with a king’s ransom of Reese’s cups, and declared, “I need that in my life.” He wasn’t wrong. That first bite is a symphony of textures and flavors. You get the rich, fudgy chew of the brownie, followed by the impossibly light yet intensely peanut-buttery mousse that melts on your tongue. Then, the cool, airy whipped cream cuts through the richness, and just when you think it can’t get any better, you get the satisfying crunch and salty-sweet perfection of a piece of Reese’s Peanut Butter Cup. It’s not just a dessert; it’s an experience. It has since become “my” dessert, the one requested for every birthday, Super Bowl party, and summer barbecue. It looks like it took days to create in a professional pastry kitchen, but the secret is that it’s surprisingly simple to assemble. This recipe isn’t just about making a dessert; it’s about creating a moment of shared, unapologetic joy.
The Ultimate Reese’s Peanut Butter Trifle Recipe
This recipe breaks down the show-stopping dessert into manageable components. While it looks incredibly impressive, each step is straightforward. The key is in the layering and allowing the flavors to meld. Below are the ingredients you’ll need, broken down by each delicious layer.
For the Fudgy Brownie Layer:
- 1 box (approx. 18.3 oz) of your favorite fudgy brownie mix
- Eggs, oil, and water as called for on the brownie mix package
- 1 cup semi-sweet chocolate chips (optional, but highly recommended for extra richness)
For the Silky Peanut Butter Mousse Layer:
- 1 package (8 oz) full-fat cream cheese, softened to room temperature
- 1 ½ cups creamy peanut butter (standard commercial brands like Jif or Skippy work best)
- 1 ¼ cups powdered sugar, sifted
- 1 teaspoon pure vanilla extract
- 1 container (16 oz) frozen whipped topping (like Cool Whip), thawed in the refrigerator
For Assembly and Topping:
- 1 container (8 oz) frozen whipped topping (like Cool Whip), thawed, for the top layer
- 20-25 regular-sized Reese’s Peanut Butter Cups, coarsely chopped, plus more for garnish
- ½ cup mini Reese’s Peanut Butter Cups for garnish
- Chocolate syrup or hot fudge sauce for drizzling
- Peanut butter sauce or melted peanut butter for drizzling
Step-by-Step Instructions
Follow these detailed instructions carefully to build your trifle masterpiece. The magic is in the method, ensuring each layer is distinct and delicious.
Part 1: Preparing the Brownie Base
- Preheat and Prepare: Preheat your oven to 350°F (175°C) or the temperature specified on your brownie mix box. Grease and flour a 9×13 inch baking pan to prevent sticking.
- Mix the Brownies: In a large mixing bowl, prepare the brownie batter according to the package directions, using the required eggs, oil, and water. If you’re using them, gently fold in the semi-sweet chocolate chips.
- Bake to Perfection: Pour the batter into your prepared pan and spread it into an even layer. Bake for the time recommended on the box, or until a wooden skewer or toothpick inserted into the center comes out with moist crumbs attached, but not wet batter. Be careful not to overbake; a slightly fudgy brownie is ideal for this trifle.
- Cool Completely: This is a crucial step! Allow the brownies to cool completely in the pan on a wire rack. This can take 1-2 hours. If you try to cut them while they are still warm, they will crumble and fall apart. Once fully cooled, cut the brownies into 1-inch cubes.
Part 2: Crafting the Peanut Butter Mousse
- Beat the Base: In a large bowl, using a hand mixer or a stand mixer fitted with the paddle attachment, beat the softened cream cheese on medium speed until it is completely smooth and free of lumps. This prevents a gritty texture in your mousse.
- Add Peanut Butter and Sugar: Add the creamy peanut butter, sifted powdered sugar, and vanilla extract to the bowl with the cream cheese. Beat on medium speed until the mixture is well-combined, smooth, and fluffy. Scrape down the sides and bottom of the bowl with a rubber spatula to ensure everything is incorporated evenly.
- Fold in the Whipped Topping: Gently switch to a rubber spatula. Add the 16 oz container of thawed whipped topping to the peanut butter mixture. Fold it in carefully, using gentle, sweeping motions from the bottom of the bowl up to the top. Continue folding until no white streaks remain. You want to keep the mixture as light and airy as possible, so avoid stirring or beating it at this stage.
Part 3: Assembling Your Masterpiece
- Choose Your Vessel: You’ll need a large, clear glass trifle bowl (typically 3-4 quarts) to showcase the beautiful layers. If you don’t have one, a large glass bowl or even individual parfait glasses will work.
- First Brownie Layer: Place half of the brownie cubes in a single, even layer at the bottom of the trifle bowl. Gently press them down to create a solid foundation.
- First Peanut Butter Mousse Layer: Spoon half of the peanut butter mousse mixture over the brownie layer. Use the back of a spoon or a small offset spatula to spread it evenly, making sure it reaches the edges of the glass for a clean, defined layer.
- First Candy Layer: Sprinkle half of your chopped Reese’s Peanut Butter Cups over the mousse layer.
- Repeat the Layers: Create the second set of layers by repeating the process. Add the remaining brownie cubes, followed by the remaining peanut butter mousse, spreading it evenly.
- The Grand Finale Top: Gently spread the final 8 oz container of thawed whipped topping over the top of the second mousse layer. You can create a simple, smooth top or make decorative swirls with the back of a spoon. For a professional touch, use a piping bag fitted with a star tip to pipe rosettes of whipped topping around the edge.
- Garnish and Chill: This is where you make it look irresistible. Generously sprinkle the remaining chopped Reese’s cups and the mini Reese’s cups over the whipped topping. Drizzle with chocolate syrup and peanut butter sauce.
- Crucial Chilling Time: Cover the trifle bowl with plastic wrap and refrigerate for at least 4-6 hours, but preferably overnight. This chilling period is essential. It allows the dessert to set firmly and gives the flavors time to meld together into something truly magical. Do not skip this step!
Nutrition Facts
- Servings: 16-20 servings
- Calories per serving: Approximately 650-750 calories
Disclaimer: The nutritional information provided is an estimate and will vary depending on the specific brands of ingredients used (e.g., brownie mix, peanut butter, whipped topping) and the exact serving size.
Preparation Time
- Active Preparation Time: 35 minutes
- Baking and Cooling Time: 2 hours 30 minutes
- Chilling Time: 4-6 hours
- Total Time: Approximately 7-9 hours (mostly inactive time)
How to Serve This Decadent Trifle
Presentation is part of the fun with a trifle. Serving it correctly enhances the experience and ensures everyone gets a perfect scoop of every layer.
- The Right Utensil: Use a large, long-handled spoon for serving. You want to be able to dig straight down to the bottom of the bowl to scoop up all the layers in a single serving.
- The Perfect Scoop: When serving, aim to get a vertical slice of the trifle. This ensures each portion includes brownie, mousse, whipped cream, and candy. Avoid scooping just from the top.
- Serving Vessels: While the trifle is a communal dessert, you can serve individual portions in:
- Small dessert bowls
- Glass ramekins
- Wide-mouthed cocktail or martini glasses for an elegant touch
- À La Minute Garnishes: For an extra “wow” factor, have extra garnishes on hand to add just before serving. A final drizzle of warm hot fudge sauce or a sprinkle of flaky sea salt can elevate the flavor and presentation.
- Occasion-Based Serving:
- For Parties & Potlucks: Leave the trifle whole on the dessert buffet and let guests serve themselves. The visual impact is a fantastic conversation starter.
- For a Seated Dinner: Pre-scoop portions into individual bowls or glasses in the kitchen for a more formal and tidy presentation.
5 Additional Tips for Trifle Perfection
Take your Reese’s Peanut Butter Trifle from great to absolutely legendary with these professional tips and tricks.
- Elevate Your Brownies: While a box mix is fantastic for convenience, you can easily elevate it. Consider using a dark chocolate or double fudge brownie mix for a deeper flavor that contrasts beautifully with the sweet peanut butter. You can also substitute brewed coffee for the water called for in the recipe to intensify the chocolate flavor. If you have a favorite from-scratch brownie recipe, feel free to use it, ensuring it’s the fudgy, not cakey, variety.
- The Secret to the Smoothest Mousse: The temperature of your ingredients is non-negotiable for the mousse. The cream cheese must be at room temperature. If it’s too cold, it will create small, unappetizing lumps in your final product. Take it out of the fridge at least an hour before you begin. Similarly, using standard, processed creamy peanut butter (like Jif or Skippy) is recommended over natural peanut butter, which can separate and create an oily texture.
- Master the Art of Clean Layers: The visual appeal of a trifle is in its distinct, clean layers. To achieve this, make sure each layer is fully spread to the edges of the glass bowl. A small offset spatula is your best friend here. For the mousse and whipped topping layers, you can spoon dollops around the edge first, then spread them inward. This presses the cream against the glass, minimizing air gaps and creating a professional look.
- Don’t Rush the Chill: We mentioned it in the instructions, but it bears repeating because it’s the most common mistake. Chilling is not optional. It serves two purposes: first, it allows the mousse and whipped topping to firm up, preventing the trifle from becoming a soupy mess when you serve it. Second, and just as importantly, it allows the flavors to “marry.” The moisture from the mousse will slightly soften the brownies, and the chocolate and peanut butter flavors will meld into a cohesive, delicious profile. An overnight chill is always best.
- Get Creative with the Crunch: Reese’s cups are the star, but you can introduce other textures and flavors. Try adding a layer of chopped peanuts or honey-roasted peanuts for extra saltiness and crunch. Crushed pretzels scattered over the mousse layer add a fantastic salty contrast to the sweetness. You could even use chopped Butterfinger bars, Nutter Butter cookies, or mini chocolate chips in addition to the Reese’s to create a “candy bar explosion” trifle.
Frequently Asked Questions (FAQ)
Here are answers to some of the most common questions about making this Reese’s Peanut Butter Trifle.
1. Can I make this dessert ahead of time?
Absolutely! This is one of the best make-ahead desserts for a party. You can assemble the entire trifle up to 48 hours in advance. Prepare it completely, cover it tightly with plastic wrap, and store it in the refrigerator. In fact, the flavor is often even better on the second day. The only thing you should wait to do is add the final garnishes. Add the drizzled sauces and any extra candy or fresh whipped cream just before serving to keep them from getting soft or weeping.
2. What can I use if I don’t have a trifle bowl?
No trifle bowl? No problem! The key is to use a clear container to show off the layers. A large, straight-sided glass salad bowl works beautifully. You can also use a large glass punch bowl. For a different approach, you can create individual trifles in smaller glass containers like parfait glasses, mason jars, or even sturdy wine glasses. This is a great option for easier serving and portion control.
3. Can I use homemade whipped cream instead of frozen whipped topping?
Yes, you can, but with a caveat. Homemade whipped cream is delicious but not as stable as commercial frozen whipped topping, which contains stabilizers. If you choose to use it, you’ll need to stabilize it yourself so it doesn’t deflate and become watery. To stabilize it, beat 2 cups of heavy whipping cream with ½ cup of powdered sugar and 1 teaspoon of vanilla until soft peaks form. In a small bowl, sprinkle 1 teaspoon of unflavored gelatin over 1 tablespoon of cold water and let it bloom for 5 minutes. Gently warm it in the microwave for 5-10 seconds until just liquid, then slowly drizzle it into the whipped cream while beating until stiff peaks form. This stabilized cream will hold its shape in the trifle.
4. How do I store leftovers?
If you’re lucky enough to have leftovers, they are easy to store. Cover the trifle bowl tightly with plastic wrap or transfer the leftovers to an airtight container. Store it in the refrigerator for up to 4 days. Be aware that after the second day, the brownie layer will become much softer and the layers may begin to bleed into each other slightly, but it will still be incredibly delicious. This dessert does not freeze well, as the texture of the mousse and whipped cream will change upon thawing.
5. Can I make a gluten-free version of this trifle?
Yes, making a gluten-free version is very straightforward! The only component containing gluten is the brownie layer. Simply substitute your favorite gluten-free brownie mix and prepare it according to the package directions. All other ingredients in the recipe—cream cheese, peanut butter, whipped topping, and Reese’s Peanut Butter Cups (in the US)—are typically gluten-free. As always, be sure to double-check the labels on all your ingredients to ensure they are certified gluten-free to avoid any cross-contamination.

Reese’s Peanut Butter Trifle Recipe
Ingredients
For the Fudgy Brownie Layer:
- 1 box (approx. 18.3 oz) of your favorite fudgy brownie mix
- Eggs, oil, and water as called for on the brownie mix package
- 1 cup semi-sweet chocolate chips (optional, but highly recommended for extra richness)
For the Silky Peanut Butter Mousse Layer:
- 1 package (8 oz) full-fat cream cheese, softened to room temperature
- 1 ½ cups creamy peanut butter (standard commercial brands like Jif or Skippy work best)
- 1 ¼ cups powdered sugar, sifted
- 1 teaspoon pure vanilla extract
- 1 container (16 oz) frozen whipped topping (like Cool Whip), thawed in the refrigerator
For Assembly and Topping:
- 1 container (8 oz) frozen whipped topping (like Cool Whip), thawed, for the top layer
- 20–25 regular-sized Reese’s Peanut Butter Cups, coarsely chopped, plus more for garnish
- ½ cup mini Reese’s Peanut Butter Cups for garnish
- Chocolate syrup or hot fudge sauce for drizzling
- Peanut butter sauce or melted peanut butter for drizzling
Instructions
Part 1: Preparing the Brownie Base
- Preheat and Prepare: Preheat your oven to 350°F (175°C) or the temperature specified on your brownie mix box. Grease and flour a 9×13 inch baking pan to prevent sticking.
- Mix the Brownies: In a large mixing bowl, prepare the brownie batter according to the package directions, using the required eggs, oil, and water. If you’re using them, gently fold in the semi-sweet chocolate chips.
- Bake to Perfection: Pour the batter into your prepared pan and spread it into an even layer. Bake for the time recommended on the box, or until a wooden skewer or toothpick inserted into the center comes out with moist crumbs attached, but not wet batter. Be careful not to overbake; a slightly fudgy brownie is ideal for this trifle.
- Cool Completely: This is a crucial step! Allow the brownies to cool completely in the pan on a wire rack. This can take 1-2 hours. If you try to cut them while they are still warm, they will crumble and fall apart. Once fully cooled, cut the brownies into 1-inch cubes.
Part 2: Crafting the Peanut Butter Mousse
- Beat the Base: In a large bowl, using a hand mixer or a stand mixer fitted with the paddle attachment, beat the softened cream cheese on medium speed until it is completely smooth and free of lumps. This prevents a gritty texture in your mousse.
- Add Peanut Butter and Sugar: Add the creamy peanut butter, sifted powdered sugar, and vanilla extract to the bowl with the cream cheese. Beat on medium speed until the mixture is well-combined, smooth, and fluffy. Scrape down the sides and bottom of the bowl with a rubber spatula to ensure everything is incorporated evenly.
- Fold in the Whipped Topping: Gently switch to a rubber spatula. Add the 16 oz container of thawed whipped topping to the peanut butter mixture. Fold it in carefully, using gentle, sweeping motions from the bottom of the bowl up to the top. Continue folding until no white streaks remain. You want to keep the mixture as light and airy as possible, so avoid stirring or beating it at this stage.
Part 3: Assembling Your Masterpiece
- Choose Your Vessel: You’ll need a large, clear glass trifle bowl (typically 3-4 quarts) to showcase the beautiful layers. If you don’t have one, a large glass bowl or even individual parfait glasses will work.
- First Brownie Layer: Place half of the brownie cubes in a single, even layer at the bottom of the trifle bowl. Gently press them down to create a solid foundation.
- First Peanut Butter Mousse Layer: Spoon half of the peanut butter mousse mixture over the brownie layer. Use the back of a spoon or a small offset spatula to spread it evenly, making sure it reaches the edges of the glass for a clean, defined layer.
- First Candy Layer: Sprinkle half of your chopped Reese’s Peanut Butter Cups over the mousse layer.
- Repeat the Layers: Create the second set of layers by repeating the process. Add the remaining brownie cubes, followed by the remaining peanut butter mousse, spreading it evenly.
- The Grand Finale Top: Gently spread the final 8 oz container of thawed whipped topping over the top of the second mousse layer. You can create a simple, smooth top or make decorative swirls with the back of a spoon. For a professional touch, use a piping bag fitted with a star tip to pipe rosettes of whipped topping around the edge.
- Garnish and Chill: This is where you make it look irresistible. Generously sprinkle the remaining chopped Reese’s cups and the mini Reese’s cups over the whipped topping. Drizzle with chocolate syrup and peanut butter sauce.
- Crucial Chilling Time: Cover the trifle bowl with plastic wrap and refrigerate for at least 4-6 hours, but preferably overnight. This chilling period is essential. It allows the dessert to set firmly and gives the flavors time to meld together into something truly magical. Do not skip this step!
Nutrition
- Serving Size: One Normal Portion
- Calories: 650-750


