

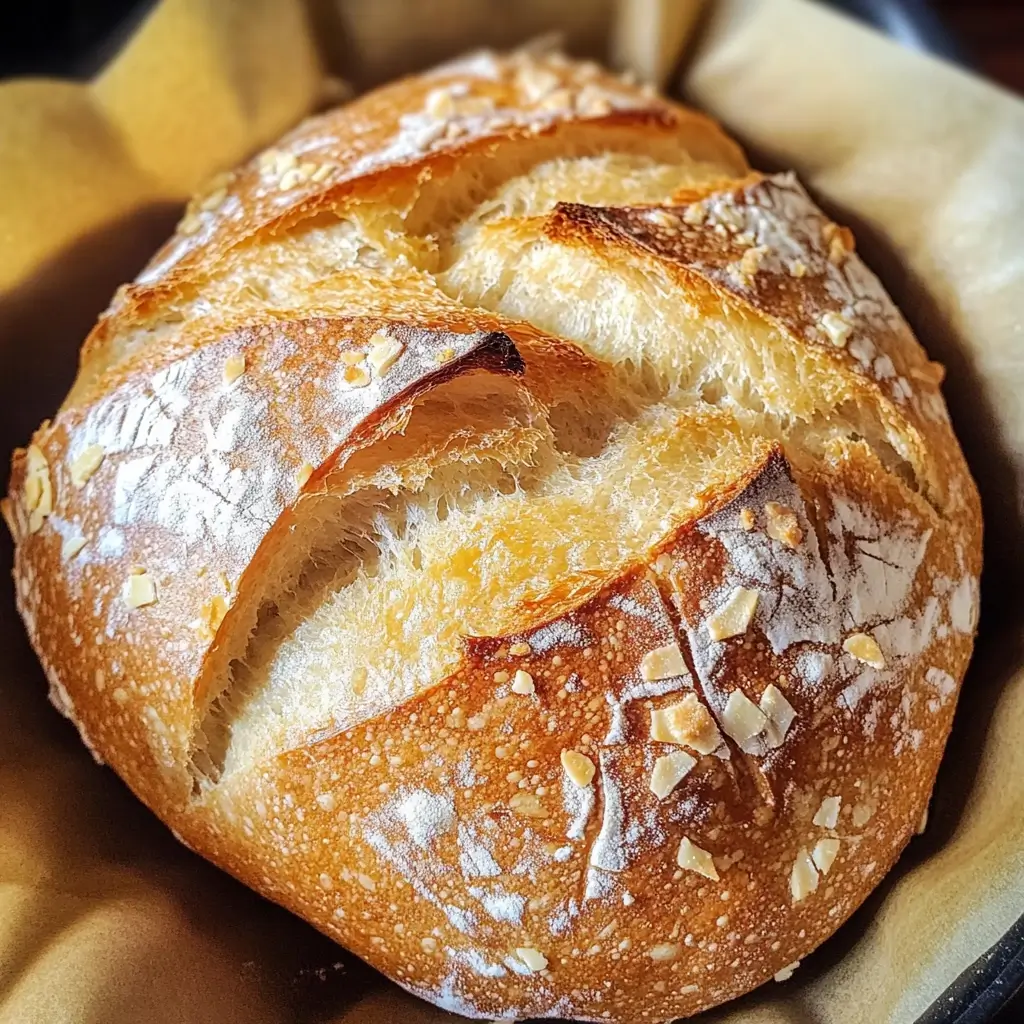

Rustic French bread, with its crackling crust and soft, airy interior, has always held a special place in my heart. There’s something undeniably comforting about the aroma of freshly baked bread wafting through the house, a scent that instantly transforms any kitchen into a warm and inviting haven. When I stumbled upon this Rustic French Bread recipe from Amanda Cooks & Styles, promising a Dutch oven method for home bakers, I was instantly intrigued. Could I really achieve bakery-quality French bread in my own kitchen with such ease? The answer, after baking this loaf for the first time, was a resounding yes! The process, while requiring some patience for the rise, is surprisingly straightforward. The active dry yeast brings the dough to life, transforming simple ingredients into a bubbling, fragrant mixture. The Dutch oven, a magical vessel for bread baking, creates the perfect steamy environment for that signature crust and tender crumb. My family devoured this bread with gusto. The crust shattered satisfyingly with each slice, revealing a soft, chewy interior that begged to be slathered with butter or dipped in olive oil. It was the perfect accompaniment to a simple weeknight dinner of soup and salad, elevating the meal to something truly special. Even days later, stored properly, the bread retained its wonderful texture and flavor, reminding us of the joy of homemade goodness. This recipe is a keeper, a reliable way to bring the rustic charm and deliciousness of French bread into your home, and I’m thrilled to share my experience and guide you through making your own perfect loaf.
Ingredients
This Rustic French Bread recipe boasts a beautifully short and simple ingredient list, highlighting the magic that can be created with just a few high-quality components. Each ingredient plays a vital role in the final texture and flavor of your loaf, so let’s delve into each one a little further:
- 3 ¼ cups all-purpose flour: The foundation of our rustic loaf, all-purpose flour provides the structure and chewiness we crave in French bread. It’s readily available in most pantries and strikes a good balance between protein content for gluten development and starch for a tender crumb. While all-purpose flour is the star here, understanding its role and potential variations is key. For this recipe, unbleached all-purpose flour is recommended. Bleached flour, while perfectly fine for many baking tasks, can sometimes result in a slightly less flavorful loaf and may impact gluten development due to the bleaching process. If you’re feeling adventurous, you can experiment with a portion of bread flour (around 1 cup) in place of some all-purpose. Bread flour has a higher protein content, which can lead to an even chewier texture and a slightly more pronounced gluten structure. However, for a classic rustic French bread, all-purpose flour delivers wonderfully. It’s important to measure your flour accurately. The best way to do this is using the “spoon and level” method. Instead of scooping flour directly from the bag, which can compact it, lightly spoon the flour into your measuring cup and then level off the excess with the back of a knife or a straight edge. This ensures you’re using the correct amount and not inadvertently adding too much flour, which can result in a dry and dense loaf.
- 1 teaspoon sugar: A seemingly small addition, sugar plays a crucial role beyond just sweetness in this recipe. Primarily, the sugar acts as food for the yeast, encouraging its activity and accelerating the fermentation process. This initial boost helps the yeast to become more vigorous, leading to a better rise and a more flavorful bread. While you might not taste the sugar directly in the final loaf, it contributes to a subtle sweetness that balances the savory notes and enhances the overall flavor profile. You can use granulated sugar, caster sugar, or even honey or maple syrup in a pinch, though granulated sugar is the most traditional and readily available choice. Just ensure you’re using the correct measurement, as too much sugar can actually inhibit yeast activity, while too little might slow down the initial rise.
- 1 teaspoon salt: Salt is an indispensable ingredient in bread making, playing a multifaceted role that goes far beyond just seasoning. Firstly, salt controls the yeast activity. While sugar encourages yeast to grow, salt regulates its fermentation, preventing it from becoming too rapid and producing off-flavors. It helps to slow down the yeast just enough to allow for a more controlled and flavorful fermentation. Secondly, salt strengthens the gluten structure. Gluten is the protein network that develops when flour is mixed with water, giving bread its elasticity and chewiness. Salt tightens and strengthens these gluten strands, leading to a dough that is easier to handle and a bread with better texture and rise. Finally, and perhaps most obviously, salt is crucial for flavor. Without salt, bread would taste bland and flat. Salt enhances the other flavors in the dough, bringing out the nutty notes of the flour and the subtle sweetness from the sugar. Use regular table salt or fine sea salt for this recipe. Avoid using coarse sea salt directly in the dough as it may not dissolve evenly. If using kosher salt, which is coarser, you may need to use slightly more to achieve the same level of saltiness.
- 1 ½ teaspoon active dry yeast: The heart and soul of our rustic bread, active dry yeast is the leavening agent that makes the dough rise and gives the bread its airy texture. Active dry yeast is a dehydrated form of yeast that needs to be rehydrated and activated before being added to the dough. This is why the first step of the recipe involves combining it with warm water and sugar. This process, often referred to as “proofing” the yeast, ensures that the yeast is alive and active and ready to do its job. It’s crucial to use fresh active dry yeast for the best results. Yeast has a shelf life, and older yeast may be less active or even completely inactive, leading to a bread that doesn’t rise properly. Always check the expiration date on your yeast package. To proof your yeast, use warm water that is between 105-115 degrees Fahrenheit (40-46 degrees Celsius). Water that is too cold will not activate the yeast, while water that is too hot can kill it. The sugar in the warm water provides food for the yeast, encouraging it to become active and bubbly. After about 5 minutes, you should see bubbles forming on the surface of the water, indicating that the yeast is alive and ready to use. If your yeast doesn’t bubble, it may be inactive and you should discard it and start with fresh yeast.
- 1 ¼ cups water 105 – 115 degrees: Water is essential for hydrating the flour and activating the gluten, forming the dough and allowing it to rise. The temperature of the water is particularly important when working with active dry yeast, as mentioned earlier. Warm water in the range of 105-115 degrees Fahrenheit (40-46 degrees Celsius) is ideal for activating active dry yeast. This temperature range provides a comfortable environment for the yeast to become active and start fermenting. Using water that is within this temperature range will ensure that your yeast is properly activated and your dough rises successfully. Using tap water is generally fine for bread making. However, if your tap water is heavily chlorinated, it may be beneficial to use filtered water or let tap water sit out uncovered for about 30 minutes to allow some of the chlorine to dissipate, as chlorine can inhibit yeast activity. The amount of water specified in the recipe (1 ¼ cups) is a guideline. The exact amount of water needed can vary slightly depending on factors like the humidity of your environment and the type of flour you are using. The dough should be sticky but manageable. If the dough seems too dry, you can add a tablespoon of water at a time until it reaches the desired consistency. Conversely, if the dough seems too wet, you can add a tablespoon of flour at a time, but be careful not to add too much, as this can make the bread dense.
By understanding the role of each ingredient and using high-quality components, you’re setting yourself up for success in baking a truly delicious and rustic French bread.
Instructions
Baking this Rustic French Bread is a rewarding journey, and each step in the process is designed to build flavor and texture into your final loaf. Let’s break down the instructions into manageable steps, providing detailed guidance along the way:
- Activate the Yeast: “Combine yeast, warm water and sugar in the bowl of your stand mixer. Let sit for about 5 minutes for yeast activation.” This initial step is crucial for ensuring your yeast is active and ready to leaven the dough. Use a stand mixer bowl for convenience, but you can also do this in a large mixing bowl if you prefer to knead by hand later. Measure out 1 ¼ cups of water and ensure it’s within the temperature range of 105-115 degrees Fahrenheit (40-46 degrees Celsius). Using a thermometer is the most accurate way to check the temperature. Add 1 ½ teaspoons of active dry yeast and 1 teaspoon of sugar to the warm water in the bowl. Gently stir to combine the ingredients. Now, patience is key. Let the mixture sit undisturbed for about 5 minutes. During this time, the yeast will begin to feed on the sugar and become active. You should see small bubbles forming on the surface, and the mixture may become slightly frothy. This is a sign that your yeast is alive and well. If after 5-10 minutes you don’t see any bubbling, your yeast may be inactive. It’s best to start again with fresh yeast to ensure your bread rises properly.
- Combine Wet and Dry Ingredients: “Add half of the flour and salt to the yeast mixture. Fit your mixer with dough hook and begin to knead over medium-low speed. Add remaining flour and continue to knead until dough just comes together. Dough will be sticky at this point.” Once your yeast is activated, it’s time to start building the dough. Add half of the flour (approximately 1 5/8 cups) and 1 teaspoon of salt to the yeast mixture in the bowl. If you are using a stand mixer, attach the dough hook. Start kneading on medium-low speed. Initially, the mixture will be quite wet and shaggy. Don’t worry, this is normal. As the mixer works, the gluten in the flour will start to develop. Gradually add the remaining flour, a little at a time, while the mixer continues to knead. Continue kneading until the dough just comes together into a cohesive mass. It’s important to note that this dough is meant to be sticky. Resist the urge to add too much extra flour to make it less sticky. A sticky dough is essential for a moist and airy crumb in the final bread. The dough should pull away from the sides of the bowl but will still be tacky to the touch. Knead for about 5-7 minutes in the stand mixer, or about 8-10 minutes by hand on a lightly floured surface if you are kneading manually.
- First Rise (Bulk Fermentation): “Transfer dough to a lightly floured bowl and cover with a clean towel. Let dough rise for 2 hours.” The first rise, also known as bulk fermentation, is a crucial step in developing flavor and texture. Lightly flour a large bowl to prevent the dough from sticking. Gently transfer the sticky dough to the floured bowl. Shape the dough into a loose ball. Cover the bowl tightly with a clean kitchen towel or plastic wrap. Place the bowl in a warm, draft-free place to rise for 2 hours. The ideal temperature for rising is around 75-80 degrees Fahrenheit (24-27 degrees Celsius). A slightly warm oven (turned off!) or a sunny spot in your kitchen can work well. During this 2-hour rise, the yeast will ferment the sugars in the dough, producing carbon dioxide gas. This gas creates air pockets in the dough, causing it to double in size. The bulk fermentation also develops the complex flavors of the bread.
- Second Rise (Proofing): “Transfer dough to a generously floured piece of parchment paper or cutting board and gently form dough into a smooth ball. Sprinkle top of dough with more flour, then cover with a large bowl (like a dome) and let rise for another 30 minutes.” After the first rise, gently punch down the dough to release some of the trapped air. Transfer the dough to a generously floured piece of parchment paper or a cutting board. The parchment paper will make it much easier to transfer the dough to the hot Dutch oven later. Gently shape the dough into a smooth, round ball. Be careful not to deflate the dough too much. Sprinkle the top of the dough generously with more flour. This will help to create a rustic, flour-dusted crust. Cover the dough ball with a large bowl, creating a dome to trap moisture and warmth. Let the dough rise for another 30 minutes. This second rise, often called proofing, allows the dough to relax and rise slightly further, resulting in a lighter and airier loaf.
- Preheat Oven and Dutch Oven: “Preheat oven to 425 degrees. Place dutch oven with lid into the oven to preheat for 20 minutes prior to baking bread. * If you don’t have a dutch oven, use a baking sheet but don’t preheat the sheet.” Preheat your oven to 425 degrees Fahrenheit (220 degrees Celsius). Place your Dutch oven with its lid inside the oven to preheat for at least 20 minutes. Preheating the Dutch oven is crucial for creating the steamy environment that is essential for a crispy crust and a well-risen loaf. The hot Dutch oven mimics a professional bread oven, trapping steam released from the dough as it bakes, which keeps the crust soft initially and allows for maximum oven spring (the final rise in the oven). Once the lid is removed later in the baking process, the dry heat of the oven then crisps up the crust beautifully. If you don’t have a Dutch oven, you can use a baking sheet. In this case, do not preheat the baking sheet.
- Score and Bake: “Score top of bread with a very sharp knife. Very carefully transfer dough with parchment paper (or by itself if not using parchment paper) to the hot dutch oven. Bake bread for 30 minutes with the lid on, then carefully remove lid and bake for another 10 minutes until top is nice and golden. *If using a baking sheet, bake for 35 minutes. Internal temperature of bread should be about 210 degrees.” Carefully remove the preheated Dutch oven from the oven. Be extremely cautious as it will be very hot. Using a very sharp knife or a bread lame (a specialized scoring tool), score the top of the dough. Scoring allows the bread to expand predictably in the oven and prevents it from cracking randomly. A simple slash or an “X” is sufficient. Carefully transfer the dough to the hot Dutch oven. If you used parchment paper, lift the dough by the parchment paper and gently lower it into the Dutch oven. If you didn’t use parchment, you’ll need to carefully transfer the dough by hand. Be very careful not to burn yourself. Cover the Dutch oven with the lid and bake for 30 minutes. Baking with the lid on traps steam and creates a humid environment, contributing to a crispy crust and a soft interior. After 30 minutes, carefully remove the lid. Continue baking for another 10-15 minutes, or until the crust is nicely golden brown and the internal temperature of the bread reaches about 210 degrees Fahrenheit (99 degrees Celsius). Using a baking sheet instead of a Dutch oven? Bake for a total of about 35 minutes, without preheating the baking sheet and without covering the bread. Check for doneness by inserting an instant-read thermometer into the center of the loaf.
- Cool and Serve: “Remove bread from oven and carefully transfer to a cooling rack. Once cooled, slice and serve! Store bread in a storage bag or container on the counter for up to 3-5 days.” Once the bread is baked, carefully remove the Dutch oven from the oven. Using oven mitts, lift the bread out of the Dutch oven and transfer it to a wire cooling rack. Allow the bread to cool completely on the cooling rack before slicing. This is crucial, as slicing hot bread can result in a gummy texture. Cooling allows the internal structure to set. Once cooled, slice and serve your delicious Rustic French Bread! Store any leftover bread in an airtight storage bag or container at room temperature for up to 3-5 days. To refresh slightly stale bread, you can lightly toast it or briefly reheat it in a low oven.
By following these detailed instructions, you’ll be well on your way to baking a perfect loaf of Rustic French Bread that rivals bakery loaves, right in the comfort of your own kitchen.
Nutrition Facts
(Please note: Nutritional information is an estimate and can vary based on specific ingredients and portion sizes.)
Servings: 1 loaf (approximately 12 slices)
Calories per serving (per slice): Approximately 180-220 calories
This is an estimated calorie count per slice, assuming the loaf is divided into 12 equal slices. The exact calorie count will depend on factors such as the precise measurements of ingredients and the slice thickness.
Approximate Macronutrients per serving (per slice):
- Carbohydrates: 35-45 grams
- Protein: 5-7 grams
- Fat: 1-2 grams
This bread is primarily a carbohydrate source, with moderate protein and low fat content. It provides energy and some dietary fiber, mainly from the all-purpose flour. The nutritional value will be enhanced when served with toppings or as part of a balanced meal.
For more precise nutritional information, you can use online nutritional calculators and input the exact ingredient amounts you used in the recipe. Keep in mind that homemade bread generally contains fewer additives and preservatives compared to commercially produced bread, making it a wholesome and delicious choice.
Preparation Time
- Prep Time: 3 hours 30 minutes (This includes yeast activation, dough kneading, and two rising periods)
- Cook Time: 40 minutes
Please note that the prep time is largely dominated by the rising periods, which are mostly hands-off time. Active hands-on time for this recipe is relatively short, making it a manageable baking project even for busy schedules. The majority of the time is spent allowing the yeast to work its magic and develop the flavor and texture of the bread.
How to Serve
Rustic French Bread is incredibly versatile and can be enjoyed in countless ways. Its robust flavor and satisfying texture make it the perfect accompaniment to a wide variety of meals and snacks. Here are some delicious serving suggestions:
- With Soup or Stew: The classic pairing! Rustic French bread is ideal for dipping into hearty soups, stews, and chowders. Its sturdy texture holds up well to soaking, and its flavor complements both rich and light broths. Try it with:
- French Onion Soup
- Tomato Soup
- Beef Stew
- Chicken Noodle Soup
- Minestrone Soup
- Alongside Salad: Elevate your salad course by serving slices of warm Rustic French bread on the side. The bread provides a satisfying contrast to the fresh, crispness of the salad and is perfect for soaking up any delicious vinaigrette. Pair it with:
- Classic Caesar Salad
- Caprese Salad
- Niçoise Salad
- Garden Salad with Balsamic Vinaigrette
- With Cheese and Charcuterie: Create a simple yet elegant appetizer or light meal by serving Rustic French bread with a selection of cheeses and charcuterie. The bread provides a neutral base that allows the flavors of the cheeses and meats to shine. Consider serving it with:
- Brie, Camembert, or Goat Cheese
- Cheddar, Gruyère, or Parmesan
- Prosciutto, Salami, or Chorizo
- Olives, Cornichons, and Fruit
- Bruschetta or Crostini: Toast slices of Rustic French bread and top them with your favorite bruschetta or crostini toppings for a flavorful appetizer or snack. The sturdy bread becomes wonderfully crisp when toasted. Try toppings like:
- Diced tomatoes, basil, and garlic
- Roasted red peppers and goat cheese
- Mushroom duxelles
- Olive tapenade
- Simply with Butter or Olive Oil: Sometimes, the simplest is best! Freshly baked Rustic French bread is delicious on its own, simply sliced and served with good quality butter or extra virgin olive oil for dipping. A sprinkle of sea salt on top of the butter or oil enhances the flavor even further.
- Sandwiches and Paninis: While not as soft as sandwich bread, Rustic French bread can be used for heartier sandwiches, especially toasted or grilled. Its robust texture holds up well to fillings. Consider using it for:
- Grilled cheese sandwiches
- Paninis with roasted vegetables and mozzarella
- Open-faced sandwiches with pâté or smoked salmon
- French Toast or Bread Pudding: If you have leftover Rustic French bread that’s slightly stale, don’t discard it! It’s perfect for making French toast or bread pudding. Its slightly denser texture soaks up the custard beautifully.
No matter how you choose to serve it, Rustic French bread is a delicious and versatile addition to any meal. Its homemade quality and rustic charm will surely impress and delight.
Additional Tips for Perfect Rustic French Bread
Baking bread is a craft that improves with practice, and these tips will help you achieve consistently delicious Rustic French Bread every time:
- Use a Kitchen Scale for Accuracy: While cup measurements are provided, using a kitchen scale to measure your ingredients, especially flour, will significantly improve your baking results. Flour density can vary, and weighing ensures you are using the precise amount needed for the recipe, leading to more consistent dough and bread texture. 3 ¼ cups of all-purpose flour is approximately 400 grams.
- Control Dough Temperature: Dough temperature is crucial for proper fermentation. After kneading, the ideal dough temperature for this recipe is around 75-78 degrees Fahrenheit (24-26 degrees Celsius). If your kitchen is very cold, the dough may take longer to rise. You can warm your bowl slightly before placing the dough in it, or place the bowl in a slightly warmer spot (like a turned-off oven with the light on). Conversely, if your kitchen is very warm, the dough may rise too quickly. Keep an eye on the dough and adjust rising times accordingly.
- Don’t Over-Knead: Over-kneading can lead to tough bread. Knead the dough until it just comes together and is smooth but still slightly sticky. The long rise times will further develop the gluten structure, so excessive kneading is not necessary. If using a stand mixer, be mindful of the kneading time; 5-7 minutes is usually sufficient.
- Proper Proofing is Key: Ensure your yeast is fresh and active by proofing it as described in the instructions. If your yeast doesn’t bubble after 5-10 minutes in warm water with sugar, it’s likely inactive and should be replaced. Inactive yeast will result in bread that doesn’t rise properly.
- Experiment with Flour: While all-purpose flour works beautifully, you can experiment with incorporating a portion of bread flour (up to 1 cup) for a chewier texture. You can also try adding a small amount of whole wheat flour (around ½ cup) for a nuttier flavor and slightly denser crumb. Just be aware that different flours absorb water differently, so you may need to adjust the water content slightly if you make substitutions.
By keeping these tips in mind and practicing your technique, you’ll become a master of Rustic French Bread baking in no time, consistently producing loaves with a perfect crust and a delightful, airy interior.
FAQ Section: Ingredients
Q1: Can I use instant yeast instead of active dry yeast?
A: Yes, you can substitute instant yeast for active dry yeast in this recipe. The conversion is generally 1:1. However, with instant yeast, you don’t need to proof it in warm water first. You can add the instant yeast directly to the dry ingredients along with the flour and salt. Then, add the warm water and sugar and proceed with the recipe as instructed. Keep in mind that instant yeast may rise slightly faster than active dry yeast, so you might need to shorten the rising times slightly, especially in warmer environments.
Q2: Can I use cold water instead of warm water?
A: While you can technically make bread with cold water, using warm water (105-115 degrees Fahrenheit) is highly recommended, especially when using active dry yeast. Warm water creates an optimal environment for the yeast to activate quickly and efficiently. Cold water will slow down the yeast activity significantly, leading to a much longer rise time and potentially a less flavorful bread. If you are using instant yeast and are in a very warm environment, you might be able to use lukewarm water, but for best results and consistent outcomes, stick to warm water as specified in the recipe, particularly for active dry yeast.
Q3: Can I use bread flour instead of all-purpose flour?
A: Yes, you can substitute bread flour for all-purpose flour, or use a combination of both. Bread flour has a higher protein content than all-purpose flour, which leads to more gluten development. Using bread flour will result in a chewier bread with a slightly more structured crumb. For a 100% bread flour loaf, you may find it slightly denser than a loaf made with all-purpose flour. Many bakers like to use a blend of all-purpose and bread flour (e.g., half and half) to achieve a balance between chewiness and tenderness. Experiment to find your preferred texture.
Q4: Can I reduce the amount of salt in the recipe?
A: While you can technically reduce the salt slightly, it’s generally not recommended to significantly decrease the amount of salt in bread recipes. Salt plays a crucial role in controlling yeast activity, strengthening gluten, and enhancing flavor. Reducing salt too much can lead to a bread that rises too quickly, has a less developed flavor, and may be overly soft or even gummy. If you are concerned about sodium intake, you can use a lower-sodium salt option, but maintaining the recommended amount of salt in the recipe is generally important for the overall quality and success of the bread.
Q5: Can I use honey or maple syrup instead of sugar?
A: Yes, you can substitute honey or maple syrup for granulated sugar in this recipe. Honey and maple syrup will add a subtle sweetness and a slightly different flavor profile to the bread. Use the same amount (1 teaspoon) of honey or maple syrup as you would sugar. When using liquid sweeteners like honey or maple syrup, you may need to slightly reduce the amount of water in the recipe by a tablespoon or two to compensate for the added liquid. Also, keep in mind that honey and maple syrup can sometimes contribute to a slightly denser crumb compared to granulated sugar.
Print
Rustic French Bread Recipe
Ingredients
- 3 ¼ cups all-purpose flour: The foundation of our rustic loaf, all-purpose flour provides the structure and chewiness we crave in French bread. It’s readily available in most pantries and strikes a good balance between protein content for gluten development and starch for a tender crumb. While all-purpose flour is the star here, understanding its role and potential variations is key. For this recipe, unbleached all-purpose flour is recommended. Bleached flour, while perfectly fine for many baking tasks, can sometimes result in a slightly less flavorful loaf and may impact gluten development due to the bleaching process. If you’re feeling adventurous, you can experiment with a portion of bread flour (around 1 cup) in place of some all-purpose. Bread flour has a higher protein content, which can lead to an even chewier texture and a slightly more pronounced gluten structure. However, for a classic rustic French bread, all-purpose flour delivers wonderfully. It’s important to measure your flour accurately. The best way to do this is using the “spoon and level” method. Instead of scooping flour directly from the bag, which can compact it, lightly spoon the flour into your measuring cup and then level off the excess with the back of a knife or a straight edge. This ensures you’re using the correct amount and not inadvertently adding too much flour, which can result in a dry and dense loaf.
- 1 teaspoon sugar: A seemingly small addition, sugar plays a crucial role beyond just sweetness in this recipe. Primarily, the sugar acts as food for the yeast, encouraging its activity and accelerating the fermentation process. This initial boost helps the yeast to become more vigorous, leading to a better rise and a more flavorful bread. While you might not taste the sugar directly in the final loaf, it contributes to a subtle sweetness that balances the savory notes and enhances the overall flavor profile. You can use granulated sugar, caster sugar, or even honey or maple syrup in a pinch, though granulated sugar is the most traditional and readily available choice. Just ensure you’re using the correct measurement, as too much sugar can actually inhibit yeast activity, while too little might slow down the initial rise.
- 1 teaspoon salt: Salt is an indispensable ingredient in bread making, playing a multifaceted role that goes far beyond just seasoning. Firstly, salt controls the yeast activity. While sugar encourages yeast to grow, salt regulates its fermentation, preventing it from becoming too rapid and producing off-flavors. It helps to slow down the yeast just enough to allow for a more controlled and flavorful fermentation. Secondly, salt strengthens the gluten structure. Gluten is the protein network that develops when flour is mixed with water, giving bread its elasticity and chewiness. Salt tightens and strengthens these gluten strands, leading to a dough that is easier to handle and a bread with better texture and rise. Finally, and perhaps most obviously, salt is crucial for flavor. Without salt, bread would taste bland and flat. Salt enhances the other flavors in the dough, bringing out the nutty notes of the flour and the subtle sweetness from the sugar. Use regular table salt or fine sea salt for this recipe. Avoid using coarse sea salt directly in the dough as it may not dissolve evenly. If using kosher salt, which is coarser, you may need to use slightly more to achieve the same level of saltiness.
- 1 ½ teaspoon active dry yeast: The heart and soul of our rustic bread, active dry yeast is the leavening agent that makes the dough rise and gives the bread its airy texture. Active dry yeast is a dehydrated form of yeast that needs to be rehydrated and activated before being added to the dough. This is why the first step of the recipe involves combining it with warm water and sugar. This process, often referred to as “proofing” the yeast, ensures that the yeast is alive and active and ready to do its job. It’s crucial to use fresh active dry yeast for the best results. Yeast has a shelf life, and older yeast may be less active or even completely inactive, leading to a bread that doesn’t rise properly. Always check the expiration date on your yeast package. To proof your yeast, use warm water that is between 105-115 degrees Fahrenheit (40–46 degrees Celsius). Water that is too cold will not activate the yeast, while water that is too hot can kill it. The sugar in the warm water provides food for the yeast, encouraging it to become active and bubbly. After about 5 minutes, you should see bubbles forming on the surface of the water, indicating that the yeast is alive and ready to use. If your yeast doesn’t bubble, it may be inactive and you should discard it and start with fresh yeast.
- 1 ¼ cups water 105 – 115 degrees: Water is essential for hydrating the flour and activating the gluten, forming the dough and allowing it to rise. The temperature of the water is particularly important when working with active dry yeast, as mentioned earlier. Warm water in the range of 105-115 degrees Fahrenheit (40–46 degrees Celsius) is ideal for activating active dry yeast. This temperature range provides a comfortable environment for the yeast to become active and start fermenting. Using water that is within this temperature range will ensure that your yeast is properly activated and your dough rises successfully. Using tap water is generally fine for bread making. However, if your tap water is heavily chlorinated, it may be beneficial to use filtered water or let tap water sit out uncovered for about 30 minutes to allow some of the chlorine to dissipate, as chlorine can inhibit yeast activity. The amount of water specified in the recipe (1 ¼ cups) is a guideline. The exact amount of water needed can vary slightly depending on factors like the humidity of your environment and the type of flour you are using. The dough should be sticky but manageable. If the dough seems too dry, you can add a tablespoon of water at a time until it reaches the desired consistency. Conversely, if the dough seems too wet, you can add a tablespoon of flour at a time, but be careful not to add too much, as this can make the bread dense.
Instructions
- Activate the Yeast: “Combine yeast, warm water and sugar in the bowl of your stand mixer. Let sit for about 5 minutes for yeast activation.” This initial step is crucial for ensuring your yeast is active and ready to leaven the dough. Use a stand mixer bowl for convenience, but you can also do this in a large mixing bowl if you prefer to knead by hand later. Measure out 1 ¼ cups of water and ensure it’s within the temperature range of 105-115 degrees Fahrenheit (40-46 degrees Celsius). Using a thermometer is the most accurate way to check the temperature. Add 1 ½ teaspoons of active dry yeast and 1 teaspoon of sugar to the warm water in the bowl. Gently stir to combine the ingredients. Now, patience is key. Let the mixture sit undisturbed for about 5 minutes. During this time, the yeast will begin to feed on the sugar and become active. You should see small bubbles forming on the surface, and the mixture may become slightly frothy. This is a sign that your yeast is alive and well. If after 5-10 minutes you don’t see any bubbling, your yeast may be inactive. It’s best to start again with fresh yeast to ensure your bread rises properly.
- Combine Wet and Dry Ingredients: “Add half of the flour and salt to the yeast mixture. Fit your mixer with dough hook and begin to knead over medium-low speed. Add remaining flour and continue to knead until dough just comes together. Dough will be sticky at this point.” Once your yeast is activated, it’s time to start building the dough. Add half of the flour (approximately 1 5/8 cups) and 1 teaspoon of salt to the yeast mixture in the bowl. If you are using a stand mixer, attach the dough hook. Start kneading on medium-low speed. Initially, the mixture will be quite wet and shaggy. Don’t worry, this is normal. As the mixer works, the gluten in the flour will start to develop. Gradually add the remaining flour, a little at a time, while the mixer continues to knead. Continue kneading until the dough just comes together into a cohesive mass. It’s important to note that this dough is meant to be sticky. Resist the urge to add too much extra flour to make it less sticky. A sticky dough is essential for a moist and airy crumb in the final bread. The dough should pull away from the sides of the bowl but will still be tacky to the touch. Knead for about 5-7 minutes in the stand mixer, or about 8-10 minutes by hand on a lightly floured surface if you are kneading manually.
- First Rise (Bulk Fermentation): “Transfer dough to a lightly floured bowl and cover with a clean towel. Let dough rise for 2 hours.” The first rise, also known as bulk fermentation, is a crucial step in developing flavor and texture. Lightly flour a large bowl to prevent the dough from sticking. Gently transfer the sticky dough to the floured bowl. Shape the dough into a loose ball. Cover the bowl tightly with a clean kitchen towel or plastic wrap. Place the bowl in a warm, draft-free place to rise for 2 hours. The ideal temperature for rising is around 75-80 degrees Fahrenheit (24-27 degrees Celsius). A slightly warm oven (turned off!) or a sunny spot in your kitchen can work well. During this 2-hour rise, the yeast will ferment the sugars in the dough, producing carbon dioxide gas. This gas creates air pockets in the dough, causing it to double in size. The bulk fermentation also develops the complex flavors of the bread.
- Second Rise (Proofing): “Transfer dough to a generously floured piece of parchment paper or cutting board and gently form dough into a smooth ball. Sprinkle top of dough with more flour, then cover with a large bowl (like a dome) and let rise for another 30 minutes.” After the first rise, gently punch down the dough to release some of the trapped air. Transfer the dough to a generously floured piece of parchment paper or a cutting board. The parchment paper will make it much easier to transfer the dough to the hot Dutch oven later. Gently shape the dough into a smooth, round ball. Be careful not to deflate the dough too much. Sprinkle the top of the dough generously with more flour. This will help to create a rustic, flour-dusted crust. Cover the dough ball with a large bowl, creating a dome to trap moisture and warmth. Let the dough rise for another 30 minutes. This second rise, often called proofing, allows the dough to relax and rise slightly further, resulting in a lighter and airier loaf.
- Preheat Oven and Dutch Oven: “Preheat oven to 425 degrees. Place dutch oven with lid into the oven to preheat for 20 minutes prior to baking bread. * If you don’t have a dutch oven, use a baking sheet but don’t preheat the sheet.” Preheat your oven to 425 degrees Fahrenheit (220 degrees Celsius). Place your Dutch oven with its lid inside the oven to preheat for at least 20 minutes. Preheating the Dutch oven is crucial for creating the steamy environment that is essential for a crispy crust and a well-risen loaf. The hot Dutch oven mimics a professional bread oven, trapping steam released from the dough as it bakes, which keeps the crust soft initially and allows for maximum oven spring (the final rise in the oven). Once the lid is removed later in the baking process, the dry heat of the oven then crisps up the crust beautifully. If you don’t have a Dutch oven, you can use a baking sheet. In this case, do not preheat the baking sheet.
- Score and Bake: “Score top of bread with a very sharp knife. Very carefully transfer dough with parchment paper (or by itself if not using parchment paper) to the hot dutch oven. Bake bread for 30 minutes with the lid on, then carefully remove lid and bake for another 10 minutes until top is nice and golden. *If using a baking sheet, bake for 35 minutes. Internal temperature of bread should be about 210 degrees.” Carefully remove the preheated Dutch oven from the oven. Be extremely cautious as it will be very hot. Using a very sharp knife or a bread lame (a specialized scoring tool), score the top of the dough. Scoring allows the bread to expand predictably in the oven and prevents it from cracking randomly. A simple slash or an “X” is sufficient. Carefully transfer the dough to the hot Dutch oven. If you used parchment paper, lift the dough by the parchment paper and gently lower it into the Dutch oven. If you didn’t use parchment, you’ll need to carefully transfer the dough by hand. Be very careful not to burn yourself. Cover the Dutch oven with the lid and bake for 30 minutes. Baking with the lid on traps steam and creates a humid environment, contributing to a crispy crust and a soft interior. After 30 minutes, carefully remove the lid. Continue baking for another 10-15 minutes, or until the crust is nicely golden brown and the internal temperature of the bread reaches about 210 degrees Fahrenheit (99 degrees Celsius). Using a baking sheet instead of a Dutch oven? Bake for a total of about 35 minutes, without preheating the baking sheet and without covering the bread. Check for doneness by inserting an instant-read thermometer into the center of the loaf.
- Cool and Serve: “Remove bread from oven and carefully transfer to a cooling rack. Once cooled, slice and serve! Store bread in a storage bag or container on the counter for up to 3-5 days.” Once the bread is baked, carefully remove the Dutch oven from the oven. Using oven mitts, lift the bread out of the Dutch oven and transfer it to a wire cooling rack. Allow the bread to cool completely on the cooling rack before slicing. This is crucial, as slicing hot bread can result in a gummy texture. Cooling allows the internal structure to set. Once cooled, slice and serve your delicious Rustic French Bread! Store any leftover bread in an airtight storage bag or container at room temperature for up to 3-5 days. To refresh slightly stale bread, you can lightly toast it or briefly reheat it in a low oven.
Nutrition
- Serving Size: One Normal Portion
- Calories: 180-220
- Fat: 1-2 grams
- Carbohydrates: 35-45 grams
- Protein: 5-7 grams


