


Of all the traditions our family has for Halloween, from carving pumpkins with goofy faces to our annual scary movie marathon, creating a mountain of Spooky-Cute Pretzel Spider Webs has become the most anticipated. The first time I made these, I was looking for a last-minute, no-bake treat for my daughter’s school Halloween party. I needed something simple, fast, and, most importantly, something that would survive the trip in a backpack. What started as a frantic kitchen experiment has since blossomed into our favorite spooky season activity. The memory of my kids, their little fingers sticky with chocolate, carefully placing candy spiders onto the webs, is etched into my mind. Their squeals of delight when they saw the finished product – a platter of glistening, eerie, and yet undeniably adorable spider webs – was the ultimate reward. These treats are more than just a recipe; they are a vessel for creating memories. They are the perfect blend of salty and sweet, crunchy and smooth. They look incredibly impressive arranged on a platter, yet they are deceptively simple to create. Every year, they are the first thing to disappear from the Halloween party table, with both kids and adults snagging them by the handful. If you’re looking for that one perfect, crowd-pleasing, and fun-to-make Halloween treat, look no further. This is it.
Spooky-Cute Pretzel Spider Webs: The Ultimate No-Bake Halloween Treat
This recipe will guide you through creating approximately 24-30 individual pretzel spider webs. The final yield can vary depending on the size you make your webs and how generously you apply the chocolate.
Ingredients:
- Pretzel Sticks: 1 bag (10-12 ounces) of standard thin pretzel sticks. You will need about 8 pretzels per web, so ensure you have at least 200 sticks to account for broken ones.
- White Chocolate Melting Wafers: 2 bags (12 ounces each) of high-quality white chocolate or vanilla-flavored melting wafers (like Ghirardelli or Wilton Candy Melts). Using melting wafers is highly recommended as they contain stabilizers that help them melt smoothly and set firmly without tempering.
- Black or Dark Chocolate Melting Wafers: 1/4 cup for creating the spider bodies. Alternatively, you can use black decorating icing or black candy melts.
- Assorted Halloween Sprinkles: 1/2 cup. A mix of black, orange, purple, and green nonpareils, jimmies, or sanding sugar adds a festive and spooky touch.
- Candy Eyeballs: 1 small container. You will need two tiny candy eyeballs for each spider you plan to make.
- Vegetable Shortening or Coconut Oil (Optional): 1-2 teaspoons. This can be added to the white chocolate if it seems too thick after melting, helping it achieve a smoother, more fluid consistency for piping.
Step-by-Step Instructions for Creating Your Webs
Follow these detailed instructions carefully to ensure your pretzel spider webs are both structurally sound and perfectly spooky. The process can be broken down into four main stages: preparation, assembly, decoration, and setting.
Stage 1: Prepare Your Workspace (Mise en Place)
- Clear a Large Area: You will need ample counter space or a large table to work on. These treats can get a bit messy, especially if you have little helpers.
- Line Baking Sheets: Line two to three large baking sheets with parchment paper or wax paper. This is a non-negotiable step! The paper prevents the chocolate from sticking, allowing you to easily lift the finished webs once they have hardened. Do not try to make these directly on the baking sheet, as they will stick permanently.
- Organize Your Ingredients: Open your bag of pretzels and sort through them, setting aside any broken pieces. Pour your sprinkles into a small, shallow bowl for easy access. Open the container of candy eyeballs. Have everything laid out and ready to go before you even think about melting the chocolate. Chocolate waits for no one!
Stage 2: Assemble the Pretzel Web Skeletons
- Arrange the Spokes: On your prepared baking sheets, begin arranging the pretzel sticks into a star or asterisk shape. For each web, you will need 8 pretzel sticks.
- Create the Asterisk: Lay one pretzel stick down. Place a second stick directly across the first to form a plus sign (+). Then, add two more sticks diagonally to create an “X” shape over the plus sign. You should now have what looks like a star with eight points, all crossing in the center.
- Space Them Out: Ensure you leave at least 2-3 inches of space between each pretzel arrangement on the baking sheet. This will prevent the chocolate from different webs from running together and merging into one giant, unmanageable web. Create as many of these pretzel “skeletons” as you can fit on your baking sheets.
Stage 3: Melt the Chocolate and Weave the Webs
- Melting the White Chocolate: The key to a smooth, beautiful web is perfectly melted chocolate. You have two primary methods:
- Microwave Method (Recommended for Beginners): Place the white chocolate melting wafers into a microwave-safe bowl. Microwave on 50% power for 30-second intervals. After each interval, remove the bowl and stir thoroughly, even if the wafers don’t look melted yet. The residual heat will continue the melting process. Continue this process until the chocolate is almost completely melted, with just a few small lumps remaining. Stir until the last lumps melt away, resulting in a smooth, fluid consistency. Be very careful not to overheat the chocolate, as it can “seize” and become a thick, unusable clump. If your chocolate seems too thick, stir in 1/2 teaspoon of vegetable shortening or coconut oil at a time until it reaches a good piping consistency.
- Double Boiler Method: If you don’t have a microwave or prefer a more controlled melt, use a double boiler. Fill the bottom pot with an inch or two of water and bring it to a simmer. Place the top pot (or a heat-safe bowl) over it, ensuring the bottom of the bowl does not touch the water. Add the white chocolate wafers to the top bowl and stir continuously until they are completely melted and smooth. This method provides gentle, even heat, reducing the risk of scorching.
- Transfer to a Piping Bag: Once the white chocolate is perfectly melted, carefully spoon it into a piping bag fitted with a small, round tip. If you don’t have a piping bag, a heavy-duty zip-top plastic bag works just as well. Simply spoon the chocolate into the bag, push it down to one corner, and snip a very tiny piece off the corner to create a small hole for piping.
- Pipe the Webs: Working quickly while the chocolate is warm and fluid, start piping the web design. Begin at the center of your pretzel asterisk, squeezing out a generous dollop of chocolate to anchor all the pretzel sticks together. This central anchor is crucial for the structural integrity of your web.
- Create the Spirals: From the central dollop, slowly pipe a continuous spiral outwards, looping the chocolate around each pretzel “spoke” as you go. Alternatively, you can pipe concentric circles, starting from the inside and working your way out, connecting each pretzel stick with a draped line of chocolate, just like a real spider web. Don’t worry about perfection; natural-looking, slightly uneven webs often look the spookiest!
Stage 4: Decorate and Chill
- Add Sprinkles Immediately: Before the white chocolate has a chance to set, immediately sprinkle your Halloween-themed sprinkles over the wet webs. The chocolate acts as the glue. If you wait too long, the sprinkles won’t stick. This is a great step for kids to help with!
- Create the Spiders: Now it’s time to make the cute little spiders.
- Melt your 1/4 cup of black or dark chocolate wafers using the same method you used for the white chocolate.
- Using a toothpick or a very small piping bag, place a small dot of the melted black chocolate onto the web where you want your spider to be. This will be the spider’s body.
- While the black chocolate dot is still wet, gently press two candy eyeballs into it.
- Let the spider bodies set for a minute before drawing the legs, or they might smudge. You can also skip this step and use pre-made spider-shaped sprinkles or candies.
- Chill to Set: Place the baking sheets in the refrigerator for at least 15-20 minutes, or in the freezer for 5-10 minutes. The goal is to get the chocolate completely hard. You’ll know they’re ready when they are firm to the touch and easily lift off the parchment paper without bending or breaking.
- Handle with Care: Once fully set, carefully peel the pretzel spider webs from the parchment paper. They are now ready to be served, stored, or packaged.
Nutrition Facts
- Servings: Approximately 24-30 webs
- Calories per serving (1 web): Approximately 120-150 kcal
Disclaimer: The nutritional information provided is an estimate and can vary significantly based on the specific brands of ingredients used, the exact size of the webs, and the amount of chocolate and sprinkles applied. This information is for guidance purposes only.
Preparation Time
- Prep Time: 15 minutes (for setting up the workspace and arranging the pretzels)
- Active Cook Time: 25-30 minutes (for melting chocolate and decorating)
- Chill Time: 20 minutes
- Total Time: Approximately 1 hour
How to Serve Your Spooky-Cute Pretzel Spider Webs
These treats are incredibly versatile. Don’t just pile them on a plate—get creative with your presentation to maximize the Halloween fun!
- The Classic Halloween Party Platter: Arrange the pretzel spider webs on a large black or orange platter. Intersperse them with other spooky-themed treats like gummy worms, candy corn, chocolate eyeballs, and “monster mouth” apple slices. The webs will serve as the stunning centerpiece of your dessert table.
- Eerie Cupcake or Brownie Toppers: Bake a batch of your favorite chocolate cupcakes with orange frosting or rich, dark brownies. Gently press one pretzel spider web into the top of each one for an instant, show-stopping decoration. It adds a delightful crunch and a professional-looking touch.
- Individual Party Favors or Classroom Treats: Carefully place one or two webs into a clear cellophane bag. Tie it off with a festive black and orange ribbon. This makes for a perfect, pre-portioned treat for school parties, trick-or-treaters, or as a take-home favor from your Halloween bash.
- Haunted House Construction Material: If you’re building a “haunted” gingerbread house, these pretzel webs are the perfect architectural detail. Use a dab of icing to “glue” them to the corners of the house, on the roof, or covering the windows for an authentic, dilapidated look.
- Spooky Hot Chocolate Garnish: Serve a rich, dark hot chocolate in a mug and carefully perch a single spider web on the rim. It will slowly melt into the drink, adding a delicious white chocolate and pretzel flavor. It’s a treat and a drink all in one!
Additional Tips for Perfect Pretzel Webs Every Time
- Chocolate Choice is Crucial: For the easiest and most reliable results, stick with candy melts or high-quality melting wafers. Real white chocolate (which contains cocoa butter) is delicious but can be finicky. It often requires a process called “tempering” to set up hard and shiny. If you skip tempering, real chocolate can be soft, dull, or streaky when it hardens. Melting wafers are designed to bypass this, making them perfect for this type of no-bake project.
- Master the Melting Process: The number one mistake people make is overheating the chocolate. This causes it to “seize,” turning it into a stiff, grainy, un-pipeable mess. Always use low power (50%) on your microwave and stir between short intervals. Water is chocolate’s other enemy. Ensure your bowl, spatula, and all utensils are bone dry before they touch the chocolate, as even a single drop of water can cause it to seize.
- Get Creative with Colors and Flavors: Don’t feel limited to white chocolate! Use orange, green, or purple candy melts to create vibrant, colorful webs. You can also add a drop of oil-based food coloring to white chocolate (water-based coloring will cause it to seize). For a flavor twist, try using peanut butter or dark chocolate melting wafers as your base.
- The “Pre-Glue” Trick for Stability: If you find your pretzel sticks are shifting around too much as you try to pipe the webs, use this simple trick. Before you even start piping the spirals, place your 8-pretzel asterisk on the parchment paper. Take your piping bag and squeeze a single, small dot of melted chocolate right in the center where all the pretzels cross. Let this dot set for a minute. This will act as “glue,” holding the spokes firmly in place while you pipe the rest of the web design over it.
- Smart Storage for Lasting Crunch: To make these ahead of time, proper storage is key. Once fully set, store the pretzel webs in a single layer in a wide, airtight container. If you need to stack them, place a sheet of parchment paper between each layer to prevent them from sticking together or breaking. Store them in a cool, dry place at room temperature (like a pantry) for up to one week. Avoid storing them in the refrigerator long-term, as condensation can make the pretzels go soft.
Frequently Asked Questions (FAQ)
1. Q: Why did my melted chocolate get thick, grainy, and impossible to pipe?
A: This is a classic case of “seized” chocolate. It happens for two main reasons: overheating or contact with water. If you microwave the chocolate for too long or on too high a power setting, it burns and seizes. If even a tiny drop of water gets into your melting chocolate, it will cause it to bind up instantly. To prevent this, always melt chocolate slowly and gently, and ensure all your equipment is completely dry.
2. Q: Can I use milk chocolate or dark chocolate instead of white chocolate?
A: Absolutely! This recipe works wonderfully with any type of melting wafer. Dark chocolate webs create a more sinister, dramatic look, especially against the salty pretzel sticks. Milk chocolate will give you a classic, creamy flavor that is always a hit with kids. The process remains exactly the same, just swap the white chocolate wafers for your preferred type.
3. Q: How far in advance can I make these for a party?
A: These are a fantastic make-ahead treat! You can make them up to a week in advance. The key is proper storage. As mentioned in the tips, store them in an airtight container at room temperature, with parchment paper between the layers. This will keep the pretzels crunchy and the chocolate in perfect condition. Do not freeze them, as they can become soggy upon thawing.
4. Q: My pretzel webs are very fragile and break when I try to lift them. What am I doing wrong?
A: This problem usually stems from two issues. First, you may not have used enough chocolate. The web needs a sufficient amount of chocolate “thread” and a solid central anchor to hold the pretzel sticks together securely. Be generous with your piping! Second, they might not be fully chilled and hardened. If the chocolate is even slightly soft, the web will be pliable and break easily. Be patient and give them the full 15-20 minutes in the refrigerator until they are completely rigid.
5. Q: Is there a way to make this recipe gluten-free?
A: Yes, it’s very easy to adapt this recipe to be gluten-free! Simply substitute the regular pretzel sticks with your favorite brand of gluten-free pretzel sticks. Most major grocery stores now carry excellent gluten-free options. The rest of the ingredients—chocolate melting wafers, sprinkles, and candy eyeballs—are typically gluten-free, but it is always essential to double-check the packaging and labels to ensure they were not processed in a facility with wheat and are certified gluten-free, especially if you are serving someone with Celiac disease.
Print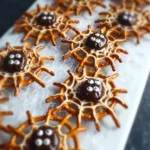
Spooky-Cute Pretzel Spider Webs Recipe
Ingredients
- Pretzel Sticks: 1 bag (10-12 ounces) of standard thin pretzel sticks. You will need about 8 pretzels per web, so ensure you have at least 200 sticks to account for broken ones.
- White Chocolate Melting Wafers: 2 bags (12 ounces each) of high-quality white chocolate or vanilla-flavored melting wafers (like Ghirardelli or Wilton Candy Melts). Using melting wafers is highly recommended as they contain stabilizers that help them melt smoothly and set firmly without tempering.
- Black or Dark Chocolate Melting Wafers: 1/4 cup for creating the spider bodies. Alternatively, you can use black decorating icing or black candy melts.
- Assorted Halloween Sprinkles: 1/2 cup. A mix of black, orange, purple, and green nonpareils, jimmies, or sanding sugar adds a festive and spooky touch.
- Candy Eyeballs: 1 small container. You will need two tiny candy eyeballs for each spider you plan to make.
- Vegetable Shortening or Coconut Oil (Optional): 1-2 teaspoons. This can be added to the white chocolate if it seems too thick after melting, helping it achieve a smoother, more fluid consistency for piping.
Instructions
Stage 1: Prepare Your Workspace (Mise en Place)
- Clear a Large Area: You will need ample counter space or a large table to work on. These treats can get a bit messy, especially if you have little helpers.
- Line Baking Sheets: Line two to three large baking sheets with parchment paper or wax paper. This is a non-negotiable step! The paper prevents the chocolate from sticking, allowing you to easily lift the finished webs once they have hardened. Do not try to make these directly on the baking sheet, as they will stick permanently.
- Organize Your Ingredients: Open your bag of pretzels and sort through them, setting aside any broken pieces. Pour your sprinkles into a small, shallow bowl for easy access. Open the container of candy eyeballs. Have everything laid out and ready to go before you even think about melting the chocolate. Chocolate waits for no one!
Stage 2: Assemble the Pretzel Web Skeletons
- Arrange the Spokes: On your prepared baking sheets, begin arranging the pretzel sticks into a star or asterisk shape. For each web, you will need 8 pretzel sticks.
- Create the Asterisk: Lay one pretzel stick down. Place a second stick directly across the first to form a plus sign (+). Then, add two more sticks diagonally to create an “X” shape over the plus sign. You should now have what looks like a star with eight points, all crossing in the center.
- Space Them Out: Ensure you leave at least 2-3 inches of space between each pretzel arrangement on the baking sheet. This will prevent the chocolate from different webs from running together and merging into one giant, unmanageable web. Create as many of these pretzel “skeletons” as you can fit on your baking sheets.
Stage 3: Melt the Chocolate and Weave the Webs
- Melting the White Chocolate: The key to a smooth, beautiful web is perfectly melted chocolate. You have two primary methods:
- Microwave Method (Recommended for Beginners): Place the white chocolate melting wafers into a microwave-safe bowl. Microwave on 50% power for 30-second intervals. After each interval, remove the bowl and stir thoroughly, even if the wafers don’t look melted yet. The residual heat will continue the melting process. Continue this process until the chocolate is almost completely melted, with just a few small lumps remaining. Stir until the last lumps melt away, resulting in a smooth, fluid consistency. Be very careful not to overheat the chocolate, as it can “seize” and become a thick, unusable clump. If your chocolate seems too thick, stir in 1/2 teaspoon of vegetable shortening or coconut oil at a time until it reaches a good piping consistency.
- Double Boiler Method: If you don’t have a microwave or prefer a more controlled melt, use a double boiler. Fill the bottom pot with an inch or two of water and bring it to a simmer. Place the top pot (or a heat-safe bowl) over it, ensuring the bottom of the bowl does not touch the water. Add the white chocolate wafers to the top bowl and stir continuously until they are completely melted and smooth. This method provides gentle, even heat, reducing the risk of scorching.
- Transfer to a Piping Bag: Once the white chocolate is perfectly melted, carefully spoon it into a piping bag fitted with a small, round tip. If you don’t have a piping bag, a heavy-duty zip-top plastic bag works just as well. Simply spoon the chocolate into the bag, push it down to one corner, and snip a very tiny piece off the corner to create a small hole for piping.
- Pipe the Webs: Working quickly while the chocolate is warm and fluid, start piping the web design. Begin at the center of your pretzel asterisk, squeezing out a generous dollop of chocolate to anchor all the pretzel sticks together. This central anchor is crucial for the structural integrity of your web.
- Create the Spirals: From the central dollop, slowly pipe a continuous spiral outwards, looping the chocolate around each pretzel “spoke” as you go. Alternatively, you can pipe concentric circles, starting from the inside and working your way out, connecting each pretzel stick with a draped line of chocolate, just like a real spider web. Don’t worry about perfection; natural-looking, slightly uneven webs often look the spookiest!
Stage 4: Decorate and Chill
- Add Sprinkles Immediately: Before the white chocolate has a chance to set, immediately sprinkle your Halloween-themed sprinkles over the wet webs. The chocolate acts as the glue. If you wait too long, the sprinkles won’t stick. This is a great step for kids to help with!
- Create the Spiders: Now it’s time to make the cute little spiders.
- Melt your 1/4 cup of black or dark chocolate wafers using the same method you used for the white chocolate.
- Using a toothpick or a very small piping bag, place a small dot of the melted black chocolate onto the web where you want your spider to be. This will be the spider’s body.
- While the black chocolate dot is still wet, gently press two candy eyeballs into it.
- Let the spider bodies set for a minute before drawing the legs, or they might smudge. You can also skip this step and use pre-made spider-shaped sprinkles or candies.
- Chill to Set: Place the baking sheets in the refrigerator for at least 15-20 minutes, or in the freezer for 5-10 minutes. The goal is to get the chocolate completely hard. You’ll know they’re ready when they are firm to the touch and easily lift off the parchment paper without bending or breaking.
- Handle with Care: Once fully set, carefully peel the pretzel spider webs from the parchment paper. They are now ready to be served, stored, or packaged.
Nutrition
- Serving Size: One Normal Portion
- Calories: 120-150


