

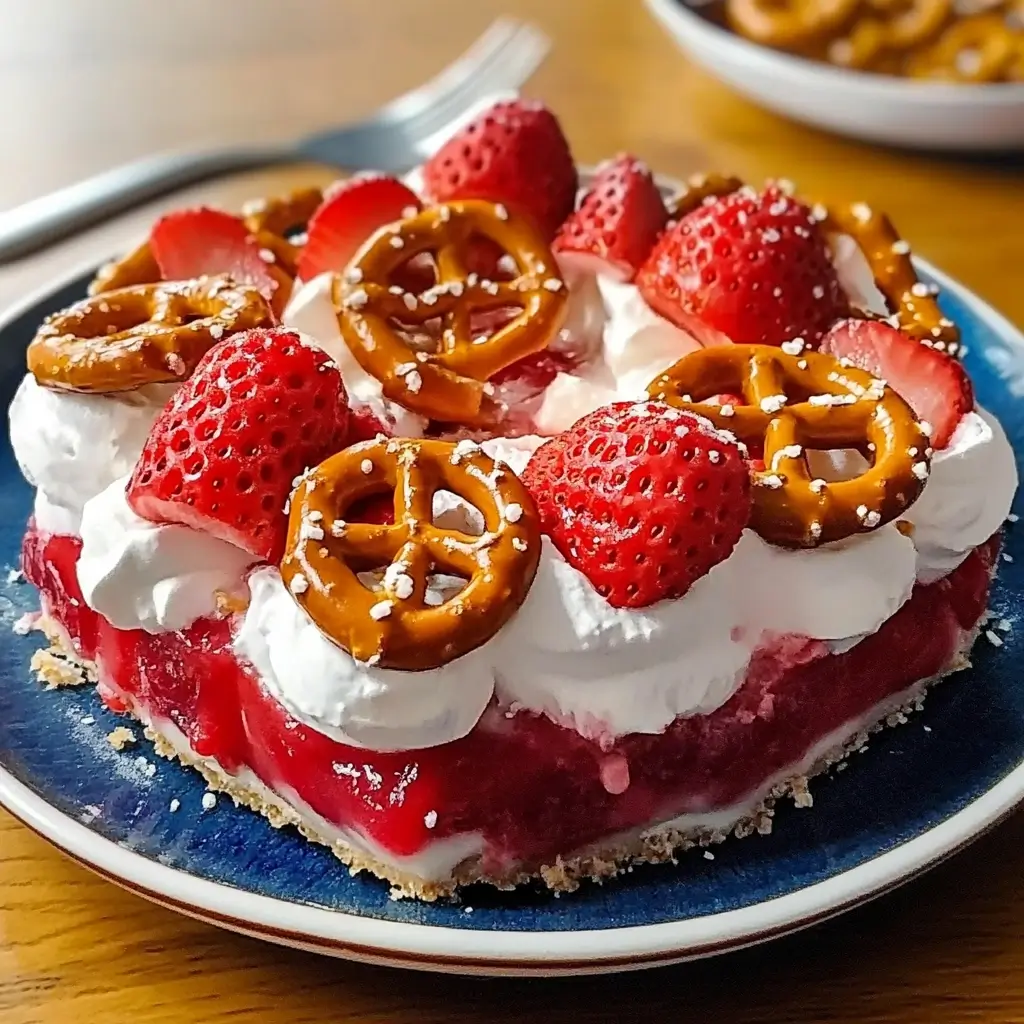

Strawberry Pretzel Salad has been a staple in my family gatherings for as long as I can remember. It’s one of those dishes that magically disappears from the dessert table, leaving behind only crumbs and satisfied smiles. From summer barbecues to holiday potlucks, this sweet and salty concoction is always a crowd-pleaser. The kids adore the crunchy pretzel crust, the adults rave about the creamy filling, and everyone agrees that the burst of fresh strawberries on top is the perfect finishing touch. It’s a recipe that manages to be both nostalgic and exciting, a comforting classic that never fails to impress. Honestly, if I bring this to any event, I know I’m guaranteed to come home with an empty dish and requests for the recipe – it’s that good. It’s more than just a dessert; it’s a conversation starter, a memory maker, and a testament to the simple joys of sweet and savory done right.
Ingredients
Creating the perfect Strawberry Pretzel Salad hinges on using quality ingredients and understanding how each component contributes to the final symphony of flavors and textures. Let’s break down each ingredient category, ensuring you have everything you need to craft this delightful dessert.
For the Pretzel Crust:
- 2 cups crushed pretzels: This is the foundation of our salad, providing that signature salty crunch that contrasts beautifully with the sweet layers above. It’s crucial to use plain, salted pretzel sticks or twists. Avoid flavored pretzels as they can clash with the overall taste profile. When crushing, aim for a texture that’s somewhere between coarse crumbs and fine powder – you want some discernible pretzel pieces for texture, but not so large that they become hard to bite. Pre-crushed pretzels from a bag can be convenient, but for optimal freshness and control over the texture, crushing them yourself right before you start is always recommended. A food processor makes quick work of this, but a ziplock bag and a rolling pin (or even the bottom of a heavy pan) work just as well.
- ¾ cup (1 ½ sticks) unsalted butter, melted: Butter is the binding agent and adds richness to the pretzel crust. Unsalted butter is preferred so you can control the overall saltiness of the crust, especially since pretzels are already salty. Ensure the butter is fully melted and slightly cooled before mixing it with the pretzels and sugar. This prevents the sugar from dissolving too much and ensures even distribution and binding of the crust. You can melt the butter in a saucepan over low heat or in the microwave in short intervals, stirring in between to prevent splattering and overheating.
- 3 tablespoons granulated sugar: A touch of sugar in the pretzel crust balances the saltiness and adds a subtle sweetness that complements the other layers. Granulated sugar is ideal as it dissolves nicely into the melted butter and provides the right level of sweetness without overpowering the pretzel flavor. Avoid using powdered sugar as it can make the crust too dry, and brown sugar can add unwanted molasses notes.
For the Cream Cheese Filling:
- 8 ounces cream cheese, softened: The creamy, tangy filling is the heart of Strawberry Pretzel Salad. Full-fat cream cheese provides the best richness and flavor, but you can use reduced-fat cream cheese if you prefer a lighter option – just be aware that it might be slightly less stable and have a slightly different texture. It is absolutely crucial that the cream cheese is properly softened to room temperature. This ensures a smooth, lump-free filling that blends seamlessly with the other ingredients. Take the cream cheese out of the refrigerator at least an hour before you plan to start, or you can speed up the process by placing the unopened package in a bowl of warm water for about 15-20 minutes.
- 1 cup granulated sugar: Sugar is essential for sweetening the cream cheese filling and balancing the tanginess. Granulated sugar dissolves easily into the softened cream cheese and provides the perfect level of sweetness for this dessert. You can adjust the amount slightly to your preference – if you prefer a less sweet dessert, you could reduce it to ¾ cup, but 1 cup is generally the standard and well-loved sweetness level.
- 1 teaspoon vanilla extract: Vanilla extract enhances the overall flavor profile of the cream cheese filling, adding a warm, aromatic note that complements both the cream cheese and the strawberries. Use pure vanilla extract for the best flavor – imitation vanilla extract can have a slightly artificial taste. If you want to elevate the vanilla flavor even further, you could use vanilla bean paste or scrape the seeds from half a vanilla bean.
- 8 ounces frozen whipped topping, thawed (such as Cool Whip): Whipped topping adds lightness and airiness to the cream cheese filling, creating a smooth and fluffy texture. Cool Whip is the classic choice and works perfectly. Make sure it’s fully thawed before you incorporate it into the cream cheese mixture, but still cold. Thawing it in the refrigerator is the best method to maintain its texture. Avoid using homemade whipped cream for this recipe, as it tends to deflate over time and may not hold up as well in the salad, especially if it sits for a while.
For the Strawberry Topping:
- 1 (16-ounce) package frozen strawberries, unsweetened: Frozen strawberries are ideal for this recipe because they release their juices as they thaw, creating a natural strawberry glaze that permeates the salad. Unsweetened frozen strawberries allow you to control the sweetness level, and their slightly tartness provides a wonderful contrast to the sweet cream cheese filling. Make sure to thaw the strawberries completely and drain off most of the excess juice before proceeding with the recipe. This prevents the topping from becoming too watery and ensures a concentrated strawberry flavor.
- 1 cup granulated sugar: Sugar sweetens the strawberries and helps to create the syrupy glaze. The amount of sugar can be adjusted slightly depending on the sweetness of your strawberries and your personal preference. If your strawberries are particularly tart, you might want to use slightly more sugar.
- 3 tablespoons cornstarch: Cornstarch acts as a thickening agent, helping to create a luscious strawberry glaze that coats the strawberries and binds them together. It prevents the topping from being too runny and ensures it sets nicely. Make sure to whisk the cornstarch thoroughly into the sugar before adding the strawberries to prevent clumps from forming.
- ½ cup water: Water is used to create the strawberry glaze base, dissolving the sugar and cornstarch and allowing the mixture to thicken properly when heated. Use cold water to ensure the cornstarch dissolves smoothly and doesn’t clump.
- 1 teaspoon lemon juice (optional, but recommended): Lemon juice brightens the strawberry flavor and adds a touch of acidity that balances the sweetness. It also helps to prevent the strawberry topping from becoming overly sweet and one-dimensional. Freshly squeezed lemon juice is preferred, but bottled lemon juice can also be used in a pinch.
By gathering these ingredients and ensuring they are prepped as described, you’re well on your way to creating a truly delightful Strawberry Pretzel Salad that will impress everyone who tries it. Remember, the quality of your ingredients directly impacts the final taste, so choose the best you can find for a truly exceptional dessert.
Instructions
Crafting Strawberry Pretzel Salad is a multi-layered process, but each step is straightforward and rewarding. Follow these detailed instructions to create this beloved dessert with ease.
Part 1: Preparing the Pretzel Crust
- Preheat Oven and Prepare Baking Dish: Begin by preheating your oven to 350°F (175°C). While the oven is heating, prepare a 9×13 inch baking dish. You can use a glass, ceramic, or metal dish. No greasing is necessary for this recipe as the butter in the crust will prevent sticking. Having your oven preheated ensures the crust bakes evenly and achieves the desired crispness.
- Combine Crust Ingredients: In a medium-sized bowl, combine the 2 cups of crushed pretzels and 3 tablespoons of granulated sugar. Mix these dry ingredients thoroughly to ensure the sugar is evenly distributed throughout the pretzel crumbs. This even distribution is key for a consistent flavor and texture in the crust.
- Add Melted Butter: Pour the ¾ cup of melted butter over the pretzel and sugar mixture. Use a spatula or spoon to stir everything together until the pretzel crumbs are evenly moistened and resemble wet sand. Ensure there are no dry pockets of pretzels and that the butter is fully incorporated. This step is crucial for binding the crust together and creating that perfect crunchy base.
- Press Crust into Baking Dish: Transfer the pretzel mixture into your prepared 9×13 inch baking dish. Use your fingers or the bottom of a measuring cup or glass to firmly and evenly press the pretzel mixture into the bottom of the dish. Press it into a uniform layer, making sure to reach the corners and edges of the dish. A firm, even crust ensures it will hold its shape and not crumble excessively when serving.
- Bake the Crust: Place the baking dish in the preheated oven and bake for 10 minutes. Baking the crust briefly sets it and gives it a golden-brown color and a more pronounced pretzel flavor. Keep a close eye on it while baking; you want it to be lightly golden but not burnt.
- Cool Completely: Once baked, remove the pretzel crust from the oven and let it cool completely. This is a crucial step. The crust needs to be completely cool before you add the cream cheese filling; otherwise, the heat could melt the filling and make it runny. Allow ample time for cooling – at least 30 minutes to an hour at room temperature, or you can speed up the process by placing it in the refrigerator for about 15-20 minutes.
Part 2: Making the Cream Cheese Filling
- Beat Cream Cheese and Sugar: In a large bowl, combine the 8 ounces of softened cream cheese and 1 cup of granulated sugar. Using an electric mixer (hand mixer or stand mixer), beat the cream cheese and sugar together until smooth, creamy, and completely combined. Beat on medium speed for about 2-3 minutes. Ensure there are no lumps of cream cheese remaining and that the mixture is light and fluffy.
- Add Vanilla Extract: Stir in 1 teaspoon of vanilla extract to the cream cheese mixture. Mix until just combined. The vanilla extract enhances the overall flavor and adds a subtle warmth to the filling.
- Fold in Whipped Topping: Gently fold in the 8 ounces of thawed whipped topping into the cream cheese mixture. Use a spatula and fold it in gradually, being careful not to deflate the whipped topping. Fold until just combined and no streaks of whipped topping remain. The goal is to create a light and airy filling. Overmixing can make the filling dense.
- Spread Filling over Crust: Once the pretzel crust is completely cooled, evenly spread the cream cheese filling over the crust. Use a spatula or knife to create a smooth and even layer. Make sure the filling covers the entire crust and reaches the edges of the dish.
- Chill the Filling: Place the baking dish with the filled crust in the refrigerator and chill for at least 2-3 hours, or preferably overnight. Chilling allows the cream cheese filling to set and firm up, making it easier to cut and serve. It also allows the flavors to meld together beautifully.
Part 3: Preparing the Strawberry Topping
- Combine Topping Ingredients in a Saucepan: In a medium saucepan, combine the 1 (16-ounce) package of thawed frozen strawberries (drained of most excess juice), 1 cup of granulated sugar, 3 tablespoons of cornstarch, ½ cup of water, and 1 teaspoon of lemon juice (if using). Stir all the ingredients together in the saucepan until the cornstarch is fully dissolved and no clumps remain.
- Cook Strawberry Topping: Place the saucepan over medium heat and bring the mixture to a simmer, stirring constantly. Continue to simmer and stir for about 5-7 minutes, or until the strawberry mixture has thickened and become glossy. The cornstarch needs to be activated by the heat to thicken the mixture. It will go from a slightly watery consistency to a thicker, glaze-like consistency. Be sure to stir constantly to prevent the cornstarch from sticking to the bottom of the pan and burning.
- Cool Strawberry Topping Slightly: Once the strawberry topping has thickened, remove the saucepan from the heat and let it cool slightly for about 10-15 minutes. Allowing it to cool slightly before pouring it over the cream cheese filling prevents the heat from melting the filling and keeps the layers distinct.
- Spoon Topping over Filling: Gently spoon the slightly cooled strawberry topping over the chilled cream cheese filling. Spread it evenly over the entire surface of the filling, making sure to reach the edges. You can use the back of a spoon or a spatula to spread it smoothly.
- Chill Again: Return the Strawberry Pretzel Salad to the refrigerator and chill for at least another 2-3 hours, or preferably overnight. This final chilling period allows the strawberry topping to set completely and for all the layers to come together and harmonize in flavor and texture.
Final Step: Serving and Enjoying
Once fully chilled, your Strawberry Pretzel Salad is ready to serve. Cut it into squares or rectangles and enjoy the delightful combination of crunchy, creamy, and fruity flavors. Keep refrigerated until serving and between servings to maintain its freshness and texture.
Following these detailed instructions will guide you through each step, ensuring a successful and delicious Strawberry Pretzel Salad every time. Enjoy the process and the wonderful dessert you’re about to create!
Nutrition Facts
(Per Serving – Estimated, Based on 12 Servings)
Please note that these are estimated values and can vary based on specific ingredients used and serving sizes.
- Serving Size: 1 slice (approximately 1/12th of a 9×13 inch dish)
- Calories: Approximately 350-400 calories
- Total Fat: 20-25g
- Saturated Fat: 12-15g
- Trans Fat: 0g
- Unsaturated Fat: Varies
- Cholesterol: 60-70mg
- Sodium: 250-300mg (primarily from pretzels)
- Total Carbohydrates: 40-45g
- Dietary Fiber: 1-2g
- Sugars: 30-35g (added and naturally occurring from strawberries)
- Protein: 3-4g
Important Considerations:
- Sugar Content: Strawberry Pretzel Salad is a dessert and is relatively high in sugar. Individuals watching their sugar intake should be mindful of portion sizes.
- Fat Content: The cream cheese and butter contribute to a higher fat content, particularly saturated fat. Using reduced-fat cream cheese and whipped topping can slightly reduce the fat content, but will also slightly alter the texture and flavor.
- Sodium Content: The pretzels contribute a significant amount of sodium. While not excessively high, it’s worth noting for individuals monitoring their sodium intake.
- Portion Control: Due to its calorie and sugar content, enjoying Strawberry Pretzel Salad in moderation and being mindful of serving sizes is recommended as part of a balanced diet.
These nutrition facts are provided as a general guideline. For more precise nutritional information, you can use online nutrition calculators and input the specific brands and quantities of ingredients you use. Enjoy this delicious treat responsibly as part of a balanced lifestyle!
Preparation Time
Strawberry Pretzel Salad requires some time for preparation and chilling, but the hands-on time is relatively minimal, making it a great make-ahead dessert. Here’s a breakdown of the estimated times:
- Active Preparation Time:
- Pretzel Crust: 15 minutes (crushing pretzels, mixing ingredients, pressing into dish)
- Cream Cheese Filling: 10 minutes (softening cream cheese, mixing filling)
- Strawberry Topping: 20 minutes (thawing strawberries, making topping on stovetop)
- Assembly: 5 minutes (spreading filling and topping)
- Total Active Time: Approximately 50 minutes
- Inactive Time (Baking and Chilling):
- Baking Crust: 10 minutes
- Cooling Crust: 30-60 minutes (room temperature or faster in refrigerator)
- Chilling Filling (First Chill): Minimum 2-3 hours (ideally longer or overnight)
- Cooling Strawberry Topping: 10-15 minutes (slightly cooling before assembly)
- Chilling Salad (Second Chill): Minimum 2-3 hours (ideally longer or overnight)
- Total Inactive Time: Minimum 6-8 hours (longer chilling recommended for best results)
- Total Time (Preparation to Serving): Approximately 7-9 hours (including active and inactive time).
Tips for Time Management:
- Make Ahead: Strawberry Pretzel Salad is an excellent make-ahead dessert. You can prepare it a day or two in advance and keep it refrigerated until ready to serve. This is perfect for parties and gatherings.
- Crust Ahead: The pretzel crust can be baked and cooled several hours or even a day ahead of time. Store it at room temperature in the baking dish, covered, until ready to assemble the rest of the salad.
- Filling Ahead: The cream cheese filling can also be made a day ahead and stored in the refrigerator. Just give it a quick stir before spreading it over the cooled crust.
- Strawberry Topping Ahead (with Caution): While the strawberry topping is best made closer to assembly to maintain the freshest strawberry flavor, you can make it a few hours ahead and keep it refrigerated. However, be aware that the color may slightly dull over time, and it might thicken further upon chilling, requiring a slight stir before spooning over the filling.
- Overnight Chilling: For the best texture and flavor, and to simplify your schedule, it is highly recommended to prepare the entire salad the day before you plan to serve it and let it chill overnight. This allows all the layers to set perfectly and the flavors to meld together beautifully.
By understanding the preparation time breakdown, you can plan accordingly and make Strawberry Pretzel Salad a stress-free and delicious addition to your menu.
How to Serve
Strawberry Pretzel Salad is versatile and can be served in various ways, making it perfect for different occasions. Here are some serving suggestions:
- Classic Presentation:
- Cut into Squares or Rectangles: The most common way to serve is to cut the salad into neat squares or rectangles directly in the baking dish. This is easy for potlucks, picnics, and casual gatherings.
- Serve Directly from Baking Dish: The 9×13 inch baking dish is perfectly presentable for serving. You can even use a pretty serving dish for an extra touch.
- Garnish (Optional): While not necessary, you can add a simple garnish just before serving. Fresh strawberry slices, a sprig of mint, or a light dusting of powdered sugar can enhance the visual appeal.
- Individual Servings:
- Dessert Cups or Parfait Glasses: For a more elegant presentation, spoon or layer the Strawberry Pretzel Salad into individual dessert cups or parfait glasses. This is great for dinner parties or more formal events.
- Small Bowls: Individual small bowls are also a nice option for serving, especially for a buffet or dessert bar.
- Mini Mason Jars: For a rustic-chic look, consider serving individual portions in mini mason jars.
- Serving Occasions:
- Potlucks and Picnics: Strawberry Pretzel Salad is a potluck and picnic superstar! It travels well and is always a crowd-pleaser. Keep it chilled in a cooler during transport, especially in warmer weather.
- Barbecues and Summer Gatherings: The refreshing flavors and chilled nature of this salad make it ideal for summer barbecues and outdoor gatherings.
- Holiday Desserts: It’s a fantastic addition to holiday dessert tables, especially for holidays like Easter, Memorial Day, 4th of July, and Thanksgiving, offering a lighter and fruitier option amidst richer desserts.
- Casual Weeknight Dessert: While it might seem a bit special, Strawberry Pretzel Salad is also easy enough to make for a delightful weeknight dessert treat.
- Birthday Parties: Kids and adults alike love it at birthday parties. It’s a festive and fun dessert option.
- Accompaniments (Optional):
- Whipped Cream: While the filling already contains whipped topping, a dollop of extra fresh whipped cream can be a lovely addition for those who want an even richer experience.
- Vanilla Ice Cream: A scoop of vanilla ice cream alongside a slice of Strawberry Pretzel Salad creates a delightful dessert duo, especially on a warm day.
- Fresh Berries: Serve with a side of mixed fresh berries like blueberries, raspberries, or more strawberries to enhance the fruity flavors.
- Mint Sprigs: A few fresh mint sprigs can add a refreshing aroma and visual appeal.
No matter how you choose to serve it, Strawberry Pretzel Salad is sure to be a hit. Its versatility and deliciousness make it a perfect dessert for almost any occasion.
Additional Tips
To ensure your Strawberry Pretzel Salad is absolutely perfect, consider these helpful tips:
- Don’t Overbake the Crust: Bake the pretzel crust just until it is lightly golden brown, about 10 minutes. Overbaking can make it too hard and dry. A slightly golden hue indicates it’s perfectly baked and will have the right texture.
- Completely Cool the Crust Before Filling: This is crucial! Make sure the pretzel crust is completely cooled before adding the cream cheese filling. If the crust is still warm, it will melt the filling, resulting in a runny and less stable salad. Patience is key for distinct layers and perfect texture.
- Soften Cream Cheese Properly: Softened cream cheese is essential for a smooth, lump-free filling. Take the cream cheese out of the refrigerator at least an hour before you plan to start, or use the warm water bath method mentioned earlier. Properly softened cream cheese blends effortlessly with sugar and whipped topping.
- Drain Strawberries Well: Thaw the frozen strawberries completely and drain off most of the excess juice before making the topping. Too much juice can make the topping watery and prevent it from thickening properly. Draining ensures a more concentrated strawberry flavor and a thicker, glaze-like topping. You can even gently pat the strawberries dry with paper towels after thawing and draining for extra assurance.
- Chill Thoroughly: Don’t rush the chilling process! Allow ample time for chilling after adding both the cream cheese filling and the strawberry topping. At least 2-3 hours of chilling after each layer, or preferably overnight chilling after the final topping, will result in the best set and most flavorful Strawberry Pretzel Salad. Chilling allows the layers to firm up, the flavors to meld, and the textures to harmonize perfectly.
By following these tips, you’ll be well on your way to creating a flawless and incredibly delicious Strawberry Pretzel Salad that will impress everyone who tries it!
FAQ
Here are some frequently asked questions about Strawberry Pretzel Salad to help you troubleshoot and perfect your recipe:
Q1: Can I use fresh strawberries instead of frozen?
A: While frozen strawberries are traditionally used for the topping to create the glaze, you can use fresh strawberries. However, you’ll need to adjust the topping recipe. If using fresh strawberries, slice them and gently toss them with a little sugar and cornstarch to create a glaze. You might need to add a touch of water if it’s not saucy enough. Keep in mind that the texture and flavor will be slightly different, and the glaze might be less pronounced compared to using frozen strawberries. Frozen strawberries release more juice, which contributes significantly to the classic glaze.
Q2: Can I make Strawberry Pretzel Salad ahead of time?
A: Absolutely! Strawberry Pretzel Salad is an excellent make-ahead dessert. In fact, it’s often better when made ahead of time as it allows the flavors to meld together and the layers to set properly. You can prepare the entire salad up to 2 days in advance and store it, covered, in the refrigerator. It’s perfect for potlucks, parties, or anytime you want to get ahead on dessert preparation.
Q3: My pretzel crust is soggy. What did I do wrong?
A: A soggy pretzel crust is usually caused by not baking it long enough or not allowing it to cool completely before adding the filling. Ensure you bake the crust for the full 10 minutes until lightly golden. Crucially, let the crust cool completely before adding the cream cheese filling. Adding the filling while the crust is still warm can trap moisture and lead to sogginess. Also, make sure you are using the correct amount of melted butter to bind the pretzels properly – too little butter can also contribute to a less stable crust.
Q4: Can I use reduced-fat cream cheese or whipped topping?
A: Yes, you can use reduced-fat cream cheese and whipped topping to lighten up the recipe slightly. Reduced-fat cream cheese will work, but the texture might be slightly less rich and creamy compared to full-fat. Reduced-fat whipped topping will also work, but it may not hold its shape quite as well as regular Cool Whip. Using full-fat versions will result in the richest flavor and most stable texture, but reduced-fat options are acceptable if you’re looking to reduce the fat content.
Q5: Can I freeze Strawberry Pretzel Salad?
A: While technically you can freeze Strawberry Pretzel Salad, it is not highly recommended. Freezing can alter the texture of the cream cheese filling and the strawberry topping, potentially making them watery or grainy upon thawing. The pretzel crust can also become slightly soggy after thawing. If you must freeze it, do so in an airtight container for no more than a month, and thaw it slowly in the refrigerator overnight. However, for the best taste and texture, it’s always best to make and enjoy Strawberry Pretzel Salad fresh or within a few days of preparation. It’s best enjoyed chilled, not frozen and thawed.

Strawberry Pretzel Salad Recipe
Ingredients
For the Pretzel Crust:
- 2 cups crushed pretzels: This is the foundation of our salad, providing that signature salty crunch that contrasts beautifully with the sweet layers above. It’s crucial to use plain, salted pretzel sticks or twists. Avoid flavored pretzels as they can clash with the overall taste profile. When crushing, aim for a texture that’s somewhere between coarse crumbs and fine powder – you want some discernible pretzel pieces for texture, but not so large that they become hard to bite. Pre-crushed pretzels from a bag can be convenient, but for optimal freshness and control over the texture, crushing them yourself right before you start is always recommended. A food processor makes quick work of this, but a ziplock bag and a rolling pin (or even the bottom of a heavy pan) work just as well.
- ¾ cup (1 ½ sticks) unsalted butter, melted: Butter is the binding agent and adds richness to the pretzel crust. Unsalted butter is preferred so you can control the overall saltiness of the crust, especially since pretzels are already salty. Ensure the butter is fully melted and slightly cooled before mixing it with the pretzels and sugar. This prevents the sugar from dissolving too much and ensures even distribution and binding of the crust. You can melt the butter in a saucepan over low heat or in the microwave in short intervals, stirring in between to prevent splattering and overheating.
- 3 tablespoons granulated sugar: A touch of sugar in the pretzel crust balances the saltiness and adds a subtle sweetness that complements the other layers. Granulated sugar is ideal as it dissolves nicely into the melted butter and provides the right level of sweetness without overpowering the pretzel flavor. Avoid using powdered sugar as it can make the crust too dry, and brown sugar can add unwanted molasses notes.
For the Cream Cheese Filling:
- 8 ounces cream cheese, softened: The creamy, tangy filling is the heart of Strawberry Pretzel Salad. Full-fat cream cheese provides the best richness and flavor, but you can use reduced-fat cream cheese if you prefer a lighter option – just be aware that it might be slightly less stable and have a slightly different texture. It is absolutely crucial that the cream cheese is properly softened to room temperature. This ensures a smooth, lump-free filling that blends seamlessly with the other ingredients. Take the cream cheese out of the refrigerator at least an hour before you plan to start, or you can speed up the process by placing the unopened package in a bowl of warm water for about 15–20 minutes.
- 1 cup granulated sugar: Sugar is essential for sweetening the cream cheese filling and balancing the tanginess. Granulated sugar dissolves easily into the softened cream cheese and provides the perfect level of sweetness for this dessert. You can adjust the amount slightly to your preference – if you prefer a less sweet dessert, you could reduce it to ¾ cup, but 1 cup is generally the standard and well-loved sweetness level.
- 1 teaspoon vanilla extract: Vanilla extract enhances the overall flavor profile of the cream cheese filling, adding a warm, aromatic note that complements both the cream cheese and the strawberries. Use pure vanilla extract for the best flavor – imitation vanilla extract can have a slightly artificial taste. If you want to elevate the vanilla flavor even further, you could use vanilla bean paste or scrape the seeds from half a vanilla bean.
- 8 ounces frozen whipped topping, thawed (such as Cool Whip): Whipped topping adds lightness and airiness to the cream cheese filling, creating a smooth and fluffy texture. Cool Whip is the classic choice and works perfectly. Make sure it’s fully thawed before you incorporate it into the cream cheese mixture, but still cold. Thawing it in the refrigerator is the best method to maintain its texture. Avoid using homemade whipped cream for this recipe, as it tends to deflate over time and may not hold up as well in the salad, especially if it sits for a while.
For the Strawberry Topping:
- 1 (16-ounce) package frozen strawberries, unsweetened: Frozen strawberries are ideal for this recipe because they release their juices as they thaw, creating a natural strawberry glaze that permeates the salad. Unsweetened frozen strawberries allow you to control the sweetness level, and their slightly tartness provides a wonderful contrast to the sweet cream cheese filling. Make sure to thaw the strawberries completely and drain off most of the excess juice before proceeding with the recipe. This prevents the topping from becoming too watery and ensures a concentrated strawberry flavor.
- 1 cup granulated sugar: Sugar sweetens the strawberries and helps to create the syrupy glaze. The amount of sugar can be adjusted slightly depending on the sweetness of your strawberries and your personal preference. If your strawberries are particularly tart, you might want to use slightly more sugar.
- 3 tablespoons cornstarch: Cornstarch acts as a thickening agent, helping to create a luscious strawberry glaze that coats the strawberries and binds them together. It prevents the topping from being too runny and ensures it sets nicely. Make sure to whisk the cornstarch thoroughly into the sugar before adding the strawberries to prevent clumps from forming.
- ½ cup water: Water is used to create the strawberry glaze base, dissolving the sugar and cornstarch and allowing the mixture to thicken properly when heated. Use cold water to ensure the cornstarch dissolves smoothly and doesn’t clump.
- 1 teaspoon lemon juice (optional, but recommended): Lemon juice brightens the strawberry flavor and adds a touch of acidity that balances the sweetness. It also helps to prevent the strawberry topping from becoming overly sweet and one-dimensional. Freshly squeezed lemon juice is preferred, but bottled lemon juice can also be used in a pinch.
Instructions
Part 1: Preparing the Pretzel Crust
- Preheat Oven and Prepare Baking Dish: Begin by preheating your oven to 350°F (175°C). While the oven is heating, prepare a 9×13 inch baking dish. You can use a glass, ceramic, or metal dish. No greasing is necessary for this recipe as the butter in the crust will prevent sticking. Having your oven preheated ensures the crust bakes evenly and achieves the desired crispness.
- Combine Crust Ingredients: In a medium-sized bowl, combine the 2 cups of crushed pretzels and 3 tablespoons of granulated sugar. Mix these dry ingredients thoroughly to ensure the sugar is evenly distributed throughout the pretzel crumbs. This even distribution is key for a consistent flavor and texture in the crust.
- Add Melted Butter: Pour the ¾ cup of melted butter over the pretzel and sugar mixture. Use a spatula or spoon to stir everything together until the pretzel crumbs are evenly moistened and resemble wet sand. Ensure there are no dry pockets of pretzels and that the butter is fully incorporated. This step is crucial for binding the crust together and creating that perfect crunchy base.
- Press Crust into Baking Dish: Transfer the pretzel mixture into your prepared 9×13 inch baking dish. Use your fingers or the bottom of a measuring cup or glass to firmly and evenly press the pretzel mixture into the bottom of the dish. Press it into a uniform layer, making sure to reach the corners and edges of the dish. A firm, even crust ensures it will hold its shape and not crumble excessively when serving.
- Bake the Crust: Place the baking dish in the preheated oven and bake for 10 minutes. Baking the crust briefly sets it and gives it a golden-brown color and a more pronounced pretzel flavor. Keep a close eye on it while baking; you want it to be lightly golden but not burnt.
- Cool Completely: Once baked, remove the pretzel crust from the oven and let it cool completely. This is a crucial step. The crust needs to be completely cool before you add the cream cheese filling; otherwise, the heat could melt the filling and make it runny. Allow ample time for cooling – at least 30 minutes to an hour at room temperature, or you can speed up the process by placing it in the refrigerator for about 15-20 minutes.
Part 2: Making the Cream Cheese Filling
- Beat Cream Cheese and Sugar: In a large bowl, combine the 8 ounces of softened cream cheese and 1 cup of granulated sugar. Using an electric mixer (hand mixer or stand mixer), beat the cream cheese and sugar together until smooth, creamy, and completely combined. Beat on medium speed for about 2-3 minutes. Ensure there are no lumps of cream cheese remaining and that the mixture is light and fluffy.
- Add Vanilla Extract: Stir in 1 teaspoon of vanilla extract to the cream cheese mixture. Mix until just combined. The vanilla extract enhances the overall flavor and adds a subtle warmth to the filling.
- Fold in Whipped Topping: Gently fold in the 8 ounces of thawed whipped topping into the cream cheese mixture. Use a spatula and fold it in gradually, being careful not to deflate the whipped topping. Fold until just combined and no streaks of whipped topping remain. The goal is to create a light and airy filling. Overmixing can make the filling dense.
- Spread Filling over Crust: Once the pretzel crust is completely cooled, evenly spread the cream cheese filling over the crust. Use a spatula or knife to create a smooth and even layer. Make sure the filling covers the entire crust and reaches the edges of the dish.
- Chill the Filling: Place the baking dish with the filled crust in the refrigerator and chill for at least 2-3 hours, or preferably overnight. Chilling allows the cream cheese filling to set and firm up, making it easier to cut and serve. It also allows the flavors to meld together beautifully.
Part 3: Preparing the Strawberry Topping
- Combine Topping Ingredients in a Saucepan: In a medium saucepan, combine the 1 (16-ounce) package of thawed frozen strawberries (drained of most excess juice), 1 cup of granulated sugar, 3 tablespoons of cornstarch, ½ cup of water, and 1 teaspoon of lemon juice (if using). Stir all the ingredients together in the saucepan until the cornstarch is fully dissolved and no clumps remain.
- Cook Strawberry Topping: Place the saucepan over medium heat and bring the mixture to a simmer, stirring constantly. Continue to simmer and stir for about 5-7 minutes, or until the strawberry mixture has thickened and become glossy. The cornstarch needs to be activated by the heat to thicken the mixture. It will go from a slightly watery consistency to a thicker, glaze-like consistency. Be sure to stir constantly to prevent the cornstarch from sticking to the bottom of the pan and burning.
- Cool Strawberry Topping Slightly: Once the strawberry topping has thickened, remove the saucepan from the heat and let it cool slightly for about 10-15 minutes. Allowing it to cool slightly before pouring it over the cream cheese filling prevents the heat from melting the filling and keeps the layers distinct.
- Spoon Topping over Filling: Gently spoon the slightly cooled strawberry topping over the chilled cream cheese filling. Spread it evenly over the entire surface of the filling, making sure to reach the edges. You can use the back of a spoon or a spatula to spread it smoothly.
- Chill Again: Return the Strawberry Pretzel Salad to the refrigerator and chill for at least another 2-3 hours, or preferably overnight. This final chilling period allows the strawberry topping to set completely and for all the layers to come together and harmonize in flavor and texture.
Final Step: Serving and Enjoying
Once fully chilled, your Strawberry Pretzel Salad is ready to serve. Cut it into squares or rectangles and enjoy the delightful combination of crunchy, creamy, and fruity flavors. Keep refrigerated until serving and between servings to maintain its freshness and texture.
Following these detailed instructions will guide you through each step, ensuring a successful and delicious Strawberry Pretzel Salad every time. Enjoy the process and the wonderful dessert you’re about to create!
Nutrition
- Serving Size: one normal portion
- Calories: 350-400
- Sugar: 30-35g
- Sodium: 250-300mg
- Fat: 20-25g
- Saturated Fat: 12-15g
- Trans Fat: 0g
- Carbohydrates: 40-45g
- Fiber: 1-2g
- Protein: 3-4g
- Cholesterol: 60-70mg


