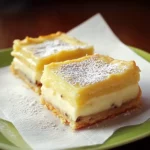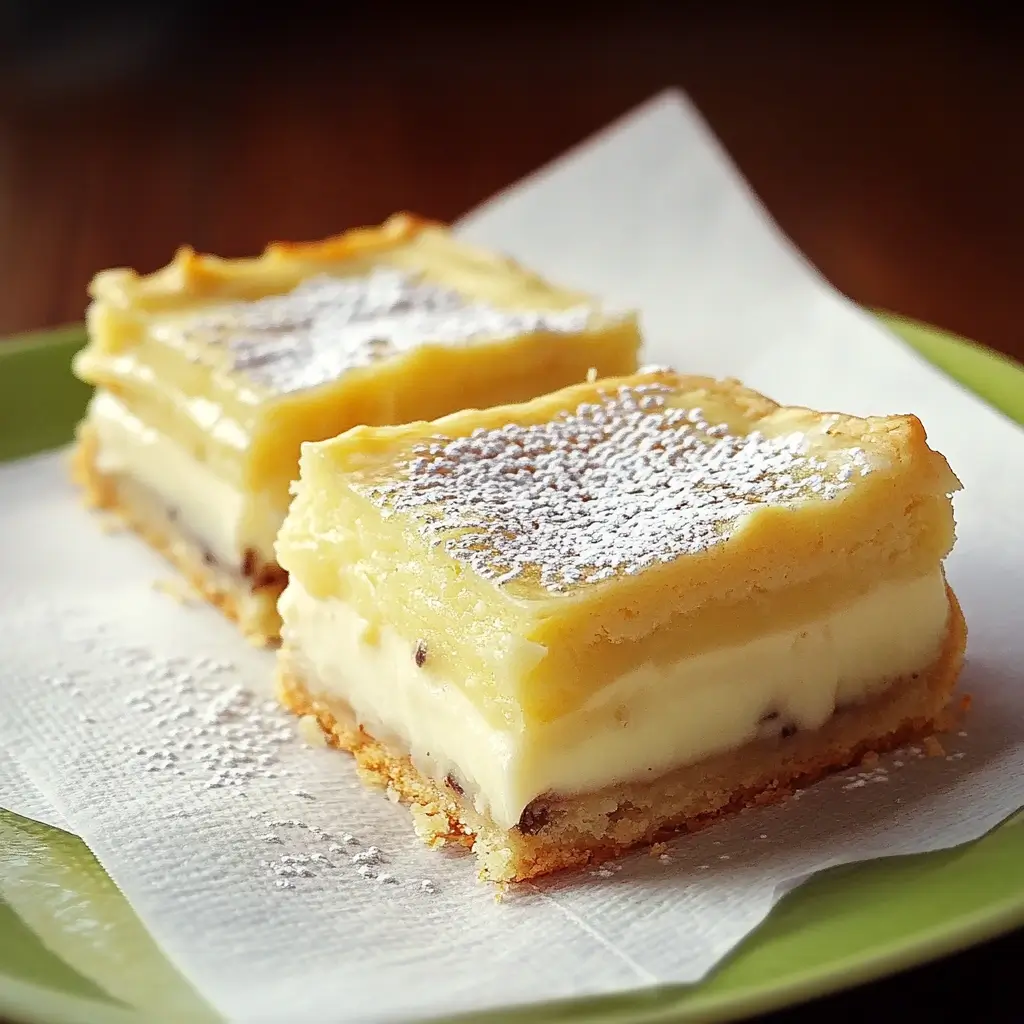
The first time I presented this Vanilla Slice to my family, a hush fell over the table – quickly followed by delighted murmurs and the clinking of forks against plates. My youngest, usually a staunch chocolate loyalist, declared it “the best cloud cake ever,” a testament to the ethereally light yet sumptuously creamy custard and the impossibly flaky pastry. It wasn’t just a dessert; it was an event. This recipe, refined over many attempts, captures that perfect balance: the crisp, shatter-in-your-mouth pastry giving way to a smooth, rich vanilla-bean flecked custard, all crowned with a simple yet elegant sweet glaze. It’s the kind of treat that evokes nostalgia for classic bakery delights, yet feels incredibly special when made at home. The beauty of this vanilla slice lies in its deceptive simplicity – with a few key techniques, you can achieve a truly professional-quality result that will have everyone asking for your secret. It has since become a requested staple for birthdays, gatherings, or simply when a craving for pure, unadulterated comfort food strikes.
Why You’ll Absolutely Adore This Vanilla Slice Recipe
Before we dive into the nitty-gritty, let’s talk about why this particular vanilla slice recipe will become your new go-to. It’s more than just a dessert; it’s an experience:
- Texture Heaven: The contrast is everything! Imagine biting through delicate, ultra-crisp layers of golden puff pastry into a cool, velvety smooth, and wobbly (but perfectly set!) vanilla custard. It’s a symphony of textures that’s utterly addictive.
- Pure Vanilla Flavour: We’re not skimping on the star ingredient. Using real vanilla bean paste or extract infuses the custard with an authentic, aromatic vanilla flavour that’s both comforting and luxurious.
- Bakery-Quality at Home: Forget those often underwhelming store-bought versions. This homemade vanilla slice rivals, and often surpasses, what you’d find in a high-end bakery. You control the quality of ingredients and the freshness.
- Surprisingly Achievable: While it looks impressive, the steps are straightforward. With clear instructions and a few pro tips (which I’ll share!), even novice bakers can achieve stunning results.
- Crowd-Pleaser Guaranteed: Whether it’s for a family gathering, a potluck, or a special afternoon tea, this vanilla slice is universally loved. Its classic appeal transcends ages and preferences.
- Customisable: While the classic is divine, you can easily tweak the icing or add subtle flavour notes to make it your own signature bake.
This isn’t just a recipe; it’s an invitation to create a little bit of magic in your kitchen. The joy of seeing the perfectly set custard, the satisfaction of cutting clean, beautiful slices, and, of course, the delight on the faces of those who taste it – it’s all part of the rewarding journey.
Ingredients: Crafting the Perfect Vanilla Slice
Achieving vanilla slice perfection hinges on using good quality ingredients. Here’s what you’ll need, with a little insight into why each component matters:
For the Puff Pastry Layers:
- Puff Pastry: 2 sheets (approx. 375g or 13.2 oz total) of good quality, all-butter puff pastry, thawed if frozen.
- Why: All-butter puff pastry offers superior flavour and a flakier, more tender texture compared to those made with other fats. The quality of your pastry is paramount for that signature crispness.
For the Vanilla Custard Filling:
- Full-Cream Milk: 750ml (3 cups)
- Why: Full-cream milk provides richness and a creamy mouthfeel essential for a luscious custard. Low-fat milk will result in a less satisfying texture.
- Caster Sugar (Superfine Sugar): 150g (¾ cup)
- Why: Caster sugar dissolves more easily than granulated sugar, leading to a smoother custard. Its fine texture is ideal for delicate baking.
- Cornflour (Cornstarch): 75g (¾ cup, sifted)
- Why: This is our primary thickening agent. Sifting prevents lumps and ensures a silky smooth custard. The quantity is crucial for a custard that sets firmly enough to slice but remains tender.
- Egg Yolks: 5 large, from free-range eggs if possible
- Why: Egg yolks contribute richness, colour, and flavour, and also aid in thickening. Free-range yolks often have a deeper colour.
- Unsalted Butter: 60g (¼ cup or ½ stick), cut into small cubes
- Why: Added off the heat, butter emulsifies into the custard, giving it a beautiful sheen, extra richness, and a smoother mouthfeel.
- Vanilla Bean Paste or Pure Vanilla Extract: 2 teaspoons of paste OR 1 tablespoon of extract (or 1 vanilla bean, split and scraped)
- Why: This is the star flavour! Vanilla bean paste offers the visual appeal of vanilla seeds and a robust flavour. High-quality pure extract is also excellent. Avoid imitation vanilla essence.
For the Simple Vanilla Icing:
- Icing Sugar (Powdered Sugar): 200g (1 ½ cups, sifted)
- Why: Sifting is non-negotiable for a smooth, lump-free icing.
- Hot Water (or Milk): 2-3 tablespoons (approximately)
- Why: Hot liquid helps the icing sugar dissolve smoothly, creating a glossy finish. You’ll adjust the amount to get the perfect pourable, yet not too runny, consistency.
- Vanilla Extract (Optional): ½ teaspoon
- Why: A little extra vanilla in the icing reinforces the overall flavour profile.
- Passionfruit Pulp (Optional, for traditional Australian style): 1-2 tablespoons, strained of excess liquid, to replace some of the water.
- Why: This adds a tangy, fruity counterpoint that is very popular in Australian vanilla slices.
Equipment You’ll Need:
- Baking tray(s) large enough for the pastry sheets
- Parchment paper
- A fork for docking the pastry
- A sharp knife or pizza cutter for trimming pastry
- A medium to large heavy-bottomed saucepan for the custard
- Whisk
- Spatula
- Sieve/Strainer
- 20cm x 30cm (8×12 inch) rectangular baking tin or slice tin. A similar size will also work.
- Plastic wrap
Having these ingredients and tools ready will make the baking process smooth and enjoyable.
Instructions: Your Step-by-Step Guide to Vanilla Slice Nirvana
Follow these detailed instructions carefully, and you’ll be rewarded with a spectacular homemade vanilla slice.
Phase 1: Perfecting the Puff Pastry Base & Top
- Preheat & Prepare: Preheat your oven to 200°C (180°C Fan / 400°F / Gas Mark 6). Line two large baking trays with parchment paper.
- Unroll Pastry: Gently unroll your thawed puff pastry sheets. If they are much larger than your intended slice tin, you can lightly score them to the tin size now, or trim after baking. It’s often easier to trim once baked and crisp.
- Dock the Pastry: Place one sheet of pastry on each prepared baking tray. Using a fork, prick the pastry all over at roughly 1cm (½ inch) intervals. This is called ‘docking’ and it prevents the pastry from puffing up too much, ensuring flat, crisp layers.
- Bake the Pastry: Place the baking trays in the preheated oven. Bake for 15-20 minutes, or until the pastry is deeply golden brown and very crisp. Keep a close eye on it, as puff pastry can brown quickly. If it starts to puff up excessively in certain spots during baking, you can gently press it down with a fish slice or another flat utensil.
- Cool and Trim (if needed): Once baked, remove the pastry from the oven and let it cool completely on the trays. If you haven’t already, carefully trim one sheet of pastry to fit snugly into the base of your 20cm x 30cm (8×12 inch) slice tin. Trim the second sheet to the exact same size – this will be your top layer. Handle with care as baked puff pastry is delicate.
- Tip: Use the trimmings as a baker’s treat – they’re delicious crumbled over ice cream or just eaten as is!
- Line the Tin: Line your slice tin with parchment paper, leaving some overhang on the longer sides to act as “handles.” This will make removing the slice much easier later. Place the trimmed pastry base layer into the lined tin.
Phase 2: Crafting the Creamiest Vanilla Custard
- Combine Dry Ingredients: In a small bowl, whisk together the caster sugar and cornflour until well combined. This helps prevent the cornflour from clumping when added to the milk.
- Prepare Egg Yolks: In another medium bowl, lightly whisk the egg yolks.
- Heat Milk: Pour the milk into a medium to large heavy-bottomed saucepan. Heat over medium heat until it’s just steaming and small bubbles are forming around the edge of the pan. Do not let it boil vigorously.
- Temper the Eggs (Crucial Step): Gradually pour about half of the hot milk into the whisked egg yolks, whisking constantly as you pour. This is called tempering – it gently warms the yolks, preventing them from scrambling when added to the hot milk in the saucepan.
- Combine and Cook: Pour the tempered egg yolk mixture back into the saucepan with the remaining milk. Whisk in the sugar and cornflour mixture.
- Thicken the Custard: Cook over medium-low heat, whisking constantly and vigorously, especially around the bottom and edges of the pan to prevent sticking and lumps. The custard will gradually thicken. This can take 5-10 minutes. Bring it to a gentle boil and continue to cook, whisking, for 1-2 minutes after it starts bubbling. It should be very thick, like a pudding.
- Consistency Check: The custard is ready when it heavily coats the back of a spoon, and if you draw a finger through it, the line holds its shape.
- Add Butter and Vanilla: Remove the saucepan from the heat. Add the cubed butter and the vanilla bean paste (or extract) to the hot custard. Whisk until the butter is completely melted and incorporated, and the custard is smooth and glossy.
- Strain (Optional but Recommended): For an ultra-smooth custard, strain it through a fine-mesh sieve into a clean bowl. This will remove any tiny lumps or bits of cooked egg that might have formed.
Phase 3: Assembling Your Masterpiece
- Pour Custard: Immediately pour the hot, strained custard over the pastry base in your prepared tin. Use a spatula to spread it evenly, ensuring it reaches all corners. Work quickly as the custard will start to set.
- Add Top Pastry Layer: Gently place the second trimmed sheet of baked puff pastry on top of the hot custard, pressing down lightly to adhere it.
- Cool Down: Let the vanilla slice cool at room temperature for about 30-60 minutes. This initial cooling prevents too much condensation from forming.
- Chill Thoroughly: Once partially cooled, cover the tin loosely with plastic wrap (try not to let it touch the pastry top too much, or wait until after icing if you prefer). Transfer to the refrigerator and chill for at least 4-6 hours, or preferably overnight. This chilling time is crucial for the custard to set completely, allowing for clean slices. Do not rush this step!
Phase 4: The Crowning Glory – Icing the Slice
- Prepare Icing: Once the slice is thoroughly chilled and set, prepare the icing. In a medium bowl, place the sifted icing sugar.
- Add Liquid: Add 2 tablespoons of hot water (or milk, or passionfruit liquid if using) and the optional ½ teaspoon of vanilla extract. Stir vigorously with a spoon or small whisk until smooth.
- Adjust Consistency: The icing should be thick but pourable. If it’s too thick, add more hot water, ½ teaspoon at a time, until you reach the desired consistency. If it’s too thin, add a little more sifted icing sugar.
- Ice the Slice: Pour the icing over the top pastry layer of the chilled vanilla slice. Quickly spread it evenly using an offset spatula or the back of a spoon, right to the edges. Work fast, as the icing will begin to set.
- Optional Feathering (for a classic bakery look): If you want to create a feathered pattern, reserve a tablespoon of the white icing and mix it with a tiny drop of melted chocolate or food colouring. Or, melt 15-20g dark chocolate. Drizzle lines of this contrasting icing (or melted chocolate) horizontally across the white icing while it’s still wet. Then, drag a skewer or toothpick vertically up and down through the lines to create a feathered effect.
- Final Chill (Briefly): Return the iced vanilla slice to the refrigerator for at least 30 minutes to allow the icing to set completely.
Phase 5: Slicing and Serving
- Remove from Tin: Once the icing is set, use the parchment paper overhangs to carefully lift the entire vanilla slice from the tin onto a cutting board.
- Slice Neatly: For the cleanest cuts, use a large, sharp knife. Dip the knife in hot water and wipe it dry between each cut. Press down firmly rather than sawing. You can cut it into squares or rectangles, depending on your preference. Typically, a 20x30cm slice yields 12 generous portions or 16 smaller ones.
- Serve and Enjoy: Serve immediately and watch the delight on everyone’s faces!
Nutrition Facts
- Servings: This recipe yields approximately 12-16 servings, depending on how you slice it.
- Calories per serving (approximate): Around 350-450 calories per serving (for 1/12th of the recipe).
Disclaimer: Nutritional information is an estimate and can vary based on specific ingredients used, brands, and portion sizes. This is provided as a general guide.
Preparation Time
- Active Preparation Time: Approximately 45-60 minutes (includes pastry prep, custard making, and assembly).
- Baking Time (Pastry): 15-20 minutes.
- Chilling Time: Minimum 4-6 hours, preferably overnight for the custard to set, plus 30 minutes after icing.
- Total Time (including chilling): At least 5.5 hours, ideally closer to 8-12 hours if chilling overnight.
While the hands-on time isn’t excessive, the chilling time is crucial, so plan accordingly! This is a great dessert to make a day ahead.
How to Serve Your Vanilla Slice
The beauty of a classic vanilla slice is its elegant simplicity, but here are a few ways to present and enjoy it:
- The Classic Way:
- Simply sliced and served as is on a dessert plate. Let the textures and flavours shine!
- Dust lightly with extra icing sugar just before serving for a touch of elegance, especially if you opted out of the top icing.
- Accompaniments:
- Fresh Berries: A handful of fresh raspberries, strawberries, or blueberries provides a lovely colour contrast and a tart counterpoint to the sweetness.
- A Dollop of Cream: Lightly whipped unsweetened cream or a quenelle of crème fraîche can add another layer of richness, though many purists prefer it unadorned.
- Fruit Coulis: A drizzle of raspberry or passionfruit coulis around the plate adds a professional touch and vibrant flavour.
- Perfect Pairings:
- Coffee: A strong espresso, a milky latte, or a simple black coffee cuts through the richness beautifully.
- Tea: A classic black tea like English Breakfast or Earl Grey is a traditional and delightful companion. Herbal teas like chamomile or peppermint can also be lovely.
- Occasions:
- Afternoon Tea: Cut into smaller, dainty squares, it’s the star of any afternoon tea spread.
- Dessert: A generous slice makes a satisfying end to any meal.
- Celebrations & Potlucks: It’s easy to transport (once fully set and chilled) and always a crowd-favourite.
- Bakery Treat at Home: Enjoy a slice with a cuppa for a moment of pure indulgence, recreating that nostalgic bakery experience.
Serving Tip for Clean Presentation:
Always use a sharp, clean knife (wiped with a hot, damp cloth between cuts) for the neatest slices. If serving at an event, slice just before guests arrive or when ready to serve to maintain freshness and prevent the pastry from softening too much.
Additional Tips for Vanilla Slice Success
Unlock the secrets to a flawless vanilla slice with these five essential tips:
- Pastry Perfection is Key: Don’t underestimate the importance of the puff pastry.
- Use All-Butter: The flavour is noticeably superior.
- Dock Thoroughly: Pricking the pastry all over prevents it from puffing into a giant pillow. You want flat, crisp layers.
- Bake Until Deeply Golden: Pale pastry will be soft and bendy. You need it crisp enough to provide that delightful textural contrast and structural integrity. Don’t be afraid of a good colour.
- Cool Completely: Assembling with warm pastry will lead to a soggy bottom.
- Lump-Free, Velvety Custard Technique:
- Whisk Dry Ingredients: Combine sugar and cornflour before adding to liquids to prevent cornflour clumps.
- Temper Your Eggs: This is non-negotiable. Adding cold yolks directly to hot milk will scramble them. Gradually introducing hot milk to the yolks brings their temperature up gently.
- Constant Whisking: Once the custard mixture is on the heat, whisk constantly and vigorously, especially the bottom and corners of the pan, to prevent sticking and ensure even cooking.
- Strain if Necessary: For the silkiest smooth finish, passing the cooked custard through a fine-mesh sieve removes any potential small lumps.
- The Chill is Crucial (Patience Pays Off!):
- Set Time: The custard needs ample time to set fully. A minimum of 4-6 hours in the refrigerator is essential, but overnight is even better. Rushing this step will result in a runny mess when you try to slice it.
- Cool Before Chilling: Allow the assembled slice to cool at room temperature for about 30-60 minutes before refrigerating to prevent excessive condensation.
- Mastering the Icing:
- Sift Icing Sugar: Always sift your icing sugar to remove lumps and ensure a super smooth glaze.
- Hot Liquid: Using hot water or milk helps the sugar dissolve better, resulting in a glossier icing.
- Add Liquid Gradually: It’s easier to thin out a thick icing than to thicken a runny one. Add your liquid a little at a time until you reach a thick, yet pourable, consistency.
- Work Quickly: Once mixed, pour and spread the icing promptly as it will start to set, especially on the cold surface of the chilled slice.
- Smart Slicing for Clean Edges:
- Fully Chilled and Set: Ensure both the custard and the icing are completely firm before attempting to slice.
- Hot, Clean Knife: Use a large, very sharp knife. Dip the blade in hot water, then wipe it clean and dry with a cloth between every single cut. This melts the icing slightly and prevents the custard from dragging, giving you beautifully clean edges.
- Press, Don’t Saw: Press down firmly and decisively with the knife rather than using a sawing motion, which can disrupt the layers.
By keeping these tips in mind, you’ll elevate your vanilla slice from good to absolutely unforgettable.
FAQ: Your Vanilla Slice Questions Answered
Here are answers to some commonly asked questions about making the perfect vanilla slice:
- Q: What’s the difference between a Vanilla Slice and a Mille-Feuille?
- A: While both feature layers of puff pastry and cream filling, they have distinct differences. A classic French Mille-Feuille (“thousand leaves”) typically has three layers of puff pastry alternating with two layers of pastry cream (crème pâtissière), and is often topped with marbled icing or just powdered sugar. A Vanilla Slice, particularly popular in Australia and New Zealand (where it’s sometimes called a “Snot Block” affectionately, or a Custard Square), usually has two layers of puff pastry sandwiching a much thicker, firmer layer of a more set vanilla custard. The icing is often a simple white glaze, sometimes with passionfruit. The custard in a vanilla slice is generally stabilised more firmly with cornflour to allow for clean, tall slices.
- Q: Can I use store-bought pre-made custard powder or instant pudding mix?
- A: While you technically could use a good quality custard powder as a shortcut (you’d need to make it very thick), the flavour and texture of homemade custard from scratch using real egg yolks, milk, and vanilla is vastly superior and truly makes this dessert special. Instant pudding mixes are generally not recommended as their texture and flavour profile are quite different and won’t yield the authentic vanilla slice experience. For the best results, homemade is the way to go.
- Q: Why is my custard runny and not setting properly?
- A: There are a few common culprits:
- Not enough cornflour (cornstarch): Ensure you’ve measured it accurately.
- Not cooked long enough: The custard needs to come to a full boil and be cooked for 1-2 minutes after boiling, while whisking constantly, to activate the cornflour’s thickening power.
- Insufficient chilling time: The slice needs several hours (preferably overnight) in the fridge to fully set.
- Incorrect milk type: Using low-fat milk can sometimes affect the set and richness. Full-cream milk is recommended.
- A: There are a few common culprits:
- Q: How long will homemade vanilla slice last, and how should I store it?
- A: Homemade vanilla slice is best enjoyed within 2-3 days of making. Store it in an airtight container in the refrigerator. The puff pastry will naturally soften over time as it absorbs moisture from the custard, so it’s at its crispiest on day one and two. After 3 days, while still edible, the texture won’t be optimal.
- Q: Can I freeze vanilla slice?
- A: Freezing vanilla slice is generally not recommended. The custard’s texture can change upon thawing, becoming watery or grainy, and the puff pastry will lose its crispness and can become quite soggy. It’s best made fresh and enjoyed within a few days. If you need to make components ahead, the baked puff pastry sheets can be stored in an airtight container at room temperature for a day or two before assembly.