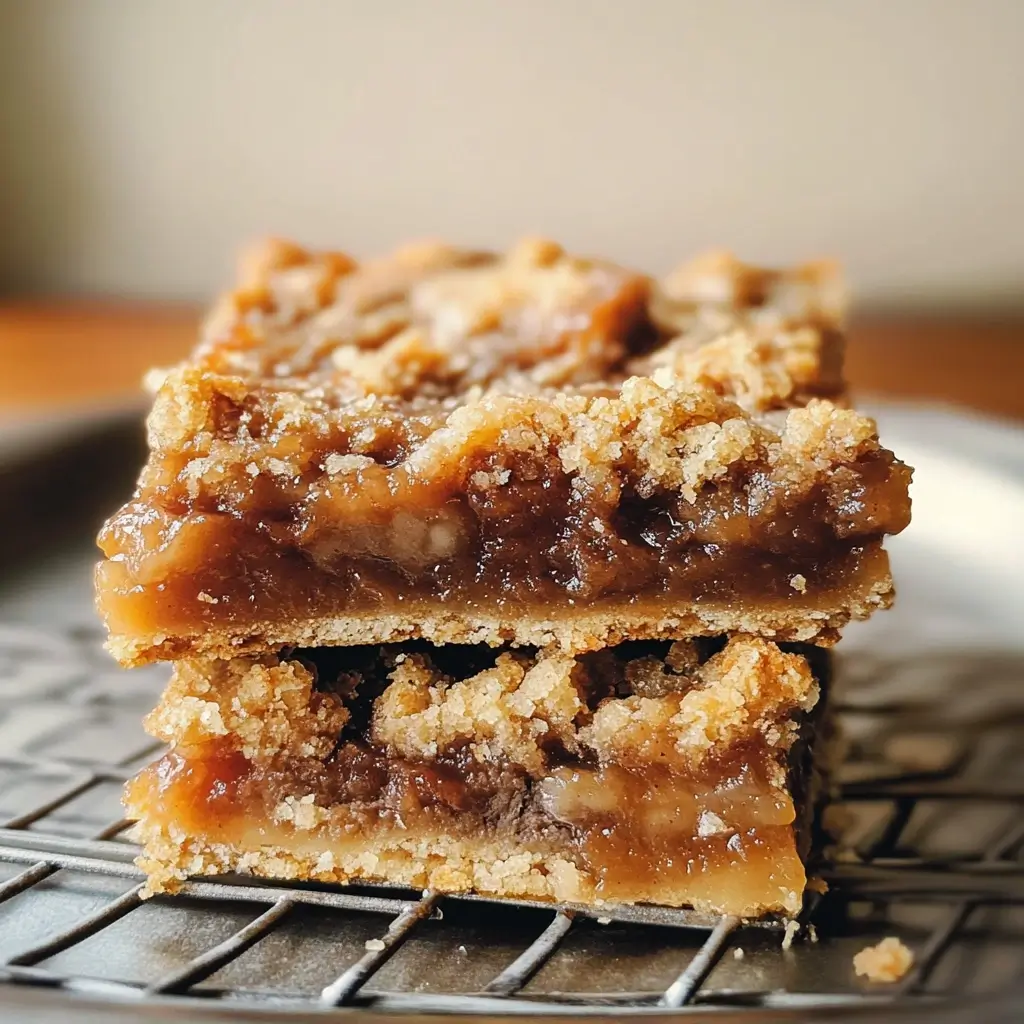
Okay, settle in, because I have a confession: Vegan Carmelitas have officially ruined all other bar desserts for me, in the best way possible. The first time I pulled a pan of these beauties from the oven, my kitchen was filled with the most intoxicating aroma of toasted oats, molten chocolate, and rich, bubbling caramel. My family, initially skeptical of “another vegan experiment,” hovered like vultures. The moment they were cool enough to slice (a true test of patience!), the silence that followed the first bites was golden. Then came the “Mmmmms,” the “Oh my gods,” and the inevitable “Can I have another piece?” These Vegan Carmelitas are not just “good for vegan”; they are exceptionally, undeniably, and outrageously delicious. The contrast between the buttery, crumbly oat base and topping, the river of gooey, homemade (or store-bought, no judgment!) vegan caramel, and the generous layer of rich, dark chocolate chips is pure magic. They are decadent yet somehow comforting, sophisticated enough for guests but easy enough for a Tuesday treat. Trust me, this recipe isn’t just a keeper; it’s a showstopper.
The Undeniable Allure of Vegan Carmelitas: A Sweet Introduction
Carmelitas are a classic American bar cookie, beloved for their irresistible layers of flavor and texture. Traditionally, they feature an oatmeal cookie base, a rich caramel filling, chocolate chips, and an oatmeal crumble topping. The name itself, “Carmelita,” evokes a sense of sweetness and indulgence. The magic lies in the symphony of these components: the slightly salty, buttery crunch of the oats, the smooth, gooey, and deeply flavored caramel, and the satisfying melt of chocolate.
So, why a vegan version? For many, it’s a dietary necessity or ethical choice. For others, it’s about exploring a healthier, plant-based approach to beloved classics without sacrificing an ounce of deliciousness. The challenge in veganizing Carmelitas lies primarily in replicating the richness of butter and the unique texture of traditional caramel, which often relies on dairy. However, with the fantastic array of vegan butter alternatives, plant-based milks, and a little culinary know-how, creating a vegan Carmelita that rivals, and dare I say, even surpasses the original, is entirely achievable.
This recipe embraces the core essence of Carmelitas while making them accessible to everyone. We use common pantry staples and straightforward techniques. The resulting bars are a testament to how plant-based baking can be every bit as decadent and satisfying. Whether you’re a seasoned vegan baker or just curious about plant-based treats, these Vegan Carmelitas are sure to become a new favorite. They are perfect for potlucks, bake sales, holiday gatherings, or simply as a well-deserved treat to brighten your day. Prepare for a taste experience that will have you reaching for “just one more” piece, again and again. The beauty of these bars also lies in their slight rustic charm; no need for perfect piping or intricate decoration. Their delicious messiness is part of their appeal.
Ingredients for Irresistible Vegan Carmelitas
This recipe is designed for an 8×8 inch or 9×9 inch square baking pan. For a larger batch (9×13 inch pan), simply double the ingredients.
For the Oat Crust and Crumble Topping:
- 1 ½ cups (135g) rolled oats (old-fashioned, not instant)
- 1 cup (120g) all-purpose flour (or use oat flour for a gluten-free option, see notes)
- ¾ cup (150g) packed light brown sugar
- ½ teaspoon baking soda
- ¼ teaspoon salt
- ¾ cup (168g) vegan butter, melted (or firm coconut oil, melted)
For the Vegan Caramel Filling:
- 1 can (13.5 oz / 400ml) full-fat coconut milk, chilled (use only the thick cream from the top, about ¾ to 1 cup)
- Alternatively, use 1 cup of store-bought thick vegan caramel sauce.
- ½ cup (100g) packed light brown sugar
- ¼ cup (60ml) maple syrup or agave nectar
- ¼ cup (56g) vegan butter
- 1 teaspoon vanilla extract
- ½ teaspoon salt (or to taste, especially if your vegan butter is unsalted)
For the Chocolate Layer:
- 1 ½ cups (255g) vegan semi-sweet or dark chocolate chips (ensure they are dairy-free)
Optional Additions:
- ½ cup chopped pecans or walnuts (to be mixed into the oat crumble mixture)
- A sprinkle of flaky sea salt for finishing (highly recommended!)
Ingredient Notes & Substitutions:
- Rolled Oats: Old-fashioned rolled oats provide the best texture. Instant oats can become mushy.
- Flour: All-purpose flour works perfectly. For a gluten-free version, you can use a good quality gluten-free all-purpose blend or make your own oat flour by blending rolled oats until fine. If using oat flour, the bars might be slightly more tender.
- Vegan Butter: Use a good quality block-style vegan butter for the best flavor and texture. Melted refined coconut oil can also work, though the flavor will be slightly different. If using coconut oil, ensure it’s refined to avoid a strong coconut taste, unless desired.
- Coconut Cream: For the homemade caramel, chilling the can of full-fat coconut milk helps the thick cream separate from the watery liquid. You want to scoop out only the solid white cream. The amount can vary per can, so aim for ¾ to 1 cup.
- Vegan Chocolate Chips: Many brands offer dairy-free chocolate chips. Always check the label. Enjoy Life, Guittard, and Kirkland (Costco) semi-sweet chips are often vegan. Dark chocolate (60% cacao or higher) is also frequently vegan.
Crafting Your Vegan Carmelitas: Step-by-Step Instructions
Follow these steps carefully for perfectly layered and utterly delicious vegan Carmelitas. Patience during cooling is key!
1. Prepare the Pan and Preheat Oven:
* Preheat your oven to 350°F (175°C).
* Grease an 8×8 inch or 9×9 inch square baking pan. For easier removal and cleanup, line the pan with parchment paper, leaving an overhang on two opposite sides to act as “handles.” Lightly grease the parchment paper as well.
2. Make the Oat Crust and Crumble Mixture:
* In a large mixing bowl, combine the rolled oats, all-purpose flour, packed light brown sugar, baking soda, and salt. Whisk them together thoroughly to ensure even distribution of the leavening agent and salt.
* If using nuts, stir them into the dry ingredients now.
* Pour the melted vegan butter (or coconut oil) over the dry ingredients.
* Using a fork or your fingertips, mix until the ingredients are well combined and the mixture resembles coarse, damp crumbs. It should hold together when pressed.
3. Par-Bake the Crust:
* Reserve approximately 1 ½ cups of the oat mixture for the topping.
* Press the remaining oat mixture firmly and evenly into the bottom of the prepared baking pan. Use the bottom of a glass or a measuring cup to get a compact and even layer.
* Bake the crust for 10-12 minutes, or until it’s lightly golden and set. Remove from the oven and set aside.
4. Prepare the Vegan Caramel Filling (if making homemade):
* While the crust is par-baking, you can start the caramel. If using store-bought caramel, you can skip this step and simply ensure your caramel is pourable (warm it slightly if necessary).
* In a medium saucepan, combine the scooped thick coconut cream, light brown sugar, maple syrup (or agave), and vegan butter.
* Place the saucepan over medium heat. Bring the mixture to a gentle boil, stirring constantly to dissolve the sugar and prevent burning.
* Once boiling, reduce the heat to medium-low and let it simmer for 5-8 minutes, stirring frequently, until the caramel has thickened slightly. It should coat the back of a spoon. Be careful, as hot caramel can bubble and spatter.
* Remove the saucepan from the heat. Stir in the vanilla extract and salt. The caramel will continue to thicken as it cools. If it seems too thin, you can return it to low heat for a few more minutes. If it becomes too thick upon cooling, you can stir in a teaspoon or two of plant-based milk or hot water to reach a pourable consistency.
5. Assemble the Carmelitas:
* Once the crust is par-baked, immediately sprinkle the vegan chocolate chips evenly over the hot crust. The residual heat will help them melt slightly, creating a lovely gooey layer.
* Carefully pour or drizzle the warm vegan caramel sauce evenly over the chocolate chip layer. Use an offset spatula or the back of a spoon to spread it gently if needed, trying not to disturb the chocolate chips too much.
* Take the reserved 1 ½ cups of the oat crumble mixture and sprinkle it evenly over the caramel layer. Gently pat it down if you prefer a more compact topping, or leave it loose for a more rustic look.
6. Bake the Assembled Carmelitas:
* Return the pan to the preheated oven (350°F / 175°C).
* Bake for an additional 15-20 minutes for an 8×8 pan, or 18-22 minutes for a 9×9 pan. The topping should be golden brown, and the caramel might be bubbling around the edges.
* Be careful not to overbake, as this can make the bars dry and the caramel too hard.
7. COOL COMPLETELY (Crucial Step!):
* Remove the pan from the oven and place it on a wire rack.
* This is the most important and perhaps the hardest part: you must let the Carmelitas cool completely before cutting. This will take at least 2-3 hours at room temperature. For best results and cleanest cuts, chill them in the refrigerator for an additional 1-2 hours (or even overnight) after they’ve cooled to room temperature.
* Attempting to cut them while warm will result in a delicious, gooey mess (still tasty, but not neat bars). The caramel needs time to set.
8. Cut and Serve:
* Once completely cooled and set (preferably chilled), use the parchment paper overhangs to lift the entire block of Carmelitas out of the pan and onto a cutting board.
* Use a large, sharp knife to cut them into squares or bars. Wiping the knife clean with a damp cloth between cuts can help achieve neater edges.
* If you chilled them in the fridge, you might want to let them sit at room temperature for 10-15 minutes before cutting for easier slicing.
* Sprinkle with flaky sea salt before serving, if desired.
Nutritional Snapshot: Vegan Carmelitas
Servings: This recipe yields approximately 16 medium-sized squares when made in an 8×8 or 9×9 inch pan.
Calories per serving (approximate): Around 280-350 calories per square.
Disclaimer: The nutritional information provided is an estimate and can vary significantly based on the specific brands of ingredients used (especially vegan butter, chocolate chips, and coconut milk), as well as exact serving sizes. Factors like the fat content of your coconut cream or the sugar content of your chosen chocolate will influence the final count. This estimate is for general guidance only. For precise nutritional data, it’s recommended to use an online recipe calculator with your specific ingredients.
These Vegan Carmelitas are an indulgent treat, rich in carbohydrates from the oats, flour, and sugars, and fats from the vegan butter/coconut oil and chocolate. They offer some fiber from the oats. Enjoy them as part of a balanced lifestyle!
Time Commitment: Crafting Your Carmelitas
Understanding the time involved will help you plan your baking adventure for these delightful vegan treats.
- Preparation Time: Approximately 20-25 minutes. This includes measuring ingredients, mixing the crust/crumble, and preparing the homemade caramel sauce (if not using store-bought). If using store-bought caramel, prep time might be closer to 15 minutes.
- Baking Time:
- Par-baking the crust: 10-12 minutes.
- Final bake after assembly: 15-22 minutes.
- Total Baking Time: Approximately 25-34 minutes.
- Cooling Time (Absolutely Essential!):
- At room temperature: Minimum 2-3 hours.
- Optional chilling for cleaner cuts: Additional 1-2 hours in the refrigerator (or overnight).
- Total Cooling Time: 2-5 hours (or longer if chilling overnight).
- Total Time from Start to Serve (including minimum cooling): Approximately 3 hours to 5 hours 50 minutes. If you opt for overnight chilling, it will naturally be longer.
While the active hands-on time is relatively short, the cooling period is non-negotiable for achieving well-set bars that are easy to cut. Plan accordingly, especially if you’re making them for an event. Often, making them a day ahead and letting them chill overnight is the best strategy.
Serving Suggestions: Elevating Your Vegan Carmelitas
Vegan Carmelitas are divine on their own, but here are a few ways to elevate the experience or incorporate them into more elaborate dessert presentations:
- The Classic:
- Enjoy a square as is, perhaps with a cup of your favorite coffee, tea, or a tall glass of cold plant-based milk. The contrasting textures and rich flavors are a standalone delight.
- Warm and Wonderful:
- Gently warm a Carmelita square in the microwave for 10-15 seconds (don’t overheat, or the caramel will become too liquid).
- Serve the warm Carmelita with a generous scoop of vegan vanilla bean ice cream. The contrast of warm, gooey bar and cold, creamy ice cream is heavenly.
- A La Mode Extravaganza:
- Beyond vanilla, try serving with vegan chocolate, salted caramel, or even coffee-flavored ice cream.
- Drizzle with a little extra vegan chocolate sauce or a thinned-out vegan caramel sauce.
- With a Dollop of Cream:
- Top with a spoonful of vegan whipped cream (coconut whipped cream or a store-bought oat or soy-based version).
- A sprinkle of cinnamon or cocoa powder on the cream adds a nice touch.
- Deconstructed Delight:
- Crumble a Vegan Carmelita bar over a bowl of vegan yogurt or a smoothie bowl for a decadent breakfast or snack.
- Use crumbled pieces as a topping for a vegan chocolate mousse or pudding.
- Party Platter Perfection:
- Cut into smaller, bite-sized pieces for easy grabbing on a dessert platter alongside other vegan treats like cookies or brownies.
- Gift Giving:
- Neatly cut squares, individually wrapped in cellophane or stacked in a decorative tin, make a wonderful homemade gift for friends, neighbors, or colleagues.
No matter how you choose to serve them, these Vegan Carmelitas are sure to impress with their rich flavor and satisfying textures.
Pro Tips for Perfect Vegan Carmelitas
Achieve Vegan Carmelita mastery with these five essential tips:
- Embrace the Chill: Cooling is Non-Negotiable: This cannot be stressed enough. Attempting to slice Carmelitas while even slightly warm will lead to a gooey, albeit delicious, mess. For clean, defined squares, allow them to cool completely at room temperature for at least 2-3 hours, then transfer to the refrigerator for another 1-2 hours (or even overnight). The patience will be rewarded with perfectly set bars.
- Quality Ingredients Shine: The final taste of your Carmelitas is directly impacted by the quality of your ingredients.
- Vegan Butter: Use a good-quality block-style vegan butter that you enjoy the taste of. Brands like Miyoko’s Kitchen, Earth Balance, or Melt can provide excellent results.
- Chocolate: Opt for vegan chocolate chips with a good flavor profile. Semi-sweet or dark chocolate (55-70% cacao) works wonderfully. Always double-check labels to ensure they are dairy-free.
- Caramel: If using store-bought, choose a thick, rich vegan caramel sauce. If making homemade, use full-fat coconut milk for the creamiest result.
- Don’t Overbake the Layers: Overbaking is the enemy of gooey Carmelitas.
- Crust: Par-bake the crust only until it’s lightly set and just beginning to turn golden.
- Final Bake: Bake the assembled bars until the topping is golden brown and the caramel is bubbly around the edges. The center should still feel slightly soft if gently pressed (though be careful, it’s hot!). They will continue to set as they cool. Overbaking can result in dry oats and hard caramel.
- Parchment Paper Power: Lining your baking pan with parchment paper, leaving an overhang on two sides, is a game-changer. It prevents sticking and allows you to easily lift the entire slab of Carmelitas out of the pan once cooled. This makes cutting much neater and cleanup a breeze.
- Customize with Confidence: While this recipe is fantastic as is, feel free to make it your own!
- Nuts: Add ½ cup of chopped pecans or walnuts to the oat mixture for extra crunch and flavor. Toast them lightly beforehand for even deeper flavor.
- Spices: A pinch of cinnamon or nutmeg in the oat mixture can add warmth.
- Chocolate Variations: Try vegan white chocolate chips or butterscotch chips (ensure they’re dairy-free) for a different flavor profile, or a mix.
- Flaky Salt Finish: A light sprinkle of flaky sea salt (like Maldon) on top of the cooled bars before serving beautifully enhances the sweetness of the caramel and chocolate.
Vegan Carmelitas FAQ: Your Questions Answered
Here are answers to some frequently asked questions about making Vegan Carmelitas:
- Q: Can I make these Vegan Carmelitas gluten-free?
- A: Yes, absolutely! To make them gluten-free, substitute the all-purpose flour with a good-quality gluten-free all-purpose flour blend (one that contains xanthan gum or add it if it doesn’t). Alternatively, you can make your own oat flour by blending certified gluten-free rolled oats in a high-speed blender until they reach a fine, flour-like consistency. Ensure your rolled oats are also certified gluten-free to avoid cross-contamination if celiac disease is a concern. The texture might be slightly more tender with oat flour.
- Q: How should I store Vegan Carmelitas, and how long will they last?
- A: Store leftover Vegan Carmelitas in an airtight container. They can be kept at room temperature for up to 3 days or in the refrigerator for up to 5-7 days. If storing in the fridge, they will become quite firm; you might want to let them sit at room temperature for 15-20 minutes before serving to allow the caramel to soften slightly.
- Q: Can I freeze Vegan Carmelitas?
- A: Yes, they freeze very well! Once completely cooled and cut into squares, wrap them individually in plastic wrap, then place them in a freezer-safe container or zip-top bag. They can be frozen for up to 2-3 months. Thaw them in the refrigerator overnight or at room temperature for a few hours before serving.
- Q: My homemade vegan caramel sauce seems too thin or too thick. What can I do?
- A: If too thin: Continue to simmer it gently on low heat for a few more minutes, stirring constantly, until it thickens to your desired consistency. Remember it will thicken more as it cools.
- If too thick (especially after cooling): Gently reheat the caramel sauce over low heat and stir in a teaspoon or two of warm plant-based milk (like almond or soy) or hot water until it reaches a pourable consistency. Be careful not to add too much liquid at once.
- Q: Can I use a different type of sugar in the oat mixture or caramel?
- A: For the oat mixture: You can substitute coconut sugar for light brown sugar in a 1:1 ratio for a refined sugar-free option, though the flavor will be slightly different (more molasses-like) and the texture might be a bit denser.
- For the caramel: Light brown sugar is traditional and provides classic caramel flavor. Using all coconut sugar in the caramel will result in a much darker, more intensely molasses-flavored caramel and may behave differently during cooking. Maple syrup is already in the caramel recipe and contributes to its liquid content and flavor. You could experiment, but for the most reliable results, stick to the recipe or make small test batches with sugar substitutions. Liquid sweeteners like more maple syrup in place of brown sugar will significantly alter the caramel’s chemistry and setting properties.

Vegan Carmelitas Recipe
Ingredients
For the Oat Crust and Crumble Topping:
- 1 ½ cups (135g) rolled oats (old-fashioned, not instant)
- 1 cup (120g) all-purpose flour (or use oat flour for a gluten-free option, see notes)
- ¾ cup (150g) packed light brown sugar
- ½ teaspoon baking soda
- ¼ teaspoon salt
- ¾ cup (168g) vegan butter, melted (or firm coconut oil, melted)
For the Vegan Caramel Filling:
- 1 can (13.5 oz / 400ml) full-fat coconut milk, chilled (use only the thick cream from the top, about ¾ to 1 cup)
- Alternatively, use 1 cup of store-bought thick vegan caramel sauce.
- ½ cup (100g) packed light brown sugar
- ¼ cup (60ml) maple syrup or agave nectar
- ¼ cup (56g) vegan butter
- 1 teaspoon vanilla extract
- ½ teaspoon salt (or to taste, especially if your vegan butter is unsalted)
Instructions
1. Prepare the Pan and Preheat Oven:
* Preheat your oven to 350°F (175°C).
* Grease an 8×8 inch or 9×9 inch square baking pan. For easier removal and cleanup, line the pan with parchment paper, leaving an overhang on two opposite sides to act as “handles.” Lightly grease the parchment paper as well.
2. Make the Oat Crust and Crumble Mixture:
* In a large mixing bowl, combine the rolled oats, all-purpose flour, packed light brown sugar, baking soda, and salt. Whisk them together thoroughly to ensure even distribution of the leavening agent and salt.
* If using nuts, stir them into the dry ingredients now.
* Pour the melted vegan butter (or coconut oil) over the dry ingredients.
* Using a fork or your fingertips, mix until the ingredients are well combined and the mixture resembles coarse, damp crumbs. It should hold together when pressed.
3. Par-Bake the Crust:
* Reserve approximately 1 ½ cups of the oat mixture for the topping.
* Press the remaining oat mixture firmly and evenly into the bottom of the prepared baking pan. Use the bottom of a glass or a measuring cup to get a compact and even layer.
* Bake the crust for 10-12 minutes, or until it’s lightly golden and set. Remove from the oven and set aside.
4. Prepare the Vegan Caramel Filling (if making homemade):
* While the crust is par-baking, you can start the caramel. If using store-bought caramel, you can skip this step and simply ensure your caramel is pourable (warm it slightly if necessary).
* In a medium saucepan, combine the scooped thick coconut cream, light brown sugar, maple syrup (or agave), and vegan butter.
* Place the saucepan over medium heat. Bring the mixture to a gentle boil, stirring constantly to dissolve the sugar and prevent burning.
* Once boiling, reduce the heat to medium-low and let it simmer for 5-8 minutes, stirring frequently, until the caramel has thickened slightly. It should coat the back of a spoon. Be careful, as hot caramel can bubble and spatter.
* Remove the saucepan from the heat. Stir in the vanilla extract and salt. The caramel will continue to thicken as it cools. If it seems too thin, you can return it to low heat for a few more minutes. If it becomes too thick upon cooling, you can stir in a teaspoon or two of plant-based milk or hot water to reach a pourable consistency.
5. Assemble the Carmelitas:
* Once the crust is par-baked, immediately sprinkle the vegan chocolate chips evenly over the hot crust. The residual heat will help them melt slightly, creating a lovely gooey layer.
* Carefully pour or drizzle the warm vegan caramel sauce evenly over the chocolate chip layer. Use an offset spatula or the back of a spoon to spread it gently if needed, trying not to disturb the chocolate chips too much.
* Take the reserved 1 ½ cups of the oat crumble mixture and sprinkle it evenly over the caramel layer. Gently pat it down if you prefer a more compact topping, or leave it loose for a more rustic look.
6. Bake the Assembled Carmelitas:
* Return the pan to the preheated oven (350°F / 175°C).
* Bake for an additional 15-20 minutes for an 8×8 pan, or 18-22 minutes for a 9×9 pan. The topping should be golden brown, and the caramel might be bubbling around the edges.
* Be careful not to overbake, as this can make the bars dry and the caramel too hard.
7. COOL COMPLETELY (Crucial Step!):
* Remove the pan from the oven and place it on a wire rack.
* This is the most important and perhaps the hardest part: you must let the Carmelitas cool completely before cutting. This will take at least 2-3 hours at room temperature. For best results and cleanest cuts, chill them in the refrigerator for an additional 1-2 hours (or even overnight) after they’ve cooled to room temperature.
* Attempting to cut them while warm will result in a delicious, gooey mess (still tasty, but not neat bars). The caramel needs time to set.
8. Cut and Serve:
* Once completely cooled and set (preferably chilled), use the parchment paper overhangs to lift the entire block of Carmelitas out of the pan and onto a cutting board.
* Use a large, sharp knife to cut them into squares or bars. Wiping the knife clean with a damp cloth between cuts can help achieve neater edges.
* If you chilled them in the fridge, you might want to let them sit at room temperature for 10-15 minutes before cutting for easier slicing.
* Sprinkle with flaky sea salt before serving, if desired.
Nutrition
- Serving Size: One Normal Portion
- Calories: 280-350