

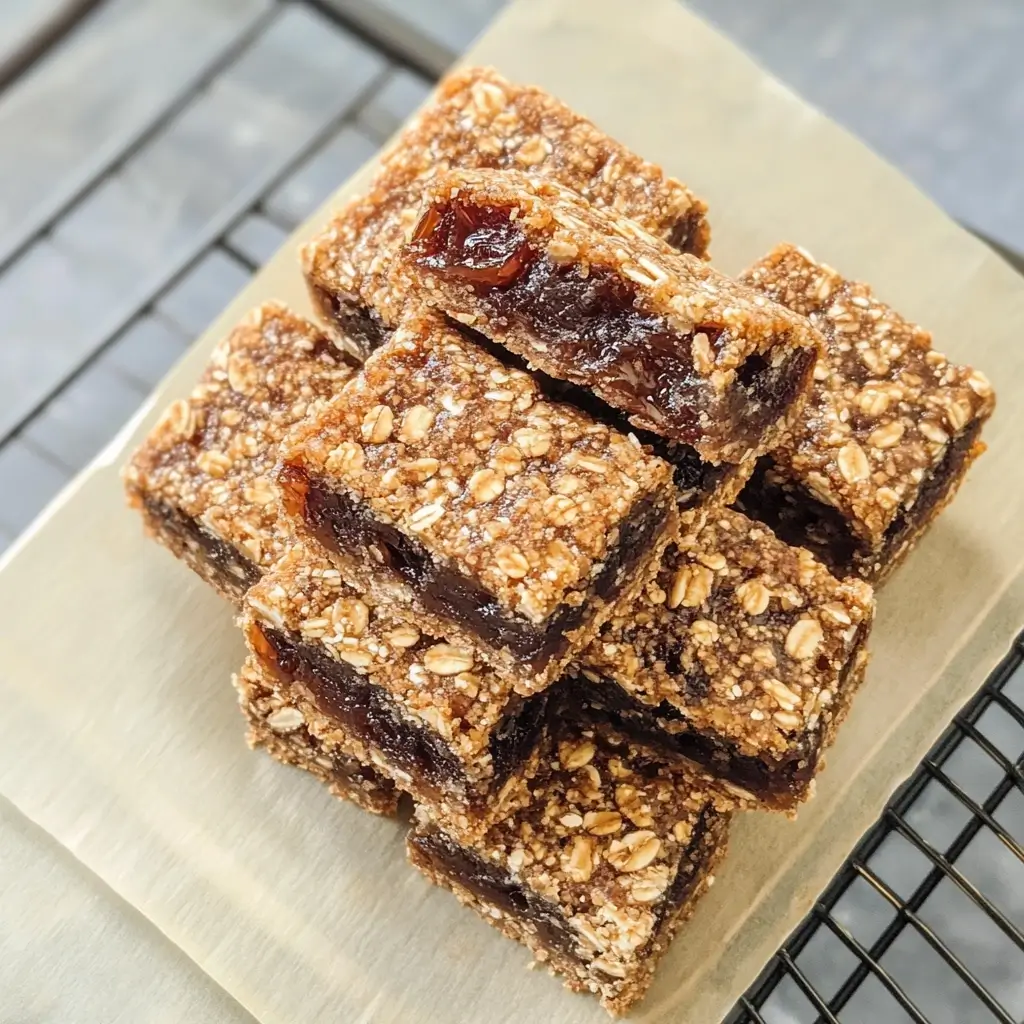

Date squares. Just the name conjures up images of warm, comforting desserts, perfect for a cozy afternoon tea or a satisfying after-dinner treat. But often, these classic squares are laden with butter and refined sugars, making them less than ideal for those seeking healthier or vegan options. That’s where this recipe for Vegan Date Squares truly shines.
I stumbled upon this recipe while searching for a naturally sweet and wholesome dessert that my family would love. Let me tell you, it was an instant hit! Even my pickiest eaters devoured these squares, praising their chewy texture, rich date filling, and subtly sweet oat crust. What I personally loved was how surprisingly easy they were to make. No fancy equipment, no complicated steps, just simple ingredients transforming into a delightful baked good. These vegan date squares are not just a dessert; they’re a guilt-free indulgence, packed with fiber, naturally sweetened, and bursting with delicious flavor. They’ve become a regular in our household, and I’m thrilled to share this fantastic recipe with you, so you too can experience the joy of wholesome, homemade goodness.
Ingredients
Crafting the perfect Vegan Date Squares starts with selecting the right ingredients. Each component plays a crucial role in achieving the desired texture, flavor, and nutritional profile. Let’s break down what you’ll need for both the crust and the luscious date filling:
For the Oat Crust:
- Rolled Oats: 3 cups (240g). The foundation of our crust, rolled oats provide a wonderfully chewy texture and a nutty flavor. It’s essential to use rolled oats (also known as old-fashioned oats) rather than instant oats. Instant oats are too finely processed and will result in a mushy crust. Rolled oats offer the perfect balance of structure and tenderness, creating a satisfying base for the sweet date filling. Opt for certified gluten-free rolled oats if you need to ensure this recipe is gluten-free.
- All-Purpose Flour (or Gluten-Free Blend): 1 ½ cups (180g). Flour binds the oat mixture together, adding structure and lightness to the crust. For a classic date square, all-purpose flour works beautifully. However, if you’re gluten-free, a good quality gluten-free all-purpose flour blend will work just as well. Ensure your gluten-free blend is designed for baking and contains xanthan gum or another binder to mimic the gluten structure. Experimenting with blends like oat flour or almond flour (in combination with a binder) can also yield interesting variations in texture and flavor, although for this recipe, a dedicated gluten-free blend or all-purpose flour is recommended for the most authentic result.
- Coconut Oil, Melted: ¾ cup (180ml). Coconut oil acts as the fat in our crust, contributing to its richness, tenderness, and slightly crumbly texture. Melted coconut oil binds the dry ingredients together and solidifies upon cooling, creating a cohesive crust. Use refined coconut oil if you prefer a neutral flavor, as unrefined coconut oil will impart a distinct coconut taste, which can be delicious but might not be desired in a classic date square. Alternatively, you could use melted vegan butter for a richer, more buttery flavor, though coconut oil is a fantastic vegan and often healthier option.
- Maple Syrup: ½ cup (120ml). Maple syrup adds a touch of natural sweetness to the crust, complementing the dates beautifully. It also contributes to the crust’s moisture and helps to bind the ingredients. Pure maple syrup is preferred for its rich flavor and natural sweetness, avoiding artificial syrups or corn syrup-based alternatives. Agave nectar or brown rice syrup could be used as substitutes if maple syrup is unavailable, though they will slightly alter the flavor profile.
- Baking Soda: 1 teaspoon. Baking soda is a leavening agent that helps to create a slightly lighter and more tender crust. It reacts with the acidity in the maple syrup to produce carbon dioxide, resulting in a subtle lift in the baked crust. Ensure your baking soda is fresh for optimal leavening power.
- Salt: ½ teaspoon. Salt enhances the flavors of all the other ingredients in the crust, balancing the sweetness and bringing out the nutty notes of the oats. It’s a crucial ingredient even in sweet recipes, as it prevents the dessert from tasting flat or one-dimensional. Use fine sea salt or table salt.
For the Date Filling:
- Medjool Dates, Pitted: 2 cups (about 300g). Medjool dates are the star of the show, providing the signature sweetness, chewiness, and rich caramel-like flavor of date squares. Medjool dates are preferred for their soft, moist texture and intense sweetness, making them ideal for creating a smooth and decadent filling. It’s crucial to use pitted dates to save time and ensure no stray pits end up in your filling. If using other types of dates like Deglet Noor, which are drier, you may need to soak them in hot water for 10-15 minutes before blending to soften them and achieve the desired consistency.
- Water: ¾ cup (180ml). Water is used to help soften the dates and create a smooth, spreadable filling. Boiling water is often recommended as it helps to break down the dates more quickly and efficiently, resulting in a smoother texture. The amount of water may need to be adjusted slightly depending on the dryness of your dates; start with ¾ cup and add more if needed to achieve a smooth, thick, and spreadable consistency.
- Vanilla Extract: 1 teaspoon. Vanilla extract enhances the overall flavor profile of the date filling, adding a touch of warmth and complexity. Pure vanilla extract is preferred for its superior flavor compared to imitation vanilla. A good quality vanilla extract complements the caramel notes of the dates and elevates the overall taste of the filling. You could also use vanilla bean paste for an even more intense vanilla flavor.
- Lemon Juice: 1 tablespoon. A touch of lemon juice brightens the date filling, adding a subtle tanginess that balances the sweetness and prevents it from being overly cloying. Freshly squeezed lemon juice is preferred for its vibrant flavor, but bottled lemon juice can be used in a pinch. The acidity of the lemon juice also helps to enhance the other flavors in the filling and prevents the date mixture from being too one-dimensional.
Instructions
Creating these delectable Vegan Date Squares is surprisingly straightforward. Follow these step-by-step instructions to bake up a batch of wholesome goodness:
- Preheat Oven and Prepare Baking Pan: Begin by preheating your oven to 350°F (175°C). This ensures the oven is at the correct temperature when you place your date squares in to bake, promoting even cooking and a perfectly golden crust. While the oven is preheating, prepare an 8×8 inch baking pan. Line the pan with parchment paper, leaving an overhang on the sides. This parchment paper sling will be your best friend when it comes to easily removing the baked date squares from the pan later, preventing sticking and ensuring clean, intact squares. Grease the parchment paper lightly with coconut oil or cooking spray to further guarantee easy removal.
- Prepare the Date Filling: Now, let’s focus on the heart of our date squares – the luscious date filling. In a medium-sized saucepan, combine the pitted Medjool dates and water. Place the saucepan over medium heat and bring the mixture to a gentle simmer. Simmer for about 5-7 minutes, or until the dates have softened significantly and become easily mashable. The simmering process softens the dates, making them easier to blend into a smooth filling and releasing their natural sweetness. Remove the saucepan from the heat and carefully transfer the softened dates and water to a blender or food processor. Add the vanilla extract and lemon juice to the blender or food processor. Blend until the mixture is completely smooth and creamy. You may need to scrape down the sides of the blender or food processor a few times to ensure all the dates are fully incorporated and the filling is uniformly smooth. The consistency should be thick and spreadable, resembling a smooth date paste. Set the date filling aside while you prepare the crust.
- Make the Oat Crust: In a large bowl, combine the rolled oats, all-purpose flour (or gluten-free blend), baking soda, and salt. Whisk these dry ingredients together thoroughly to ensure the baking soda and salt are evenly distributed throughout the mixture. This step is important for even leavening and flavor distribution in the crust. In a separate bowl, melt the coconut oil in the microwave or in a saucepan over low heat. Once melted, add the maple syrup to the melted coconut oil and whisk to combine them. Pour the wet ingredients (coconut oil and maple syrup mixture) into the bowl with the dry ingredients. Using a spatula or your hands, mix until all the ingredients are well combined and moistened. The mixture should resemble damp crumbs and hold together when pressed.
- Assemble the Date Squares: It’s time to assemble our date squares. Press approximately two-thirds of the oat crust mixture evenly into the prepared baking pan. Use your fingers or the back of a spoon to firmly press the crust into the bottom of the pan, creating a compact and even base. Pour the prepared date filling evenly over the oat crust base, spreading it to the edges of the pan. Ensure the date filling is distributed uniformly for consistent flavor and texture in each square. Crumble the remaining one-third of the oat crust mixture evenly over the date filling. Distribute the crumbles loosely and evenly to create a textured topping for the date squares. You can gently press the crumbles down slightly, but avoid packing them too tightly, as you want to maintain a slightly crumbly topping.
- Bake to Golden Perfection: Place the assembled date squares in the preheated oven and bake for 25-30 minutes, or until the crust is golden brown and the date filling is set. The edges of the crust should be nicely browned, and the top should be lightly golden. A toothpick inserted into the center of the crust should come out with moist crumbs, indicating that the crust is baked through but still tender. Avoid overbaking, as this can result in a dry crust.
- Cool and Cut: Once baked, remove the date squares from the oven and let them cool completely in the baking pan on a wire rack. Allowing the date squares to cool completely is crucial for them to set properly and for easier cutting. Cooling helps the date filling firm up and the crust to solidify, resulting in cleaner cuts and better texture. Once completely cooled, use the parchment paper overhang to lift the date squares out of the pan. Place them on a cutting board and cut them into squares using a sharp knife. For clean cuts, you can use a slightly damp knife and wipe it clean between cuts. The size of the squares is up to your preference; you can cut them into smaller bite-sized squares or larger dessert portions.
- Serve and Enjoy: Your homemade Vegan Date Squares are now ready to be enjoyed! These squares are delicious served warm or cold. Store any leftover date squares in an airtight container at room temperature for up to 3 days, or in the refrigerator for up to a week. They are perfect as a snack, dessert, or even a healthier treat to pack in lunchboxes.
Nutrition Facts
(Per serving, approximately 1 square, recipe yields 16 squares)
- Serving Size: 1 square (approx. 5cm x 5cm)
- Calories: Approximately 220-250 kcal
- Total Fat: 8-10g
- Saturated Fat: 5-7g
- Unsaturated Fat: 2-3g
- Cholesterol: 0mg
- Sodium: 50-70mg
- Total Carbohydrate: 35-40g
- Dietary Fiber: 4-5g
- Total Sugars: 20-25g (naturally occurring from dates and maple syrup)
- Protein: 3-4g
Please Note: Nutritional information is an estimate and may vary based on specific ingredients used and serving sizes. For precise nutritional information, use a nutrition calculator with the exact brands and quantities of ingredients used.
Health Highlights:
- Vegan and Dairy-Free: Suitable for individuals following a vegan diet or those with dairy allergies or intolerances.
- Naturally Sweetened: Primarily sweetened with dates and maple syrup, reducing the reliance on refined sugars.
- Good Source of Fiber: Dates and oats are excellent sources of dietary fiber, promoting digestive health and satiety.
- Source of Energy: Dates provide natural sugars for sustained energy release, making these squares a great option for a pre or post-workout snack.
- Contains Healthy Fats: Coconut oil provides medium-chain triglycerides (MCTs), which are considered a healthier type of saturated fat.
Preparation Time
- Prep Time: 20 minutes (includes date filling preparation and crust mixing)
- Cook Time: 25-30 minutes
- Cooling Time: 1-2 hours (recommended for optimal texture and cutting)
- Total Time: Approximately 2-3 hours (including cooling)
While the total time might seem a bit lengthy due to cooling, the active preparation and cooking time are relatively short, making these date squares a manageable recipe even for busy bakers. The cooling time is essential for achieving the perfect texture and making them easy to cut into clean squares.
How to Serve
Vegan Date Squares are incredibly versatile and can be enjoyed in various ways. Here are some serving suggestions to elevate your date square experience:
- Warm: Slightly warm date squares are incredibly comforting, especially during colder months. A gentle reheat in the microwave for a few seconds or a brief warming in a low oven will enhance their gooeyness and aroma.
- Cold: Chilled date squares are equally delicious, offering a firmer texture and a refreshing sweetness, perfect for warmer weather or as a make-ahead treat.
- With Vegan Ice Cream: Pair warm date squares with a scoop of creamy vegan vanilla ice cream for a classic dessert combination. The warm squares and cold ice cream create a delightful contrast in temperature and texture.
- With a Dusting of Cinnamon: A light dusting of ground cinnamon over the squares enhances their warm, spiced notes and adds an extra layer of flavor.
- With a Sprinkle of Nuts: Chopped walnuts, pecans, or almonds sprinkled over the squares add a delightful crunch and nutty flavor that complements the dates and oats.
- With a Drizzle of Vegan Caramel Sauce: For an extra indulgent treat, drizzle vegan caramel sauce over the date squares. This adds a rich, buttery sweetness that elevates the dessert to another level.
- With a Cup of Tea or Coffee: Date squares are the perfect accompaniment to a warm beverage. Enjoy them with a cup of herbal tea, black tea, or coffee for a comforting afternoon or evening treat.
- As a Snack: Cut into smaller squares, they make a satisfying and wholesome snack to enjoy throughout the day, providing a boost of energy and fiber.
- In Lunchboxes: Date squares are portable and travel well, making them a great addition to lunchboxes for both kids and adults.
Additional Tips for Perfect Vegan Date Squares
To ensure your Vegan Date Squares turn out perfectly every time, consider these helpful tips:
- Use Good Quality Dates: The quality of your dates significantly impacts the flavor and texture of the filling. Medjool dates are highly recommended for their soft texture and rich flavor. Ensure your dates are fresh and moist for the best results. If your dates are dry, soak them in hot water for a bit longer to soften them before blending.
- Don’t Overbake the Crust: Overbaking the crust can result in dry and crumbly squares. Bake until the crust is just golden brown and set. The date filling will continue to set as it cools. Keep an eye on the oven and adjust baking time as needed based on your oven and pan.
- Cool Completely Before Cutting: Patience is key! Allow the date squares to cool completely in the pan before attempting to cut them. This allows the filling to firm up and the crust to set, resulting in cleaner cuts and preventing the squares from crumbling. If you’re in a hurry, you can chill them in the refrigerator to speed up the cooling process.
- Customize with Spices: Enhance the flavor profile of your date squares by adding spices to either the crust or the filling. Cinnamon, nutmeg, cardamom, or ginger all pair beautifully with dates and oats. Experiment with ¼ to ½ teaspoon of your favorite spice blend to add a warm and aromatic touch.
- Add Nuts or Seeds to the Crust: For added texture and nutritional value, incorporate chopped nuts or seeds into the oat crust. Walnuts, pecans, almonds, or pumpkin seeds would all be delicious additions. Add about ½ cup of chopped nuts or seeds to the dry ingredients and mix well before adding the wet ingredients. This will add a delightful crunch and nutty flavor to the crust.
FAQ Section: Your Vegan Date Square Questions Answered
Q1: Can I make these date squares gluten-free?
A: Absolutely! Simply substitute the all-purpose flour in the crust with a gluten-free all-purpose flour blend. Ensure your blend is designed for baking and contains a binder like xanthan gum. Also, use certified gluten-free rolled oats to guarantee a completely gluten-free recipe.
Q2: Can I use a different type of sweetener instead of maple syrup?
A: Yes, you can substitute maple syrup with other liquid sweeteners like agave nectar, brown rice syrup, or even melted coconut sugar syrup. Keep in mind that different sweeteners will have slightly different flavor profiles and sweetness levels, so you may need to adjust the quantity to your preference.
Q3: My date filling is too thick/too thin. How can I adjust it?
A: If your date filling is too thick, add a tablespoon of water at a time and blend until you reach the desired spreadable consistency. If your filling is too thin (which is less common with Medjool dates), you can simmer it in a saucepan over low heat for a few minutes, stirring constantly, to allow some of the excess moisture to evaporate and thicken it slightly.
Q4: How long do vegan date squares last?
A: Vegan date squares will keep at room temperature in an airtight container for up to 3 days, or in the refrigerator for up to a week. They can also be frozen for longer storage. Wrap individual squares tightly in plastic wrap and then place them in a freezer-safe bag or container. Frozen date squares can be thawed at room temperature or in the refrigerator.
Q5: Can I add chocolate chips to these date squares?
A: Yes, you can definitely add vegan chocolate chips to these date squares for an extra touch of indulgence! Stir in about ½ cup of vegan chocolate chips into the oat crust mixture or sprinkle them on top of the date filling before adding the crumb topping. Dark chocolate chips would complement the sweetness of the dates beautifully.
Enjoy baking and indulging in these wholesome and delicious Vegan Date Squares! They are a testament to how simple, natural ingredients can come together to create a truly satisfying and guilt-free treat.
Print
Vegan Date Squares Recipe
Ingredients
For the Oat Crust:
- Rolled Oats: 3 cups (240g). The foundation of our crust, rolled oats provide a wonderfully chewy texture and a nutty flavor. It’s essential to use rolled oats (also known as old-fashioned oats) rather than instant oats. Instant oats are too finely processed and will result in a mushy crust. Rolled oats offer the perfect balance of structure and tenderness, creating a satisfying base for the sweet date filling. Opt for certified gluten-free rolled oats if you need to ensure this recipe is gluten-free.
- All-Purpose Flour (or Gluten-Free Blend): 1 ½ cups (180g). Flour binds the oat mixture together, adding structure and lightness to the crust. For a classic date square, all-purpose flour works beautifully. However, if you’re gluten-free, a good quality gluten-free all-purpose flour blend will work just as well. Ensure your gluten-free blend is designed for baking and contains xanthan gum or another binder to mimic the gluten structure. Experimenting with blends like oat flour or almond flour (in combination with a binder) can also yield interesting variations in texture and flavor, although for this recipe, a dedicated gluten-free blend or all-purpose flour is recommended for the most authentic result.
- Coconut Oil, Melted: ¾ cup (180ml). Coconut oil acts as the fat in our crust, contributing to its richness, tenderness, and slightly crumbly texture. Melted coconut oil binds the dry ingredients together and solidifies upon cooling, creating a cohesive crust. Use refined coconut oil if you prefer a neutral flavor, as unrefined coconut oil will impart a distinct coconut taste, which can be delicious but might not be desired in a classic date square. Alternatively, you could use melted vegan butter for a richer, more buttery flavor, though coconut oil is a fantastic vegan and often healthier option.
- Maple Syrup: ½ cup (120ml). Maple syrup adds a touch of natural sweetness to the crust, complementing the dates beautifully. It also contributes to the crust’s moisture and helps to bind the ingredients. Pure maple syrup is preferred for its rich flavor and natural sweetness, avoiding artificial syrups or corn syrup-based alternatives. Agave nectar or brown rice syrup could be used as substitutes if maple syrup is unavailable, though they will slightly alter the flavor profile.
- Baking Soda: 1 teaspoon. Baking soda is a leavening agent that helps to create a slightly lighter and more tender crust. It reacts with the acidity in the maple syrup to produce carbon dioxide, resulting in a subtle lift in the baked crust. Ensure your baking soda is fresh for optimal leavening power.
- Salt: ½ teaspoon. Salt enhances the flavors of all the other ingredients in the crust, balancing the sweetness and bringing out the nutty notes of the oats. It’s a crucial ingredient even in sweet recipes, as it prevents the dessert from tasting flat or one-dimensional. Use fine sea salt or table salt.
For the Date Filling:
- Medjool Dates, Pitted: 2 cups (about 300g). Medjool dates are the star of the show, providing the signature sweetness, chewiness, and rich caramel-like flavor of date squares. Medjool dates are preferred for their soft, moist texture and intense sweetness, making them ideal for creating a smooth and decadent filling. It’s crucial to use pitted dates to save time and ensure no stray pits end up in your filling. If using other types of dates like Deglet Noor, which are drier, you may need to soak them in hot water for 10-15 minutes before blending to soften them and achieve the desired consistency.
- Water: ¾ cup (180ml). Water is used to help soften the dates and create a smooth, spreadable filling. Boiling water is often recommended as it helps to break down the dates more quickly and efficiently, resulting in a smoother texture. The amount of water may need to be adjusted slightly depending on the dryness of your dates; start with ¾ cup and add more if needed to achieve a smooth, thick, and spreadable consistency.
- Vanilla Extract: 1 teaspoon. Vanilla extract enhances the overall flavor profile of the date filling, adding a touch of warmth and complexity. Pure vanilla extract is preferred for its superior flavor compared to imitation vanilla. A good quality vanilla extract complements the caramel notes of the dates and elevates the overall taste of the filling. You could also use vanilla bean paste for an even more intense vanilla flavor.
- Lemon Juice: 1 tablespoon. A touch of lemon juice brightens the date filling, adding a subtle tanginess that balances the sweetness and prevents it from being overly cloying. Freshly squeezed lemon juice is preferred for its vibrant flavor, but bottled lemon juice can be used in a pinch. The acidity of the lemon juice also helps to enhance the other flavors in the filling and prevents the date mixture from being too one-dimensional.
Instructions
- Preheat Oven and Prepare Baking Pan: Begin by preheating your oven to 350°F (175°C). This ensures the oven is at the correct temperature when you place your date squares in to bake, promoting even cooking and a perfectly golden crust. While the oven is preheating, prepare an 8×8 inch baking pan. Line the pan with parchment paper, leaving an overhang on the sides. This parchment paper sling will be your best friend when it comes to easily removing the baked date squares from the pan later, preventing sticking and ensuring clean, intact squares. Grease the parchment paper lightly with coconut oil or cooking spray to further guarantee easy removal.
- Prepare the Date Filling: Now, let’s focus on the heart of our date squares – the luscious date filling. In a medium-sized saucepan, combine the pitted Medjool dates and water. Place the saucepan over medium heat and bring the mixture to a gentle simmer. Simmer for about 5-7 minutes, or until the dates have softened significantly and become easily mashable. The simmering process softens the dates, making them easier to blend into a smooth filling and releasing their natural sweetness. Remove the saucepan from the heat and carefully transfer the softened dates and water to a blender or food processor. Add the vanilla extract and lemon juice to the blender or food processor. Blend until the mixture is completely smooth and creamy. You may need to scrape down the sides of the blender or food processor a few times to ensure all the dates are fully incorporated and the filling is uniformly smooth. The consistency should be thick and spreadable, resembling a smooth date paste. Set the date filling aside while you prepare the crust.
- Make the Oat Crust: In a large bowl, combine the rolled oats, all-purpose flour (or gluten-free blend), baking soda, and salt. Whisk these dry ingredients together thoroughly to ensure the baking soda and salt are evenly distributed throughout the mixture. This step is important for even leavening and flavor distribution in the crust. In a separate bowl, melt the coconut oil in the microwave or in a saucepan over low heat. Once melted, add the maple syrup to the melted coconut oil and whisk to combine them. Pour the wet ingredients (coconut oil and maple syrup mixture) into the bowl with the dry ingredients. Using a spatula or your hands, mix until all the ingredients are well combined and moistened. The mixture should resemble damp crumbs and hold together when pressed.
- Assemble the Date Squares: It’s time to assemble our date squares. Press approximately two-thirds of the oat crust mixture evenly into the prepared baking pan. Use your fingers or the back of a spoon to firmly press the crust into the bottom of the pan, creating a compact and even base. Pour the prepared date filling evenly over the oat crust base, spreading it to the edges of the pan. Ensure the date filling is distributed uniformly for consistent flavor and texture in each square. Crumble the remaining one-third of the oat crust mixture evenly over the date filling. Distribute the crumbles loosely and evenly to create a textured topping for the date squares. You can gently press the crumbles down slightly, but avoid packing them too tightly, as you want to maintain a slightly crumbly topping.
- Bake to Golden Perfection: Place the assembled date squares in the preheated oven and bake for 25-30 minutes, or until the crust is golden brown and the date filling is set. The edges of the crust should be nicely browned, and the top should be lightly golden. A toothpick inserted into the center of the crust should come out with moist crumbs, indicating that the crust is baked through but still tender. Avoid overbaking, as this can result in a dry crust.
- Cool and Cut: Once baked, remove the date squares from the oven and let them cool completely in the baking pan on a wire rack. Allowing the date squares to cool completely is crucial for them to set properly and for easier cutting. Cooling helps the date filling firm up and the crust to solidify, resulting in cleaner cuts and better texture. Once completely cooled, use the parchment paper overhang to lift the date squares out of the pan. Place them on a cutting board and cut them into squares using a sharp knife. For clean cuts, you can use a slightly damp knife and wipe it clean between cuts. The size of the squares is up to your preference; you can cut them into smaller bite-sized squares or larger dessert portions.
- Serve and Enjoy: Your homemade Vegan Date Squares are now ready to be enjoyed! These squares are delicious served warm or cold. Store any leftover date squares in an airtight container at room temperature for up to 3 days, or in the refrigerator for up to a week. They are perfect as a snack, dessert, or even a healthier treat to pack in lunchboxes.
Nutrition
- Serving Size: One Normal Portion
- Calories: 220-250 kcal
- Sugar: 20-25g
- Sodium: 50-70mg
- Fat: 8-10g
- Saturated Fat: 5-7g
- Unsaturated Fat: 2-3g
- Carbohydrates: 35-40g
- Fiber: 4-5g
- Protein: 3-4g
- Cholesterol: 0mg


