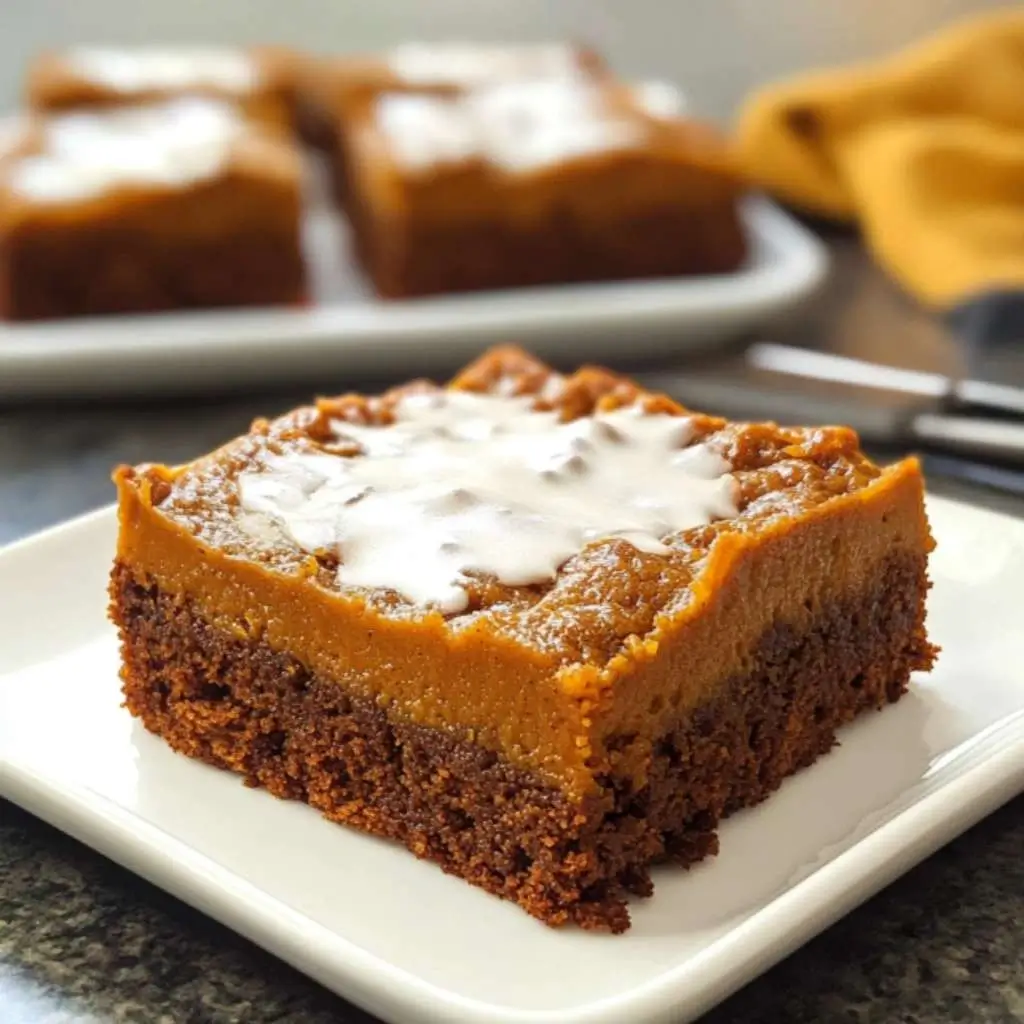

Fall has officially arrived, and with it comes the irresistible craving for all things pumpkin spice! This year, my family and I decided to dive headfirst into the autumnal spirit with these Vegan Pumpkin Bars, and let me tell you, they were an absolute revelation. Even my most discerning dessert critics (aka my kids!) devoured them in record time, proclaiming them the “best pumpkin treat ever!” These bars are not just delicious; they’re incredibly moist, perfectly spiced, and topped with a dreamy vegan cream cheese frosting that takes them to a whole new level of indulgence. Whether you’re vegan, gluten-free, or simply looking for a healthier and equally scrumptious alternative to traditional pumpkin desserts, this recipe is a guaranteed crowd-pleaser. Easy to make, bursting with warm fall flavors, and perfect for any occasion from holiday gatherings to a cozy night in, these vegan pumpkin bars are about to become your new go-to fall baking project. Get ready to experience pumpkin perfection in every bite!
Ingredients
This recipe utilizes simple, wholesome ingredients to create a truly decadent dessert. Let’s break down each component and explore why they are essential for achieving the perfect vegan pumpkin bar.
- 2 tablespoons Ground Flax Seeds + 6 tablespoons Water (Flax Eggs): This dynamic duo is the magic behind our eggless baking! When ground flax seeds are mixed with water, they create a gel-like consistency, mimicking the binding properties of eggs in traditional baking. This is crucial for creating the structure and moistness we desire in our pumpkin bars. Flax seeds are also a nutritional powerhouse, packed with omega-3 fatty acids, fiber, and lignans, adding a healthy boost to our dessert. Make sure to use ground flax seeds, as whole flax seeds won’t create the same binding effect. Let the flax egg mixture sit for at least 5 minutes to thicken properly before adding it to the wet ingredients – you’ll notice it becoming noticeably thicker and viscous.
- 1 ½ cups (210g) Gluten-Free Flour Blend OR 1 ½ cups (188g) All-Purpose White Flour: Flour is the foundation of our pumpkin bars, providing structure and texture. This recipe offers flexibility, allowing you to choose between a gluten-free blend or all-purpose flour.
- Gluten-Free Flour Blend: For those following a gluten-free diet, a good quality gluten-free all-purpose flour blend is essential. Look for blends that are designed for baking and contain a mix of flours like rice flour, tapioca starch, and potato starch, often with a binder like xanthan gum or guar gum. Xanthan gum is particularly important in gluten-free baking as it acts as a gluten replacement, helping to bind the ingredients and prevent the bars from becoming crumbly. Different gluten-free flour blends can vary in density, so weighing your flour (210g) is recommended for the most accurate results.
- All-Purpose White Flour: If gluten is not a concern, all-purpose white flour works beautifully in this recipe. It provides a classic cake-like texture and is readily available in most pantries. If using all-purpose flour, it is recommended to slightly reduce the amount to 1 ½ cups (188g) as it can absorb liquid differently than some gluten-free blends. Again, weighing your flour is the most precise method, but if measuring by volume, use the “spoon and level” method: lightly spoon the flour into your measuring cup and then level off the top with a straight edge, avoiding packing the flour.
- 2 teaspoons Baking Powder & ¾ teaspoon Baking Soda: These are our leavening agents, responsible for the rise and airy texture of the pumpkin bars. Baking powder is a complete leavening agent, containing both an acid and a base, activated by liquid and heat. Baking soda (sodium bicarbonate) requires an acidic ingredient to activate, which in this recipe comes from the pumpkin purée and brown sugar (if used). Using both baking powder and baking soda creates a balanced rise and ensures our bars are light and fluffy, not dense or flat. Make sure your baking powder and baking soda are fresh, as they can lose their potency over time, leading to flat or dense baked goods. To test freshness, you can add a teaspoon of baking powder to hot water – it should bubble vigorously. For baking soda, mix a teaspoon with vinegar – it should also fizz.
- 1 tablespoon Pumpkin Pie Spice: This blend of warm spices is the heart and soul of our pumpkin bars, delivering that quintessential fall flavor. Pumpkin pie spice typically includes cinnamon, ginger, nutmeg, and cloves, creating a complex and comforting aroma and taste. You can easily find pre-made pumpkin pie spice blends in most grocery stores. For an even more intense flavor, you can make your own pumpkin pie spice blend at home. A good starting point is: 4 teaspoons ground cinnamon, 2 teaspoons ground ginger, 1 teaspoon ground nutmeg, and ½ teaspoon ground cloves. Feel free to adjust the ratios to your personal preference. If you don’t have pumpkin pie spice on hand, you can use a combination of cinnamon and nutmeg as a substitute, though the flavor will be slightly less complex.
- ¼ teaspoon Salt: Salt might seem counterintuitive in a dessert, but it plays a crucial role in enhancing flavors and balancing sweetness. Salt helps to bring out the sweetness of the sugar and the warmth of the spices, creating a more well-rounded flavor profile. It also helps to control the leavening process and can improve the texture of baked goods. Use fine sea salt or table salt in this recipe.
- ¾ cup (180g) Unsweetened Pumpkin Purée: Pumpkin purée is the star ingredient, providing moisture, flavor, and that beautiful orange hue to our bars. Make sure to use unsweetened pumpkin purée, not pumpkin pie filling, which is already sweetened and spiced. Canned pumpkin purée is readily available and convenient. Alternatively, you can make your own pumpkin purée by roasting or steaming pumpkin or other winter squash like butternut squash. Homemade pumpkin purée can sometimes be more watery than canned, so if you’re using homemade, you might want to drain off any excess liquid before measuring. The consistency of the pumpkin purée is important for the overall moisture of the bars.
- ¾ cup (113g) Coconut Sugar OR ⅔ cup (133g) Brown Sugar: Sweetness is essential in any dessert, and this recipe offers options for different types of sugar, each contributing slightly different nuances to the flavor and texture.
- Coconut Sugar: Coconut sugar is a natural sweetener with a slightly caramel-like flavor and a lower glycemic index than refined white sugar. It adds a subtle depth of flavor to the pumpkin bars and contributes to their moistness. It is less refined than white sugar and retains some minerals and nutrients from the coconut palm sap it is derived from.
- Brown Sugar: Brown sugar, whether light or dark, adds a rich molasses flavor and contributes to a chewier texture in baked goods. Dark brown sugar has a more intense molasses flavor than light brown sugar. Using brown sugar will result in slightly denser and chewier bars compared to coconut sugar. If using brown sugar, make sure to pack it lightly when measuring to avoid using too much.
- ¼ cup (60ml) Oil: Oil adds moisture and tenderness to our pumpkin bars, preventing them from becoming dry or crumbly. A neutral-flavored oil like vegetable oil, canola oil, or avocado oil is recommended so it doesn’t compete with the pumpkin and spice flavors. Melted coconut oil can also be used, which will add a subtle coconut flavor. Olive oil is generally not recommended for this recipe as its strong flavor can overpower the other ingredients. Using oil instead of butter makes these bars vegan and also contributes to their incredibly moist texture, as oil remains liquid at room temperature, unlike butter which solidifies.
- 1 teaspoon Vanilla Extract: Vanilla extract enhances the overall flavor profile of the pumpkin bars, adding warmth and complexity. Use pure vanilla extract for the best flavor. Imitation vanilla extract can have a slightly artificial taste. Vanilla extract complements the pumpkin and spices beautifully, rounding out the flavors and adding a touch of sweetness.
- 1 recipe Vegan Cream Cheese Frosting: No pumpkin bar is complete without a luscious cream cheese frosting! This vegan version uses dairy-free cream cheese to create a tangy, sweet, and utterly irresistible topping. The frosting adds a creamy contrast to the spiced pumpkin bars and elevates them to a truly decadent dessert. You can find many delicious vegan cream cheese frosting recipes online or use your favorite store-bought vegan cream cheese to create a simple frosting by mixing it with powdered sugar and a touch of vanilla extract. The recipe notes mention that you can make the frosting layer as thick or thin as you like, giving you flexibility in how sweet and decadent you want your bars to be. Leftover frosting can be stored in the refrigerator and used for other desserts or even spread on toast or bagels.
Instructions
Let’s walk through the step-by-step instructions to create these delightful vegan pumpkin bars. Follow these steps carefully for baking success!
- Preheat Oven to 350°F (177°C): Start by preheating your oven to the correct temperature. Accurate oven temperature is crucial for even baking. If your oven runs hot or cold, consider using an oven thermometer to ensure accuracy. Preheating ensures that the oven is at the desired temperature when you place the bars inside, allowing them to bake evenly from the start.
- Line an 8″ x 8″ Square Baking Pan: Prepare your baking pan for easy removal of the bars. Lining the pan with parchment paper with an overhang on all sides is the key. Cut a piece of parchment paper slightly wider than your pan. Press it into the pan, allowing the excess paper to hang over the edges. This overhang will act as handles, making it incredibly easy to lift the baked bars out of the pan once they are cooled. Using parchment paper also prevents the bars from sticking to the pan, ensuring clean and intact squares. Set the prepared pan aside.
- Prepare Flax Eggs: Combine the ground flax seeds and water in a small bowl. Whisk them together thoroughly to ensure the flax seeds are well distributed in the water. Set the mixture aside to thicken for at least 5 minutes, or while you prepare the other ingredients. As the flax seeds absorb the water, the mixture will transform into a gel-like consistency, resembling the texture of raw egg whites. This “flax egg” is our vegan egg replacement and will provide binding and moisture to the bars.
- Combine Dry Ingredients: In a large bowl, whisk together the gluten-free flour blend (or all-purpose flour), baking powder, baking soda, pumpkin pie spice, and salt. Whisking is important to evenly distribute the leavening agents and spices throughout the flour. This ensures that the bars rise uniformly and have a consistent flavor. Set the dry ingredients aside.
- Combine Wet Ingredients: In a medium bowl, combine the pumpkin purée, sugar (coconut or brown), oil, vanilla extract, and the prepared flax eggs. Mix these wet ingredients together until they are well combined and smooth. This creates a homogenous base for our batter, ensuring that the flavors are evenly distributed and the bars are moist and consistent in texture.
- Combine Wet and Dry Ingredients: Gradually add the dry mixture to the wet mixture. Stir with a wooden spoon or rubber spatula until just combined and a thick batter forms. Be careful not to over-mix the batter. Over-mixing can develop the gluten in the flour (even gluten-free flour can be over-mixed), leading to tough or dense bars. Mix only until the dry ingredients are just incorporated into the wet ingredients. A few streaks of flour are okay at this stage, as they will disappear as you scrape and spread the batter in the pan.
- Scrape Batter into Pan and Smooth: Using a rubber spatula, scrape all the batter from the bowl into the prepared baking pan. Spread the batter evenly in the pan, reaching all corners. Smooth out the top of the batter with the spatula to create an even surface for baking. An even surface ensures that the bars bake uniformly and don’t have any sunken or raised areas.
- Bake for 23 Minutes: Place the baking pan in the preheated oven and bake for 23 minutes, or until a toothpick inserted into the center of the bars comes out clean. Baking time can vary slightly depending on your oven, so it’s important to check for doneness using the toothpick test. Insert a toothpick into the center of the bars; if it comes out with moist crumbs attached, the bars are done. If it comes out with wet batter, they need to bake for a few more minutes. Be careful not to overbake the bars, as this can make them dry.
- Cool in Pan for 10 Minutes: Once baked, remove the pan from the oven and place it on a cooling rack. Let the bars cool in the pan for 10 minutes. This allows them to set slightly and makes them easier to handle without breaking when you remove them from the pan.
- Cool Completely on Rack: After 10 minutes of cooling in the pan, use the parchment paper overhang to carefully lift the cake out of the pan and place it directly on a cooling rack. Cool the bars completely before frosting. Frosting warm bars will cause the frosting to melt and become runny. Allowing the bars to cool completely ensures that the frosting will set properly and have the desired consistency. Complete cooling also allows the flavors of the bars to fully develop.
- Prepare Cream Cheese Frosting (While Cooling): While the bars are cooling, prepare your vegan cream cheese frosting according to your chosen recipe or using store-bought vegan cream cheese. This ensures the frosting is ready to go as soon as the bars are completely cooled.
- Frost, Slice, and Serve: Once the bars are fully cooled, frost them with the vegan cream cheese frosting. You can make the frosting layer as thick or thin as you prefer. Use a small offset decorating spatula or a knife to spread the frosting evenly over the bars. Slice the frosted bars into 9 squares (or more, depending on your desired serving size) and serve. Enjoy the deliciousness of your homemade vegan pumpkin bars!
Nutrition Facts
(Estimated, per serving, based on 9 servings – Note: Nutritional values can vary based on specific ingredient brands and frosting recipe used)
- Servings: 9
- Calories per serving: Approximately 350-400 calories (depending on frosting thickness and sugar type)
These vegan pumpkin bars offer a delightful balance of sweet and spiced flavors while being relatively wholesome. Pumpkin purée is a good source of Vitamin A and fiber. Flax seeds contribute omega-3 fatty acids and fiber. While still a dessert, this vegan version can be a slightly lighter and more nutritious option compared to traditional pumpkin bars made with eggs and dairy.
Preparation Time
- Prep Time: 15 minutes
- Cook Time: 23 minutes
- Total Time: 38 minutes
These vegan pumpkin bars are surprisingly quick and easy to prepare, making them perfect for busy weeknights or last-minute dessert cravings. The short prep time and relatively quick baking time mean you can have a warm, delicious fall treat on the table in under 40 minutes!
How to Serve
These vegan pumpkin bars are incredibly versatile and can be served in a variety of ways:
- Classic Dessert: Serve them as is, sliced into squares, for a simple yet satisfying dessert.
- With a dollop of whipped cream: Add a dollop of vegan whipped cream or coconut whipped cream for extra indulgence.
- With a sprinkle of cinnamon: Dust the frosted bars with a sprinkle of cinnamon or pumpkin pie spice for an extra touch of flavor and visual appeal.
- Alongside a warm beverage: Pair them with a cup of hot coffee, tea, or a warm mug of spiced apple cider for a cozy fall treat.
- As a potluck contribution: These bars are perfect for potlucks and gatherings as they are easy to transport and serve a crowd.
- Holiday Dessert: Elevate your holiday dessert table with these vegan pumpkin bars – they are sure to be a hit!
- Dessert Bar: Cut them into smaller squares or rectangles and arrange them on a dessert platter alongside other fall treats for a festive dessert bar.
- With Caramel Drizzle: Drizzle with vegan caramel sauce for an extra layer of sweetness and flavor.
- Warm with Ice Cream: Slightly warm a square of pumpkin bar and serve it with a scoop of vegan vanilla ice cream for a decadent dessert experience.
Additional Tips for Perfect Vegan Pumpkin Bars
- Use Quality Ingredients: Starting with fresh, high-quality ingredients will make a noticeable difference in the final taste and texture of your pumpkin bars. Use fresh spices, good quality vanilla extract, and ensure your baking powder and baking soda are not expired.
- Don’t Over-Mix the Batter: Over-mixing can lead to tough bars. Mix the wet and dry ingredients just until combined. A few streaks of flour are okay – they will disappear during baking.
- Measure Flour Accurately: Especially when using gluten-free flour, accurate measurement is crucial. Weighing your flour is the most precise method. If measuring by volume, use the spoon and level method to avoid packing the flour.
- Cool Completely Before Frosting: Ensure the pumpkin bars are completely cooled before frosting. Frosting warm bars will cause the frosting to melt and become runny. Patience is key for a beautifully frosted dessert!
- Customize Your Frosting: Feel free to adjust the sweetness and tanginess of your vegan cream cheese frosting to your liking. You can add more or less powdered sugar to adjust sweetness and a squeeze of lemon juice for extra tang. You can also experiment with adding different flavors to the frosting, such as cinnamon, maple extract, or a hint of orange zest.
FAQ Section
Q: Can I make these pumpkin bars ahead of time?
A: Absolutely! These vegan pumpkin bars are perfect for making ahead. You can bake the bars a day or two in advance and store them unfrosted at room temperature in an airtight container. Frost them just before serving for the best texture and flavor. Frosted bars can be stored in the refrigerator for up to 3 days.
Q: Can I freeze vegan pumpkin bars?
A: Yes, you can freeze both unfrosted and frosted vegan pumpkin bars. For best results, freeze them unfrosted. Wrap the cooled bars tightly in plastic wrap and then in foil, or place them in a freezer-safe container. Freeze for up to 2-3 months. Thaw overnight in the refrigerator before frosting and serving. Frosted bars can also be frozen, but the frosting texture might slightly change after thawing.
Q: Can I use a different size pan?
A: This recipe is specifically formulated for an 8×8 inch square pan. Using a different size pan will affect the baking time and the thickness of the bars. If you use a 9×13 inch pan, the bars will be thinner and will bake faster. Keep a close eye on them and reduce the baking time accordingly. If you use a smaller pan, the bars will be thicker and may require a longer baking time.
Q: Can I substitute the oil with applesauce or another oil-free alternative?
A: While oil contributes to the moistness and tender texture of these bars, you can try substituting it with unsweetened applesauce for a slightly lower-fat option. However, the texture might be slightly denser. Start with replacing half of the oil with applesauce and see how you like the results. Completely oil-free versions may be drier and require adjustments to the liquid ingredients.
Q: My pumpkin bars are sinking in the middle. What did I do wrong?
A: Sinking in the middle can be caused by a few factors: over-mixing the batter, oven temperature being too high, or underbaking. Make sure not to over-mix the batter, ensure your oven temperature is accurate, and bake the bars until a toothpick inserted in the center comes out clean. Also, avoid opening the oven door frequently during baking, as temperature fluctuations can cause sinking.

Vegan Pumpkin Bars Recipe
Ingredients
- 2 tablespoons Ground Flax Seeds + 6 tablespoons Water (Flax Eggs): This dynamic duo is the magic behind our eggless baking! When ground flax seeds are mixed with water, they create a gel-like consistency, mimicking the binding properties of eggs in traditional baking. This is crucial for creating the structure and moistness we desire in our pumpkin bars. Flax seeds are also a nutritional powerhouse, packed with omega-3 fatty acids, fiber, and lignans, adding a healthy boost to our dessert. Make sure to use ground flax seeds, as whole flax seeds won’t create the same binding effect. Let the flax egg mixture sit for at least 5 minutes to thicken properly before adding it to the wet ingredients – you’ll notice it becoming noticeably thicker and viscous.
- 1 ½ cups (210g) Gluten-Free Flour Blend OR 1 ½ cups (188g) All-Purpose White Flour: Flour is the foundation of our pumpkin bars, providing structure and texture. This recipe offers flexibility, allowing you to choose between a gluten-free blend or all-purpose flour.
- Gluten-Free Flour Blend: For those following a gluten-free diet, a good quality gluten-free all-purpose flour blend is essential. Look for blends that are designed for baking and contain a mix of flours like rice flour, tapioca starch, and potato starch, often with a binder like xanthan gum or guar gum. Xanthan gum is particularly important in gluten-free baking as it acts as a gluten replacement, helping to bind the ingredients and prevent the bars from becoming crumbly. Different gluten-free flour blends can vary in density, so weighing your flour (210g) is recommended for the most accurate results.
- All-Purpose White Flour: If gluten is not a concern, all-purpose white flour works beautifully in this recipe. It provides a classic cake-like texture and is readily available in most pantries. If using all-purpose flour, it is recommended to slightly reduce the amount to 1 ½ cups (188g) as it can absorb liquid differently than some gluten-free blends. Again, weighing your flour is the most precise method, but if measuring by volume, use the “spoon and level” method: lightly spoon the flour into your measuring cup and then level off the top with a straight edge, avoiding packing the flour.
- 2 teaspoons Baking Powder & ¾ teaspoon Baking Soda: These are our leavening agents, responsible for the rise and airy texture of the pumpkin bars. Baking powder is a complete leavening agent, containing both an acid and a base, activated by liquid and heat. Baking soda (sodium bicarbonate) requires an acidic ingredient to activate, which in this recipe comes from the pumpkin purée and brown sugar (if used). Using both baking powder and baking soda creates a balanced rise and ensures our bars are light and fluffy, not dense or flat. Make sure your baking powder and baking soda are fresh, as they can lose their potency over time, leading to flat or dense baked goods. To test freshness, you can add a teaspoon of baking powder to hot water – it should bubble vigorously. For baking soda, mix a teaspoon with vinegar – it should also fizz.
- 1 tablespoon Pumpkin Pie Spice: This blend of warm spices is the heart and soul of our pumpkin bars, delivering that quintessential fall flavor. Pumpkin pie spice typically includes cinnamon, ginger, nutmeg, and cloves, creating a complex and comforting aroma and taste. You can easily find pre-made pumpkin pie spice blends in most grocery stores. For an even more intense flavor, you can make your own pumpkin pie spice blend at home. A good starting point is: 4 teaspoons ground cinnamon, 2 teaspoons ground ginger, 1 teaspoon ground nutmeg, and ½ teaspoon ground cloves. Feel free to adjust the ratios to your personal preference. If you don’t have pumpkin pie spice on hand, you can use a combination of cinnamon and nutmeg as a substitute, though the flavor will be slightly less complex.
- ¼ teaspoon Salt: Salt might seem counterintuitive in a dessert, but it plays a crucial role in enhancing flavors and balancing sweetness. Salt helps to bring out the sweetness of the sugar and the warmth of the spices, creating a more well-rounded flavor profile. It also helps to control the leavening process and can improve the texture of baked goods. Use fine sea salt or table salt in this recipe.
- ¾ cup (180g) Unsweetened Pumpkin Purée: Pumpkin purée is the star ingredient, providing moisture, flavor, and that beautiful orange hue to our bars. Make sure to use unsweetened pumpkin purée, not pumpkin pie filling, which is already sweetened and spiced. Canned pumpkin purée is readily available and convenient. Alternatively, you can make your own pumpkin purée by roasting or steaming pumpkin or other winter squash like butternut squash. Homemade pumpkin purée can sometimes be more watery than canned, so if you’re using homemade, you might want to drain off any excess liquid before measuring. The consistency of the pumpkin purée is important for the overall moisture of the bars.
- ¾ cup (113g) Coconut Sugar OR ⅔ cup (133g) Brown Sugar: Sweetness is essential in any dessert, and this recipe offers options for different types of sugar, each contributing slightly different nuances to the flavor and texture.
- Coconut Sugar: Coconut sugar is a natural sweetener with a slightly caramel-like flavor and a lower glycemic index than refined white sugar. It adds a subtle depth of flavor to the pumpkin bars and contributes to their moistness. It is less refined than white sugar and retains some minerals and nutrients from the coconut palm sap it is derived from.
- Brown Sugar: Brown sugar, whether light or dark, adds a rich molasses flavor and contributes to a chewier texture in baked goods. Dark brown sugar has a more intense molasses flavor than light brown sugar. Using brown sugar will result in slightly denser and chewier bars compared to coconut sugar. If using brown sugar, make sure to pack it lightly when measuring to avoid using too much.
- ¼ cup (60ml) Oil: Oil adds moisture and tenderness to our pumpkin bars, preventing them from becoming dry or crumbly. A neutral-flavored oil like vegetable oil, canola oil, or avocado oil is recommended so it doesn’t compete with the pumpkin and spice flavors. Melted coconut oil can also be used, which will add a subtle coconut flavor. Olive oil is generally not recommended for this recipe as its strong flavor can overpower the other ingredients. Using oil instead of butter makes these bars vegan and also contributes to their incredibly moist texture, as oil remains liquid at room temperature, unlike butter which solidifies.
- 1 teaspoon Vanilla Extract: Vanilla extract enhances the overall flavor profile of the pumpkin bars, adding warmth and complexity. Use pure vanilla extract for the best flavor. Imitation vanilla extract can have a slightly artificial taste. Vanilla extract complements the pumpkin and spices beautifully, rounding out the flavors and adding a touch of sweetness.
- 1 recipe Vegan Cream Cheese Frosting: No pumpkin bar is complete without a luscious cream cheese frosting! This vegan version uses dairy-free cream cheese to create a tangy, sweet, and utterly irresistible topping. The frosting adds a creamy contrast to the spiced pumpkin bars and elevates them to a truly decadent dessert. You can find many delicious vegan cream cheese frosting recipes online or use your favorite store-bought vegan cream cheese to create a simple frosting by mixing it with powdered sugar and a touch of vanilla extract. The recipe notes mention that you can make the frosting layer as thick or thin as you like, giving you flexibility in how sweet and decadent you want your bars to be. Leftover frosting can be stored in the refrigerator and used for other desserts or even spread on toast or bagels
Instructions
- Preheat Oven to 350°F (177°C): Start by preheating your oven to the correct temperature. Accurate oven temperature is crucial for even baking. If your oven runs hot or cold, consider using an oven thermometer to ensure accuracy. Preheating ensures that the oven is at the desired temperature when you place the bars inside, allowing them to bake evenly from the start.
- Line an 8″ x 8″ Square Baking Pan: Prepare your baking pan for easy removal of the bars. Lining the pan with parchment paper with an overhang on all sides is the key. Cut a piece of parchment paper slightly wider than your pan. Press it into the pan, allowing the excess paper to hang over the edges. This overhang will act as handles, making it incredibly easy to lift the baked bars out of the pan once they are cooled. Using parchment paper also prevents the bars from sticking to the pan, ensuring clean and intact squares. Set the prepared pan aside.
- Prepare Flax Eggs: Combine the ground flax seeds and water in a small bowl. Whisk them together thoroughly to ensure the flax seeds are well distributed in the water. Set the mixture aside to thicken for at least 5 minutes, or while you prepare the other ingredients. As the flax seeds absorb the water, the mixture will transform into a gel-like consistency, resembling the texture of raw egg whites. This “flax egg” is our vegan egg replacement and will provide binding and moisture to the bars.
- Combine Dry Ingredients: In a large bowl, whisk together the gluten-free flour blend (or all-purpose flour), baking powder, baking soda, pumpkin pie spice, and salt. Whisking is important to evenly distribute the leavening agents and spices throughout the flour. This ensures that the bars rise uniformly and have a consistent flavor. Set the dry ingredients aside.
- Combine Wet Ingredients: In a medium bowl, combine the pumpkin purée, sugar (coconut or brown), oil, vanilla extract, and the prepared flax eggs. Mix these wet ingredients together until they are well combined and smooth. This creates a homogenous base for our batter, ensuring that the flavors are evenly distributed and the bars are moist and consistent in texture.
- Combine Wet and Dry Ingredients: Gradually add the dry mixture to the wet mixture. Stir with a wooden spoon or rubber spatula until just combined and a thick batter forms. Be careful not to over-mix the batter. Over-mixing can develop the gluten in the flour (even gluten-free flour can be over-mixed), leading to tough or dense bars. Mix only until the dry ingredients are just incorporated into the wet ingredients. A few streaks of flour are okay at this stage, as they will disappear as you scrape and spread the batter in the pan.
- Scrape Batter into Pan and Smooth: Using a rubber spatula, scrape all the batter from the bowl into the prepared baking pan. Spread the batter evenly in the pan, reaching all corners. Smooth out the top of the batter with the spatula to create an even surface for baking. An even surface ensures that the bars bake uniformly and don’t have any sunken or raised areas.
- Bake for 23 Minutes: Place the baking pan in the preheated oven and bake for 23 minutes, or until a toothpick inserted into the center of the bars comes out clean. Baking time can vary slightly depending on your oven, so it’s important to check for doneness using the toothpick test. Insert a toothpick into the center of the bars; if it comes out with moist crumbs attached, the bars are done. If it comes out with wet batter, they need to bake for a few more minutes. Be careful not to overbake the bars, as this can make them dry.
- Cool in Pan for 10 Minutes: Once baked, remove the pan from the oven and place it on a cooling rack. Let the bars cool in the pan for 10 minutes. This allows them to set slightly and makes them easier to handle without breaking when you remove them from the pan.
- Cool Completely on Rack: After 10 minutes of cooling in the pan, use the parchment paper overhang to carefully lift the cake out of the pan and place it directly on a cooling rack. Cool the bars completely before frosting. Frosting warm bars will cause the frosting to melt and become runny. Allowing the bars to cool completely ensures that the frosting will set properly and have the desired consistency. Complete cooling also allows the flavors of the bars to fully develop.
- Prepare Cream Cheese Frosting (While Cooling): While the bars are cooling, prepare your vegan cream cheese frosting according to your chosen recipe or using store-bought vegan cream cheese. This ensures the frosting is ready to go as soon as the bars are completely cooled.
- Frost, Slice, and Serve: Once the bars are fully cooled, frost them with the vegan cream cheese frosting. You can make the frosting layer as thick or thin as you prefer. Use a small offset decorating spatula or a knife to spread the frosting evenly over the bars. Slice the frosted bars into 9 squares (or more, depending on your desired serving
Nutrition
- Serving Size: One Normal Portion
- Calories: 350-400