


Of all the spooky, ghoulish, and downright delightful treats that grace my kitchen table every October, there is one that disappears with supernatural speed. I call it Werewolf Kibble, and it has single-handedly become the most requested Halloween recipe in my family’s history. The first time I made it, I was simply looking for a quick, no-bake snack for a last-minute class party for my youngest. I scooped it into a large, rustic wooden bowl, playfully labeled it “Werewolf Kibble – Do Not Feed After Midnight,” and watched with amusement as children and parents alike descended upon it like a hungry pack. The combination of crunchy, chocolate-peanut butter coated cereal, the salty hit from pretzels, and the colorful burst of festive candies was an instant sensation. Now, it’s not just a recipe; it’s a tradition. The kids love shaking the bag to coat the cereal in powdered sugar, creating a cloud of sweet “moon dust,” and fighting over who gets the most candy eyeballs in their portion. It’s the perfect fuel for a night of trick-or-treating or the centerpiece of a spooky movie marathon snack board. This isn’t just a snack mix; it’s a bowl full of Halloween spirit, and I’m thrilled to share the magic with you.
What Exactly is Werewolf Kibble?
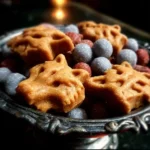
Before we unleash the full recipe, let’s break down this monstrously delicious concoction. At its heart, Werewolf Kibble is a creative and themed evolution of the classic American treat known as “Puppy Chow” or “Muddy Buddies.” The base consists of a crunchy cereal, typically Chex, which gets completely enrobed in a luscious, melted mixture of chocolate and peanut butter. The magic happens next when this warm, sticky cereal is tossed in a generous amount of powdered sugar, creating a signature dusty, matte finish that’s irresistibly sweet.
What elevates this from simple Puppy Chow to bona fide Werewolf Kibble is the careful selection of mix-ins. This isn’t just about adding more sugar; it’s about building a narrative in a bowl. We’re aiming for a mix that tells a story of a moonlit night in a haunted forest. You’ll find:
- Salty & Savory Crunch: Pretzel twists or sticks act as “twigs and branches” from the forest floor, providing a crucial salty counterpoint to the sweetness.
- Harvest Moon Hues: Candies like Reese’s Pieces or autumn-colored M&M’s bring in the warm, golden, and orange colors of a full harvest moon.
- Ghoulish Surprises: This is where the fun really begins! Candy eyeballs stare back at you from the mix, bone-shaped sprinkles add a macabre touch, and other Halloween-themed candies create a treasure hunt in every handful.
The final result is a snack that hits every note: it’s sweet, salty, crunchy, chocolatey, and visually spectacular. It’s the perfect no-bake recipe for when you need a high-impact treat without spending hours in the kitchen.
Complete Werewolf Kibble Recipe
This recipe yields a large batch, perfect for a party or for portioning out into smaller gift bags. It can easily be halved or doubled depending on the size of your pack!
Ingredients
For the Cereal Base:
- 9 cups Rice Chex or Corn Chex cereal (or a mix of both)
- 1 ½ cups mini pretzel twists or sticks
- 1 cup salted peanuts or almonds (optional, for extra crunch)
For the Chocolate Peanut Butter Coating:
- 1 ½ cups semi-sweet chocolate chips
- ¾ cup creamy peanut butter
- ½ cup (1 stick) unsalted butter, cubed
- 1 teaspoon pure vanilla extract
For the “Moon Dust” Coating:
- 2 cups powdered sugar (confectioners’ sugar)
For the “Werewolf” Mix-Ins:
- 1 ½ cups Reese’s Pieces
- 1 cup Halloween-themed M&M’s (“Ghoul’s Mix” or similar)
- ½ cup candy eyeballs
- ¼ cup bone-shaped sprinkles or other Halloween sprinkles
- 1 cup mini marshmallows (optional, for a soft texture contrast)
Step-by-Step Instructions to Make Your Kibble
Follow these detailed instructions carefully to ensure your Werewolf Kibble comes out perfectly crunchy and delicious every time.
Step 1: Prepare Your Workspace and Cereal Base
First, measure out your cereal, pretzels, and nuts (if using) into a very large mixing bowl. This needs to be your biggest bowl, as you’ll need plenty of room to gently stir the mixture without crushing the cereal. Gently toss them together to distribute everything evenly. Set this bowl aside.
Step 2: Prepare the Coating Station
Take a 2-gallon zip-top bag (this is the secret to a mess-free coating!) and add the 2 cups of powdered sugar. Set this bag aside nearby. You’ll need to work quickly once the chocolate is melted. Also, lay out two large baking sheets and line them with parchment paper or wax paper. This is where you’ll spread the finished kibble to cool and set.
Step 3: Melt the Chocolate Coating
In a separate, large, microwave-safe bowl, combine the semi-sweet chocolate chips, creamy peanut butter, and cubed unsalted butter. Microwave on high in 30-second intervals. It is crucial to stir well after each interval. The chocolate and butter will melt at different rates, and stirring prevents hot spots and ensures the chocolate doesn’t scorch or “seize.” Continue this process for about 90 seconds to 2 minutes, or until the mixture is completely smooth and glossy when stirred.
Step 4: Finish the Coating and Combine
Once the chocolate mixture is perfectly smooth, remove it from the microwave and immediately stir in the 1 teaspoon of vanilla extract. Pour this hot, luscious chocolate mixture all over the cereal and pretzels in your large bowl.
Step 5: Gently Coat the Cereal
Using a large silicone spatula, gently fold the chocolate mixture into the cereal. Use a “scoop from the bottom and fold over the top” motion. Be gentle but thorough. You want every single piece of cereal and pretzel to be evenly coated. Avoid vigorous stirring, which will break the cereal into small crumbs.
Step 6: The “Moon Dust” Shake
Working quickly while the mixture is still warm, carefully pour the chocolate-coated cereal into the 2-gallon zip-top bag containing the powdered sugar. Seal the bag securely, leaving some air inside. Now for the fun part! Shake the bag vigorously for a good 60-90 seconds. Shake it up, down, and side to side. This ensures that every nook and cranny of the coated cereal is covered in a thick layer of powdered sugar.
Step 7: Cool and Set the Kibble
Once everything is thoroughly coated, open the bag and pour the Werewolf Kibble out onto your prepared baking sheets. Spread it into a single, even layer. This step is vital for two reasons: it allows the chocolate to fully set, and it prevents the kibble from hardening into one giant clump. Let it cool completely at room temperature for at least 1-2 hours.
Step 8: Add the Final Mix-Ins
After the kibble has completely cooled and the chocolate is hard, break up any large chunks with your hands. Transfer the kibble back to your large (now clean) serving bowl. Now, gently fold in your final “Werewolf” mix-ins: the Reese’s Pieces, Halloween M&M’s, candy eyeballs, bone sprinkles, and mini marshmallows. Mixing them in at the end ensures they stay vibrant, don’t melt, and their textures remain distinct. Your Werewolf Kibble is now ready to be devoured!
Nutrition Facts
Please note that these values are an estimate and can vary based on the specific brands of ingredients and optional mix-ins you use.
- Servings: This recipe makes approximately 18 servings.
- Serving Size: About 1 cup.
- Calories Per Serving: Approximately 450-500 kcal.
This is a decadent treat meant for special occasions like Halloween parties. It’s rich in flavor and designed for indulgence, not as a daily snack.
Preparation Time
This is one of the best parts of the recipe—it’s incredibly fast!
- Prep Time: 15 minutes (measuring ingredients, preparing bowls and pans)
- Cook/Melting Time: 5 minutes
- Cooling & Setting Time: 1-2 hours
- Total Time (Active): 20 minutes
- Total Time (Including Cooling): Approximately 2 hours
How to Serve Your Werewolf Kibble
The presentation is half the fun! Don’t just dump it in any old bowl. Here are some spooky and creative ways to serve your Werewolf Kibble to maximize the Halloween theme:
- The Classic “Dog Bowl”: Find a new, clean metal or ceramic dog bowl (or a large, rustic wooden bowl) and serve the kibble straight from it. Add a fun, handwritten label that says “Werewolf Kibble” or “Good Boy.”
- Individual “Treat Bags”: Portion the kibble into small cellophane bags. Tie them with black and orange ribbon and attach a custom tag. This is perfect for party favors or for portion control at a kids’ party.
- A Cauldron Centerpiece: Use a small, plastic witch’s cauldron as your serving dish. For extra effect, you can place a small piece of dry ice in a separate container at the bottom of the cauldron (never let it touch the food) to create a spooky, smoky effect.
- Specimen Jars: For a “Mad Scientist” or “Dr. Frankenstein” theme, serve the kibble in large, clear glass apothecary jars or Mason jars. You can create aged-looking labels with spooky scientific names like Cerealis Lycanthropus.
- Halloween Snack Board: Make the Werewolf Kibble the star of a larger Halloween-themed snack board. Surround it with other themed foods like:
- Clementine “pumpkins” (peeled clementines with a small piece of celery for a stem).
- “Witch Finger” pretzel rods dipped in green candy melts with a sliced almond for a fingernail.
- A block of cream cheese topped with pepper jelly, made to look like a “bleeding brain.”
- Dark grapes, blackberries, and assorted cheeses.
Additional Tips for a Howling Success
Follow these five expert tips to ensure your recipe is foolproof and fabulous.
- Don’t Scorch the Chocolate: The biggest mistake people make with recipes like this is overheating the chocolate. Microwaving in short 30-second bursts and stirring in between is not optional—it’s essential. If chocolate gets too hot, it will “seize,” turning into a grainy, clumpy mess that cannot be saved. Low and slow is the key to a silky-smooth coating.
- The Two-Bag Method: For an extra-thick and even coating of powdered sugar, try the two-bag method. Place 1 cup of powdered sugar in the first bag. Add half of the warm, chocolate-coated cereal, shake to coat, then transfer to the cooling sheet. Repeat with the second cup of sugar and the rest of the cereal. This prevents the sugar from getting clumpy from too much moisture at once and gives a better coating.
- Cool It Completely: Be patient! Do not add the final mix-ins while the kibble is still warm. The residual heat from the chocolate will melt the M&M’s, Reese’s Pieces, and marshmallows, creating a sticky, messy-looking final product. The kibble needs to be completely cool to the touch so that every component remains distinct and crunchy.
- Embrace the Salt: The salty elements—pretzels and salted nuts—are not just for texture; they are crucial for balancing the intense sweetness of the chocolate and powdered sugar. Don’t be tempted to skip them. The interplay between sweet and salty is what makes this snack mix so incredibly addictive.
- Get the Kids Involved: This is a wonderfully kid-friendly recipe. Let older kids help measure ingredients. Let younger kids have the best job of all: shaking the bag of powdered sugar. It’s a safe, fun way to get them excited about helping in the kitchen and creates a wonderful holiday memory. Just be prepared for a small cloud of sugar in the air!
Frequently Asked Questions (FAQ)
1. How do I store Werewolf Kibble and how long does it last?
Store your finished Werewolf Kibble in an airtight container at room temperature. A large zip-top bag or a container with a tight-fitting lid works perfectly. It will stay fresh and crunchy for up to one week. Do not refrigerate it, as the condensation can make the cereal and powdered sugar soggy.
2. Can I make this recipe gluten-free?
Absolutely! To make a gluten-free version, simply make the following substitutions:
- Use Gluten-Free Chex Cereal.
- Use Gluten-Free Pretzels.
- Ensure all your candies and chocolate chips are certified gluten-free, as some brands can have cross-contamination.
3. Can I make this recipe nut-free?
Yes. For a nut-free version for schools or parties with allergy concerns:
- Omit the optional peanuts/almonds.
- Substitute the peanut butter with a seed butter, such as sunflower seed butter (SunButter) or tahini.
- Crucially, omit the Reese’s Pieces, as they contain peanuts. Replace them with extra Halloween M&M’s, Skittles, or another nut-free candy of your choice. Always double-check the labels on all your ingredients.
4. What other cereals can I use?
While Chex is ideal for its shape and sturdiness, you can certainly experiment. Crispix is a great alternative that works almost identically. You could also try a heartier cereal like Golden Grahams for a different flavor profile, but be aware it might get slightly softer than Chex. Avoid delicate, flaky cereals as they will turn to mush when mixed with the hot chocolate.
5. My chocolate coating seems too thick to pour. What did I do wrong?
This usually happens for one of two reasons. First, the chocolate may have been slightly overheated and started to seize. Second, you may not have used enough butter or peanut butter, which adds the necessary fat and liquidity to the coating. Double-check your measurements. If it’s just a little thick, you can try stirring in a teaspoon of neutral oil (like canola or vegetable oil) to help loosen it up, but if it’s grainy and stiff, it’s best to start over.
Werewolf Kibble Recipe
Ingredients
For the Cereal Base:
- 9 cups Rice Chex or Corn Chex cereal (or a mix of both)
- 1 ½ cups mini pretzel twists or sticks
- 1 cup salted peanuts or almonds (optional, for extra crunch)
For the Chocolate Peanut Butter Coating:
- 1 ½ cups semi-sweet chocolate chips
- ¾ cup creamy peanut butter
- ½ cup (1 stick) unsalted butter, cubed
- 1 teaspoon pure vanilla extract
For the “Moon Dust” Coating:
- 2 cups powdered sugar (confectioners’ sugar)
For the “Werewolf” Mix-Ins:
- 1 ½ cups Reese’s Pieces
- 1 cup Halloween-themed M&M’s (“Ghoul’s Mix” or similar)
- ½ cup candy eyeballs
- ¼ cup bone-shaped sprinkles or other Halloween sprinkles
- 1 cup mini marshmallows (optional, for a soft texture contrast)
Instructions
Step 1: Prepare Your Workspace and Cereal Base
First, measure out your cereal, pretzels, and nuts (if using) into a very large mixing bowl. This needs to be your biggest bowl, as you’ll need plenty of room to gently stir the mixture without crushing the cereal. Gently toss them together to distribute everything evenly. Set this bowl aside.
Step 2: Prepare the Coating Station
Take a 2-gallon zip-top bag (this is the secret to a mess-free coating!) and add the 2 cups of powdered sugar. Set this bag aside nearby. You’ll need to work quickly once the chocolate is melted. Also, lay out two large baking sheets and line them with parchment paper or wax paper. This is where you’ll spread the finished kibble to cool and set.
Step 3: Melt the Chocolate Coating
In a separate, large, microwave-safe bowl, combine the semi-sweet chocolate chips, creamy peanut butter, and cubed unsalted butter. Microwave on high in 30-second intervals. It is crucial to stir well after each interval. The chocolate and butter will melt at different rates, and stirring prevents hot spots and ensures the chocolate doesn’t scorch or “seize.” Continue this process for about 90 seconds to 2 minutes, or until the mixture is completely smooth and glossy when stirred.
Step 4: Finish the Coating and Combine
Once the chocolate mixture is perfectly smooth, remove it from the microwave and immediately stir in the 1 teaspoon of vanilla extract. Pour this hot, luscious chocolate mixture all over the cereal and pretzels in your large bowl.
Step 5: Gently Coat the Cereal
Using a large silicone spatula, gently fold the chocolate mixture into the cereal. Use a “scoop from the bottom and fold over the top” motion. Be gentle but thorough. You want every single piece of cereal and pretzel to be evenly coated. Avoid vigorous stirring, which will break the cereal into small crumbs.
Step 6: The “Moon Dust” Shake
Working quickly while the mixture is still warm, carefully pour the chocolate-coated cereal into the 2-gallon zip-top bag containing the powdered sugar. Seal the bag securely, leaving some air inside. Now for the fun part! Shake the bag vigorously for a good 60-90 seconds. Shake it up, down, and side to side. This ensures that every nook and cranny of the coated cereal is covered in a thick layer of powdered sugar.
Step 7: Cool and Set the Kibble
Once everything is thoroughly coated, open the bag and pour the Werewolf Kibble out onto your prepared baking sheets. Spread it into a single, even layer. This step is vital for two reasons: it allows the chocolate to fully set, and it prevents the kibble from hardening into one giant clump. Let it cool completely at room temperature for at least 1-2 hours.
Step 8: Add the Final Mix-Ins
After the kibble has completely cooled and the chocolate is hard, break up any large chunks with your hands. Transfer the kibble back to your large (now clean) serving bowl. Now, gently fold in your final “Werewolf” mix-ins: the Reese’s Pieces, Halloween M&M’s, candy eyeballs, bone sprinkles, and mini marshmallows. Mixing them in at the end ensures they stay vibrant, don’t melt, and their textures remain distinct. Your Werewolf Kibble is now ready to be devoured!
Nutrition
- Serving Size: One Normal Portion
- Calories: 450-500


