I still remember the first time I stumbled upon the idea of making pancakes with just bananas, oats, and eggs. It sounded almost too simple, too good to be true. Could three basic ingredients really transform into fluffy, satisfying pancakes? As a busy parent constantly searching for quick, healthy breakfast options that my kids would actually eat, I was skeptical but intrigued. The verdict? An absolute game-changer. That first morning, the aroma of warm bananas filled the kitchen, and the sight of those golden-brown discs sizzling on the griddle was enough to get everyone excited. My kids, usually picky eaters, devoured them without a second thought, asking for more. My partner, initially wary of “healthy” pancakes, was impressed by their naturally sweet flavor and surprisingly hearty texture. Since then, these 3-ingredient banana oatmeal pancakes have become a weekly staple in our home. They’re our go-to for hectic weekday mornings, lazy weekend brunches, and even the occasional “breakfast for dinner” night. They solve the eternal problem of overripe bananas, require minimal effort, and deliver a nutritious punch without any added sugar or refined flour. Honestly, their simplicity is their genius, proving that delicious and wholesome doesn’t have to be complicated.
The Easiest 3-Ingredient Banana Oatmeal Pancakes You’ll Ever Make
Prepare to revolutionize your breakfast routine with a recipe that’s as simple as it is delicious. These pancakes rely on the natural sweetness of ripe bananas, the hearty texture of oats, and the binding power of eggs to create a wholesome breakfast or snack. Forget complicated ingredient lists and processed mixes; this is back-to-basics cooking at its finest. Perfect for busy mornings, post-workout fuel, or a healthy treat for the kids, these pancakes are naturally gluten-free (if using certified gluten-free oats) and packed with goodness.
Ingredients You’ll Need
The beauty of this recipe lies in its minimalism. You genuinely only need three core ingredients, likely already sitting in your kitchen!
- Ripe Bananas: 2 medium-sized, very ripe bananas (the more brown spots, the better!). Riper bananas are sweeter and mash more easily, providing natural moisture and flavor. This eliminates the need for added sugars.
- Rolled Oats: 1 cup (approx. 90-100g). Rolled oats (also called old-fashioned oats) provide the best texture. Quick-cooking oats can work in a pinch but might result in a slightly denser pancake. Steel-cut oats are not suitable for this recipe as they won’t soften enough during blending and cooking. For a gluten-free option, ensure you use certified gluten-free rolled oats to avoid cross-contamination.
- Large Eggs: 2 large eggs. Eggs act as the binder, holding the pancake together, and add protein and richness.
(Optional, but recommended for enhanced flavor/cooking):
- Vanilla Extract: 1/2 teaspoon (enhances sweetness)
- Cinnamon: 1/4 to 1/2 teaspoon (adds warmth)
- Baking Powder: 1/2 teaspoon (for slightly fluffier pancakes)
- Salt: A tiny pinch (balances sweetness)
- Cooking Fat: Coconut oil, butter, or non-stick cooking spray for the pan.
Step-by-Step Instructions
Making these pancakes is incredibly straightforward, especially if you have a blender.
- Prepare the Bananas: Peel the ripe bananas and break them into chunks. Add them directly to your blender pitcher.
- Add Oats and Eggs: Pour the rolled oats over the bananas in the blender. Crack the two large eggs and add them to the pitcher.
- Include Optional Ingredients (If Using): If you’re adding vanilla extract, cinnamon, baking powder, or salt, add them now. The baking powder is particularly helpful if you prefer a slightly lighter, airier pancake.
- Blend the Batter: Secure the lid on the blender. Blend on high speed for about 30-60 seconds, or until the mixture is smooth and well combined. You might need to scrape down the sides once or twice with a spatula to ensure all the oats are incorporated. The batter should be relatively thick but pourable, similar to traditional pancake batter. If it seems too thick (like paste), add a tablespoon of milk (dairy or non-dairy) or water and blend again briefly. If it seems too thin, add another tablespoon or two of oats and blend.
- Let the Batter Rest (Optional but Recommended): Allow the batter to sit for 5-10 minutes. This gives the oats time to absorb some liquid, which helps thicken the batter slightly and improves the final texture of the pancakes.
- Heat the Pan: Place a non-stick skillet, frying pan, or griddle over medium heat. Allow it to heat up properly – a drop of water should sizzle and evaporate quickly.
- Grease the Pan: Add a small amount of your chosen cooking fat – about 1/2 teaspoon of coconut oil or butter, or a light coating of cooking spray. Swirl the pan to ensure the surface is lightly coated. Using a little fat helps prevent sticking and promotes even browning, adding flavor.
- Pour the Pancakes: Once the pan is hot and greased, reduce the heat slightly to medium-low. This is key to prevent the outside from burning before the inside cooks through, especially since the banana makes them prone to browning quickly. Pour or scoop the batter onto the hot pan to form small-to-medium sized pancakes, typically about 1/4 cup of batter per pancake (around 3-4 inches in diameter). Smaller pancakes are easier to flip. Don’t overcrowd the pan; cook in batches if necessary.
- Cook the First Side: Cook for 2-4 minutes on the first side. You’ll know it’s ready to flip when the edges start to look set, and small bubbles appear on the surface and begin to pop. Unlike traditional flour pancakes, these might not bubble quite as vigorously. Look for the set edges as your primary cue.
- Flip Carefully: Gently slide a thin spatula underneath the pancake. If it releases easily, carefully flip it over. If it sticks, give it another 30 seconds.
- Cook the Second Side: Cook for another 2-3 minutes on the second side, or until golden brown and cooked through. The center should feel slightly firm when gently pressed.
- Repeat: Remove the cooked pancakes to a plate (you can keep them warm in a low oven if making a large batch). Add a little more cooking fat to the pan if needed, and repeat the process with the remaining batter.
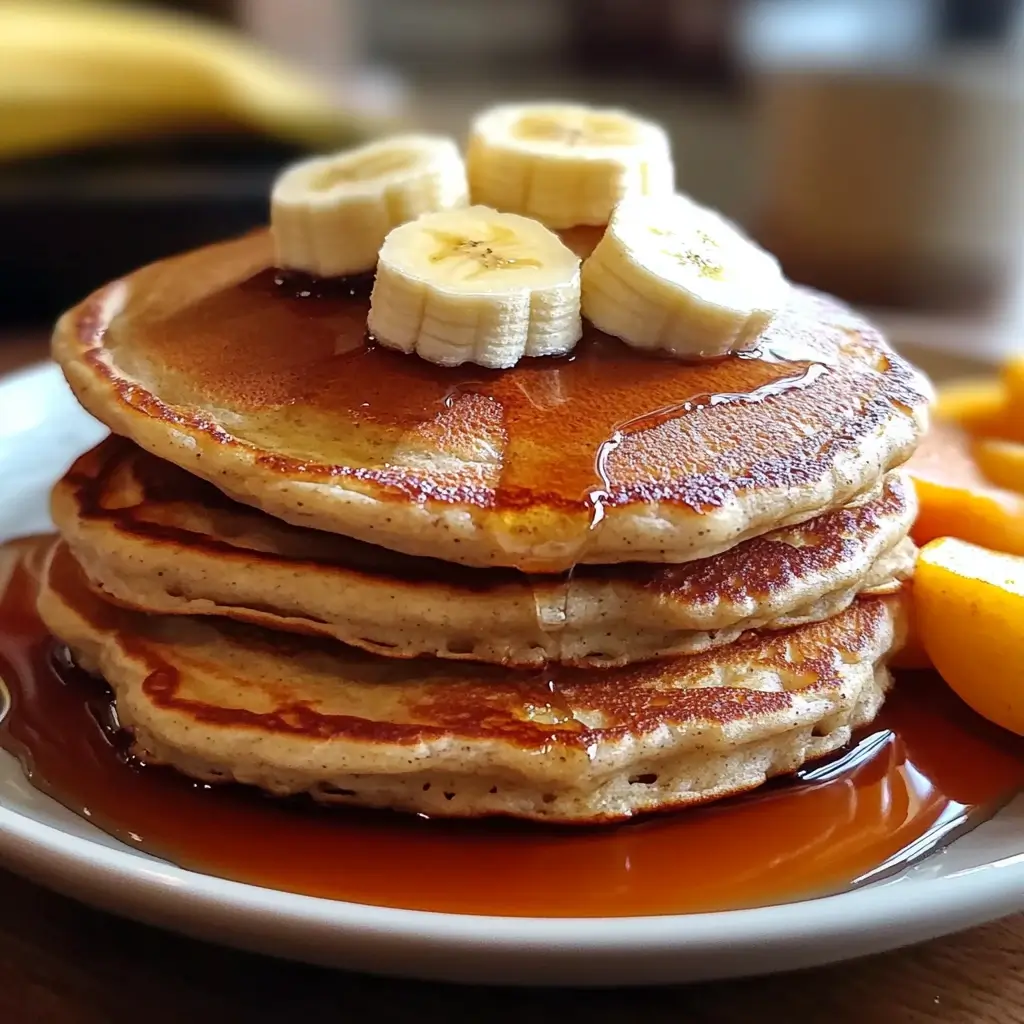
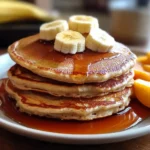
- Serve: Serve immediately with your favorite toppings!
Nutrition Facts (Estimated)
Nutritional information can vary based on the exact size of your bananas and eggs, and the type of oats used. This is an estimate based on the core 3 ingredients (2 medium bananas, 1 cup rolled oats, 2 large eggs) and assumes the recipe yields about 8 small (3-inch) pancakes.
- Servings: Approximately 2-3 servings (3-4 small pancakes per serving)
- Calories Per Serving (approx. 3 pancakes): 250-350 kcal
Estimated Nutritional Breakdown Per Serving:
- Protein: 10-15g
- Carbohydrates: 40-50g
- Fiber: 5-8g
- Sugar: 15-20g (primarily natural sugars from the banana)
- Fat: 7-10g (mostly from the eggs)
Key Points:
- These pancakes are a good source of dietary fiber from the oats and bananas, promoting digestive health and satiety.
- They provide a decent amount of protein from the eggs and oats.
- They are rich in potassium from the bananas.
- They contain complex carbohydrates from the oats for sustained energy.
- They are significantly lower in added sugar and refined carbohydrates compared to traditional pancakes made with white flour and sugar.
Disclaimer: These are estimates. For precise nutritional information, it’s recommended to use a recipe nutrition calculator with your specific ingredient measurements and brands.
Quick Preparation Time
One of the biggest advantages of this recipe is how incredibly fast it is to whip up.
- Preparation Time: 5 minutes (gathering ingredients, blending)
- Resting Time (Optional): 5-10 minutes
- Cooking Time: 10-15 minutes (depending on your stove and pan size, cooking in batches)
- Total Time: Approximately 20-30 minutes (including optional resting time)
This makes it an exceptionally practical choice for busy mornings when time is limited, but you still crave a warm, satisfying breakfast.
Delicious Ways to Serve Your Banana Oatmeal Pancakes
While delicious on their own thanks to the natural sweetness of the banana, toppings can elevate these pancakes from simple to spectacular! Here are some ideas, ranging from classic to creative:
- Classic Comfort:
- A drizzle of pure maple syrup
- A pat of melting butter (or dairy-free butter)
- A simple dusting of powdered sugar (use sparingly)
- Fresh & Fruity:
- Sliced fresh bananas (double down on the banana goodness!)
- A handful of fresh berries (blueberries, raspberries, strawberries)
- Warm berry compote (simmer berries with a splash of water or orange juice)
- Sliced peaches, nectarines, or mango
- Apple slices sautéed with cinnamon
- Creamy & Dreamy:
- A dollop of plain Greek yogurt or regular yogurt (adds protein and tang)
- Coconut yogurt (for a dairy-free option)
- A smear of peanut butter, almond butter, or other nut/seed butter (adds healthy fats and protein)
- Ricotta cheese mixed with a little honey or vanilla
- Whipped cream (or coconut cream) for an indulgent treat
- Crunch & Texture:
- A sprinkle of chopped nuts (walnuts, pecans, almonds)
- A scattering of seeds (chia seeds, flax seeds, pumpkin seeds, sunflower seeds)
- Toasted coconut flakes
- Granola for extra crunch
- Flavor Boosters:
- A drizzle of honey or agave nectar
- A sprinkle of extra cinnamon or nutmeg
- Lemon zest for a bright note
- Mini chocolate chips (stirred into the batter or sprinkled on top)
- A drizzle of melted dark chocolate
- Savory Twist (Less Common but Possible):
- Serve alongside bacon or sausage.
- Top with a fried egg. (The pancake itself is sweet, so this is for the adventurous!)
Presentation Tips:
- Stack ’em high! A stack of 3-4 pancakes always looks appealing.
- Arrange fruit artistically around or on top of the stack.
- Drizzle syrups or nut butters generously over the top, letting them drip down the sides.
- Add a final sprinkle of nuts, seeds, or cinnamon just before serving.
Additional Tips for Perfect Pancakes Every Time
Mastering these simple pancakes is easy, but these tips will ensure consistent success and delicious results:
- Use VERY Ripe Bananas: This is arguably the most crucial tip. Overripe bananas (the ones with lots of brown spots, almost looking past their prime for eating raw) are significantly sweeter and softer. They blend easily into a smooth batter and provide enough natural sweetness that you won’t miss added sugar. Green or barely ripe bananas will result in less sweet, potentially chunkier, and less flavorful pancakes.
- Don’t Overmix the Batter (If Mixing by Hand): While a blender usually takes care of this, if you ever mash the bananas and mix by hand, be careful not to overmix once you add the oats and eggs. Mix just until combined. Overmixing can develop the gluten (if using regular oats, though less of an issue here than with flour) and can make the pancakes tough. Blending until just smooth is perfect.
- Master Medium-Low Heat: Resist the urge to cook these pancakes on high heat. Because of the natural sugars in the banana, they brown (and can burn) much faster than traditional pancakes. Medium-low heat allows the inside to cook through fully before the outside gets too dark. Patience here is key. Ensure your pan is preheated correctly before adding the batter.
- Keep Them Small: Especially when you’re first getting the hang of this recipe, make smaller pancakes (around 3 inches in diameter). They are much easier to flip without breaking. The batter is more delicate than flour-based batters, and larger pancakes are more prone to falling apart during the flip. Use about 1/4 cup of batter per pancake.
- Consider Certified Gluten-Free Oats for Celiac/Sensitivity: While oats are naturally gluten-free, they are often processed in facilities that also handle wheat, barley, and rye, leading to cross-contamination. If you or someone you’re cooking for has celiac disease or severe gluten sensitivity, it is essential to use oats specifically labeled “Certified Gluten-Free.”
Frequently Asked Questions (FAQ)
Here are answers to some common questions about these 3-ingredient banana oatmeal pancakes:
- Q: Can I make these pancakes vegan?
- A: Yes, you can make these vegan! The primary substitution needed is for the eggs. You can replace the 2 large eggs with 2 “flax eggs” or “chia eggs.” To make one flax/chia egg, mix 1 tablespoon of ground flaxseed or chia seeds with 3 tablespoons of water. Let it sit for 5-10 minutes until it becomes gelatinous and resembles the consistency of an egg white. Use two of these mixtures in place of the two eggs in the recipe. The texture might be slightly denser or more fragile than the egg version, but it works quite well. Ensure your other ingredients (like any optional milk added) are also plant-based.
- Q: Are these pancakes truly gluten-free?
- A: They can be gluten-free, but it depends entirely on your oats. Bananas and eggs are naturally gluten-free. Oats are also naturally gluten-free, BUT they are frequently subject to cross-contamination with gluten-containing grains during growing, harvesting, and processing. Therefore, if you require a strictly gluten-free diet (e.g., for celiac disease), you MUST use certified gluten-free rolled oats. If gluten is not a concern for you, regular rolled oats are perfectly fine.
- Q: Can I add protein powder to the batter?
- A: Absolutely! Adding a scoop of your favorite protein powder (whey, casein, or plant-based) is a great way to boost the protein content further, making them even more satisfying, especially post-workout. Start with about 1/4 to 1/2 scoop (adjusting based on the scoop size of your brand). Adding protein powder will likely thicken the batter, so you may need to add a splash more liquid (water, milk, or non-dairy milk) to reach the desired consistency. Blend it in along with the other ingredients. Be mindful that flavored protein powders will alter the taste. Vanilla or unflavored protein usually works best.
- Q: How do I store leftover pancakes? Can I freeze them?
- A: Yes, leftovers store very well!
- Refrigeration: Let the pancakes cool completely. Store them in an airtight container in the refrigerator for up to 3-4 days. Reheat gently in the microwave (about 20-30 seconds per pancake), in a toaster oven, or briefly in a non-stick skillet over low heat until warmed through.
- Freezing: These pancakes freeze beautifully, making them great for meal prep. Let them cool completely. You can flash-freeze them by placing them in a single layer on a baking sheet lined with parchment paper in the freezer until solid (about 1-2 hours). Then, transfer the frozen pancakes to a freezer-safe bag or container, placing layers of parchment paper between stacks if desired to prevent sticking. They can be frozen for up to 2-3 months. Reheat directly from frozen in the microwave, toaster, toaster oven, or skillet until hot.
- A: Yes, leftovers store very well!
- Q: Why are my pancakes falling apart or mushy?
- A: There are a few common reasons why this might happen:
- Batter Too Thin: Your bananas might have been extra large or juicy, or you might have added too much extra liquid. The batter should be thick but pourable. Try adding another tablespoon or two of oats and blending again. Letting the batter rest for 5-10 minutes also helps it thicken.
- Heat Too High: If the pan is too hot, the outside cooks too quickly and may burn while the inside remains undercooked and mushy, making it unstable. Cook on medium-low heat.
- Flipping Too Soon: You need to wait until the edges are set and bubbles start appearing and popping (or at least forming across the surface). Flipping prematurely when the structure isn’t set will cause them to fall apart.
- Pancakes Too Large: As mentioned in the tips, smaller pancakes are much easier to handle and less likely to break. Stick to 3-4 inch diameter pancakes.
- Not Enough Binding (Less Common): Ensure you used large eggs, or if using flax/chia eggs, that they were properly prepared and allowed to gel.
- A: There are a few common reasons why this might happen:
3-Ingredient Banana Oatmeal Pancake Recipe
Ingredients
- Ripe Bananas: 2 medium-sized, very ripe bananas (the more brown spots, the better!). Riper bananas are sweeter and mash more easily, providing natural moisture and flavor. This eliminates the need for added sugars.
- Rolled Oats: 1 cup (approx. 90-100g). Rolled oats (also called old-fashioned oats) provide the best texture. Quick-cooking oats can work in a pinch but might result in a slightly denser pancake. Steel-cut oats are not suitable for this recipe as they won’t soften enough during blending and cooking. For a gluten-free option, ensure you use certified gluten-free rolled oats to avoid cross-contamination.
- Large Eggs: 2 large eggs. Eggs act as the binder, holding the pancake together, and add protein and richness.
Instructions
- Prepare the Bananas: Peel the ripe bananas and break them into chunks. Add them directly to your blender pitcher.
- Add Oats and Eggs: Pour the rolled oats over the bananas in the blender. Crack the two large eggs and add them to the pitcher.
- Include Optional Ingredients (If Using): If you’re adding vanilla extract, cinnamon, baking powder, or salt, add them now. The baking powder is particularly helpful if you prefer a slightly lighter, airier pancake.
- Blend the Batter: Secure the lid on the blender. Blend on high speed for about 30-60 seconds, or until the mixture is smooth and well combined. You might need to scrape down the sides once or twice with a spatula to ensure all the oats are incorporated. The batter should be relatively thick but pourable, similar to traditional pancake batter. If it seems too thick (like paste), add a tablespoon of milk (dairy or non-dairy) or water and blend again briefly. If it seems too thin, add another tablespoon or two of oats and blend.
- Let the Batter Rest (Optional but Recommended): Allow the batter to sit for 5-10 minutes. This gives the oats time to absorb some liquid, which helps thicken the batter slightly and improves the final texture of the pancakes.
- Heat the Pan: Place a non-stick skillet, frying pan, or griddle over medium heat. Allow it to heat up properly – a drop of water should sizzle and evaporate quickly.
- Grease the Pan: Add a small amount of your chosen cooking fat – about 1/2 teaspoon of coconut oil or butter, or a light coating of cooking spray. Swirl the pan to ensure the surface is lightly coated. Using a little fat helps prevent sticking and promotes even browning, adding flavor.
- Pour the Pancakes: Once the pan is hot and greased, reduce the heat slightly to medium-low. This is key to prevent the outside from burning before the inside cooks through, especially since the banana makes them prone to browning quickly. Pour or scoop the batter onto the hot pan to form small-to-medium sized pancakes, typically about 1/4 cup of batter per pancake (around 3-4 inches in diameter). Smaller pancakes are easier to flip. Don’t overcrowd the pan; cook in batches if necessary.
- Cook the First Side: Cook for 2-4 minutes on the first side. You’ll know it’s ready to flip when the edges start to look set, and small bubbles appear on the surface and begin to pop. Unlike traditional flour pancakes, these might not bubble quite as vigorously. Look for the set edges as your primary cue.
- Flip Carefully: Gently slide a thin spatula underneath the pancake. If it releases easily, carefully flip it over. If it sticks, give it another 30 seconds.
- Cook the Second Side: Cook for another 2-3 minutes on the second side, or until golden brown and cooked through. The center should feel slightly firm when gently pressed.
- Repeat: Remove the cooked pancakes to a plate (you can keep them warm in a low oven if making a large batch). Add a little more cooking fat to the pan if needed, and repeat the process with the remaining batter.
- Serve: Serve immediately with your favorite toppings!
Nutrition
- Serving Size: One Normal Portion
- Calories: 250-350
- Sugar: 15-20g
- Fat: 7-10g
- Carbohydrates: 40-50g
- Fiber: 5-8g
- Protein: 10-15g