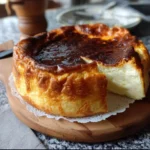
Of all the desserts that have graced my kitchen, none has caused such a delightful stir as the Basque Cheesecake. The first time I pulled it from the oven, my family gathered around with looks of genuine concern. “I think you burnt it,” my son said, pointing at the deeply caramelized, almost blackened top. I’ll admit, a flicker of doubt crossed my mind too. It defied everything I thought I knew about the perfect cheesecake—where were the gentle, pale top and the fear of a single crack? But then, the moment of truth. I slid a knife through the dark, rustic crust, and it sank into an impossibly creamy, custardy center. The aroma that filled the air was not of char, but of a rich, toasted caramel. We took our first bites, and a wave of silence fell over the kitchen, quickly replaced by murmurs of pure bliss. That contrast—the bold, slightly bitter, caramelized exterior giving way to a soft, luscious, and tangy-sweet interior—is pure culinary magic. It’s rustic yet elegant, simple yet profound. This isn’t just a recipe; it’s an experience, and one that has become a celebrated, non-negotiable staple for every family gathering.
The Legendary Basque Cheesecake: A Complete Guide to Perfection
Welcome to the ultimate guide to creating the iconic Burnt Basque Cheesecake. Hailing from the Basque region of Spain, specifically from a small bar called La Viña in San Sebastián, this cheesecake is a rebellion against its more famous cousin, the New York Cheesecake. It has no crust, its top is intentionally “burnt,” and its texture is a glorious dream—light, airy, and unbelievably creamy, with a center that can be beautifully molten when served slightly warm.
The genius of this dessert lies in its simplicity. With just a handful of common ingredients and a refreshingly straightforward method, you can create a show-stopping dessert that tastes like it came from a high-end patisserie. The high-temperature baking process is the secret; it creates a natural, caramelized crust while protecting the delicate, custard-like interior. Forget water baths, gentle baking, and praying for a crack-free surface. Here, the cracks and the dark, burnished color are badges of honor.
This article will not only provide you with a foolproof recipe but will also delve into the science and technique behind each step, ensuring you can bake the perfect Basque Cheesecake every single time.
What is a Basque Cheesecake? A Tale of Delicious Rebellion
Before we dive into the mixing bowl, let’s appreciate the story of this unique dessert. Unlike the dense, meticulously constructed New York Cheesecake, the Basque Cheesecake, or Tarta de Queso, is all about rustic charm and unpretentious flavor. It was created in the 1990s by chef Santiago Rivera of La Viña restaurant. He wanted to create a lighter, faster-to-bake cheesecake that could be served at his bustling pintxos bar.
The result was a crustless cheesecake baked at a very high temperature. This process does two things:
- Caramelization: The high heat deeply caramelizes the sugars and milk solids on the outside of the cake, creating a natural “crust” with complex, slightly bitter notes of toffee and caramel that perfectly balance the sweetness within. This is the Maillard reaction and caramelization working in beautiful harmony.
- Texture: The fast, hot bake sets the edges of the cheesecake while leaving the center incredibly soft and creamy. Depending on how long you bake it and how long you chill it, the center can range from just-set custard to an almost-liquid lava-like consistency.
Its fame spread from the local patrons of San Sebastián to food critics and eventually, the world. Today, it stands as a testament to the idea that sometimes, the most magnificent results come from breaking the rules.
A Deep Dive into Your Ingredients: The Key to a Creamy Dream
The beauty of this recipe is its short ingredient list. However, because there are so few components, the quality and state of each one are paramount. There’s nowhere for a sub-par ingredient to hide.
The Star of the Show: Cream Cheese
- Amount: 32 ounces (900g), or four 8-ounce blocks
- Why it’s crucial: This is the heart and soul of your cheesecake. You absolutely must use full-fat, block-style cream cheese. Do not substitute with low-fat, fat-free, or whipped cream cheese from a tub. The lower fat content and added air/stabilizers in those products will result in a soupy, grainy, or watery cheesecake that fails to set properly. The high fat content is essential for the rich flavor and luxurious, dense-yet-light texture. Brands like Philadelphia are the gold standard for a reason.
The Sweetener: Granulated Sugar
- Amount: 1 ¾ cups (350g)
- Why it’s crucial: Sugar does more than just sweeten the cake. It helps create the creamy texture by tenderizing the proteins in the eggs and cream cheese. It also plays a vital role in the “burnt” top. As the sugar on the surface is exposed to high heat, it caramelizes, creating that signature dark color and complex flavor. You can slightly reduce the sugar to 1 ½ cups (300g) if you prefer a tangier cheesecake, but don’t reduce it too much, or you’ll compromise both texture and the quality of the caramelization.
The Structure and Richness: Large Eggs
- Amount: 6 large eggs
- Why it’s crucial: Eggs are the primary setting agent in this custard-like cake. They provide structure, richness from the yolks, and leavening as they heat up. Using large eggs ensures the correct ratio of liquid to solids. Most importantly, they must be at room temperature to incorporate smoothly into the batter without causing the cream cheese to seize up and become lumpy.
The Silky Mouthfeel: Heavy Cream
- Amount: 2 cups (480ml)
- Why it’s crucial: Heavy cream (or heavy whipping cream with at least 36% milk fat) is what gives the Basque Cheesecake its signature light, almost mousse-like, yet incredibly rich texture. It thins the batter to the perfect consistency and adds a layer of dairy richness that complements the tangy cream cheese. Do not use half-and-half or milk; the fat content is too low and will result in a less decadent, potentially unstable cheesecake.
The Flavor Enhancers: Vanilla and Salt
- Amount: 2 teaspoons pure vanilla extract
- Amount: 1 teaspoon kosher salt
- Why they are crucial: Vanilla adds a beautiful, aromatic warmth that rounds out the flavors of the dairy and eggs. Use pure vanilla extract for the best, most authentic flavor. Salt is the secret weapon in all baking. It doesn’t make the cheesecake salty; instead, it sharpens and intensifies all the other flavors, balancing the sweetness and enhancing the tang of the cream cheese.
The Stabilizer: All-Purpose Flour
- Amount: ⅓ cup (40g)
- Why it’s crucial: A small amount of flour acts as a stabilizer and provides a bit of insurance against the cheesecake curdling or splitting. It helps to bind the ingredients together, contributing to the cake’s unique texture, which is somewhere between a classic cheesecake and a flan. For a gluten-free version, you can substitute this with the same amount of a 1-to-1 gluten-free baking flour blend or 3 tablespoons (25g) of cornstarch.
Complete Basque Cheesecake Recipe
Here is the full, detailed recipe to guide you from start to finish.
Preparation Time: 20 minutes
Cook Time: 55-65 minutes
Cooling Time: 3 hours
Total Time: Approximately 4 hours 20 minutes
Servings: 10-12
Calories per serving: Approximately 650-700 (estimate)
Essential Equipment
- 9-inch or 10-inch springform pan: A springform pan is highly recommended for easy removal. A 9-inch pan will yield a taller cake, while a 10-inch pan will result in a slightly wider, shorter cake.
- Parchment paper: You will need two large sheets.
- Stand mixer with paddle attachment or a large bowl with a hand mixer: This makes getting the cream cheese perfectly smooth much easier.
- Silicone spatula: Essential for scraping the bowl to ensure a homogenous batter.
- Fine-mesh sieve: For sifting the flour to prevent lumps.
**Instructions: Crafting Your Masterpiece Step-by-Step**
Follow these instructions carefully for a flawless result. The key is in the technique, not the complexity.
Step 1: Prepare the Oven and Pan
First things first, position an oven rack in the middle of your oven and preheat it to 400°F (200°C). This high heat is non-negotiable.
Next, prepare your pan. This is a critical step for achieving the rustic, wrinkled look. Take one large sheet of parchment paper and press it firmly into your 9-inch springform pan, letting it crease and wrinkle naturally as you fit it in. Don’t worry about making it smooth. The excess paper should extend up and over the sides of the pan by at least 2 inches. This “collar” contains the cheesecake as it puffs up dramatically in the oven. Take a second sheet of parchment and lay it in the pan perpendicular to the first one, creating a cross shape. This provides extra security against leaks. Lightly grease the pan before adding the parchment can help it stick in place.
Step 2: Beat the Cream Cheese and Sugar
In the bowl of a stand mixer fitted with the paddle attachment, or in a large bowl using a hand mixer, place the room temperature cream cheese. Beat on medium speed for about 2-3 minutes until it is completely smooth, creamy, and free of any lumps.
With the mixer on low speed, gradually stream in the granulated sugar. Once all the sugar is added, increase the speed to medium and beat for another 2 minutes until the mixture is light and fluffy. Scrape down the sides and bottom of the bowl with a silicone spatula at least twice during this process to ensure everything is evenly incorporated.
Step 3: Incorporate the Eggs
With the mixer still on low speed, add the room temperature eggs one at a time, waiting for each egg to be fully incorporated before adding the next. This is a crucial step: do not overmix here. Mix just until the yellow yolk disappears. Overmixing after the eggs are added can incorporate too much air, leading to a texture that is too soufflé-like and prone to cracking excessively and falling. After the last egg is mixed in, scrape down the bowl one more time.
Step 4: Add the Remaining Ingredients
Pour in the heavy cream, vanilla extract, and salt. Mix on low speed just until the ingredients are combined. The batter will be quite thin and liquidy at this point; this is normal.
Finally, place a fine-mesh sieve over the bowl and sift the all-purpose flour directly into the batter. Mix on the lowest possible speed for about 15-20 seconds, just until the flour streaks disappear. One final scrape of the bowl is a good idea to catch any bits of flour or cream cheese at the bottom.
Step 5: Bake to Burnt Perfection
Pour the thin batter into your prepared springform pan. The batter should come up quite high in the pan. Place the pan on a baking sheet to catch any potential butter leakage from the springform seam.
Bake at 400°F (200°C) for 55 to 65 minutes. The cheesecake will puff up significantly, rise above the pan’s rim (held in by the parchment collar), and the top will turn a very deep brown, even appearing black in spots. The edges should be set, but the center will still be extremely jiggly when you gently nudge the pan. It should look like a loosely set pudding in the middle. This is the sign of a perfect Basque Cheesecake. Don’t be afraid of the color—it’s not burnt, it’s caramelized!
Step 6: The Crucial Cooling Process
Remove the cheesecake from the oven and place it on a wire rack. It will be very puffed up and will sink dramatically as it cools; this is what creates the classic slumped, rustic appearance.
Let it cool completely to room temperature in the pan, which will take about 2-3 hours. Do not rush this step. Once it’s at room temperature, you can serve it for a truly soft, molten-center experience. For a firmer, more traditional (but still incredibly creamy) cheesecake texture, cover it loosely with plastic wrap and transfer it to the refrigerator to chill for at least 4 hours, or preferably overnight.
**How to Serve Your Basque Cheesecake**
The beauty of this cheesecake is its versatility in serving. The temperature at which you serve it dramatically changes its texture.
- Slightly Warm or Room Temperature: For a truly decadent, “molten” experience, serve the cheesecake after it has cooled to room temperature for about 2-3 hours. The center will be incredibly soft, spoonable, and custard-like. This is arguably the most authentic way to enjoy it.
- Chilled: For a cleaner slice and a texture that is firmer yet still supremely creamy and light, serve it after chilling in the refrigerator. The flavors will have melded and deepened, and the tang from the cream cheese will be more pronounced. This is perfect for making ahead of time.
- With a Simple Pairing: This cheesecake needs very little adornment, but a few simple pairings can elevate it further:
- A dusting of flaky sea salt on top to contrast the sweetness.
- A side of fresh, tart berries like raspberries or blackberries to cut through the richness.
- A cup of strong black coffee or espresso.
- A small glass of a Spanish dessert wine like Pedro Ximénez Sherry or a dry Amontillado Sherry for a truly authentic Basque experience.
To slice, use a long, thin knife, dipping it in hot water and wiping it clean between each cut for the neatest possible slices, especially when serving chilled.
**Additional Tips for Guaranteed Success**
Here are five essential tips to ensure your first (and every) Basque Cheesecake is a triumph.
- Room Temperature is Non-Negotiable: I cannot stress this enough. Cold cream cheese will result in a lumpy batter. Cold eggs can cause the cream cheese mixture to seize and curdle. Take your cream cheese, eggs, and even your heavy cream out of the fridge at least 1-2 hours before you begin.
- The Magic is in the Parchment: Don’t try to make the parchment paper neat. Crumple it, then press it into the pan. The resulting wrinkles and high collar are signature features of the cake’s appearance and are functional, preventing leaks and containing the cake as it rises.
- Don’t Overmix After Adding Eggs: Once the eggs go in, you are no longer trying to incorporate air. Mix on low speed and only until each egg is just combined. Over-aerating the batter can cause the cheesecake to puff up too much and then crack and fall into a crater.
- Embrace the High Heat: Trust the process. 400°F (200°C) might seem alarmingly high for a cheesecake, but it’s essential for achieving the caramelized exterior and creamy interior. If your cake isn’t browning enough by the 50-minute mark, you can move the rack one level higher in the oven for the last 10-15 minutes of baking.
- Patience in Cooling is a Virtue: The cheesecake finishes “baking” with residual heat as it cools on the counter. Cutting into it too early will result in a soupy mess. Allowing it to cool completely to room temperature is the minimum. Chilling it deepens the flavor and perfects the texture.
**Frequently Asked Questions (FAQ)**
1. Why did my cheesecake crack so much and sink in the middle?
A little sinking and some rustic cracking on the surface are characteristic and desirable. However, if your cake developed a massive, deep crater, it’s likely that the batter was overmixed after the eggs were added. Too much air was incorporated, causing it to rise like a soufflé and then collapse dramatically. Mix on low speed and just until combined to prevent this.
2. My cheesecake top isn’t dark enough. What went wrong?
This is usually an oven temperature issue. First, verify your oven is properly calibrated with an oven thermometer. If the temperature is correct and it’s still too pale, your oven’s heating element might be at the bottom. Try moving the oven rack one position higher to get the top closer to the heat source. You can also bake it for an additional 5-10 minutes until the desired color is achieved.
3. Can I make this cheesecake gluten-free?
Absolutely! This recipe is very easy to adapt. Simply replace the ⅓ cup (40g) of all-purpose flour with 3 tablespoons (25g) of cornstarch. Sift it in just as you would the flour. The cornstarch will act as a stabilizer and yield a beautifully silky, gluten-free cheesecake.
4. How do I know when it’s perfectly baked? It looks raw in the middle!
The “jiggle test” is key. When you gently shake the pan, the outer 2-3 inches of the cheesecake should be set and barely move, while the inner circle (about 4-5 inches across) should have a very pronounced jiggle, similar to Jell-O or a loose pudding. It will look underbaked, but it will continue to set as it cools. If the entire cake, edge to edge, is soupy and liquid, it needs more time.
5. Can I use low-fat or whipped cream cheese?
No, this is the one ingredient where there is no substitute. Full-fat (at least 33% milk fat), block-style cream cheese is the only option for achieving the correct structure and ultra-creamy texture. Low-fat versions have more water and stabilizers, which will break down under the high heat, and whipped cream cheese will introduce too much air, ruining the dense, custardy consistency. Stick to the good stuff—it’s worth it
Basque Cheesecake Recipe
Ingredients
The Star of the Show: Cream Cheese
- Amount: 32 ounces (900g), or four 8-ounce blocks
- Why it’s crucial: This is the heart and soul of your cheesecake. You absolutely must use full-fat, block-style cream cheese. Do not substitute with low-fat, fat-free, or whipped cream cheese from a tub. The lower fat content and added air/stabilizers in those products will result in a soupy, grainy, or watery cheesecake that fails to set properly. The high fat content is essential for the rich flavor and luxurious, dense-yet-light texture. Brands like Philadelphia are the gold standard for a reason.
The Sweetener: Granulated Sugar
- Amount: 1 ¾ cups (350g)
- Why it’s crucial: Sugar does more than just sweeten the cake. It helps create the creamy texture by tenderizing the proteins in the eggs and cream cheese. It also plays a vital role in the “burnt” top. As the sugar on the surface is exposed to high heat, it caramelizes, creating that signature dark color and complex flavor. You can slightly reduce the sugar to 1 ½ cups (300g) if you prefer a tangier cheesecake, but don’t reduce it too much, or you’ll compromise both texture and the quality of the caramelization.
The Structure and Richness: Large Eggs
- Amount: 6 large eggs
- Why it’s crucial: Eggs are the primary setting agent in this custard-like cake. They provide structure, richness from the yolks, and leavening as they heat up. Using large eggs ensures the correct ratio of liquid to solids. Most importantly, they must be at room temperature to incorporate smoothly into the batter without causing the cream cheese to seize up and become lumpy.
The Silky Mouthfeel: Heavy Cream
- Amount: 2 cups (480ml)
- Why it’s crucial: Heavy cream (or heavy whipping cream with at least 36% milk fat) is what gives the Basque Cheesecake its signature light, almost mousse-like, yet incredibly rich texture. It thins the batter to the perfect consistency and adds a layer of dairy richness that complements the tangy cream cheese. Do not use half-and-half or milk; the fat content is too low and will result in a less decadent, potentially unstable cheesecake.
The Flavor Enhancers: Vanilla and Salt
- Amount: 2 teaspoons pure vanilla extract
- Amount: 1 teaspoon kosher salt
- Why they are crucial: Vanilla adds a beautiful, aromatic warmth that rounds out the flavors of the dairy and eggs. Use pure vanilla extract for the best, most authentic flavor. Salt is the secret weapon in all baking. It doesn’t make the cheesecake salty; instead, it sharpens and intensifies all the other flavors, balancing the sweetness and enhancing the tang of the cream cheese.
The Stabilizer: All-Purpose Flour
- Amount: ⅓ cup (40g)
- Why it’s crucial: A small amount of flour acts as a stabilizer and provides a bit of insurance against the cheesecake curdling or splitting. It helps to bind the ingredients together, contributing to the cake’s unique texture, which is somewhere between a classic cheesecake and a flan. For a gluten-free version, you can substitute this with the same amount of a 1-to-1 gluten-free baking flour blend or 3 tablespoons (25g) of cornstarch.
Instructions
First things first, position an oven rack in the middle of your oven and preheat it to 400°F (200°C). This high heat is non-negotiable.
Next, prepare your pan. This is a critical step for achieving the rustic, wrinkled look. Take one large sheet of parchment paper and press it firmly into your 9-inch springform pan, letting it crease and wrinkle naturally as you fit it in. Don’t worry about making it smooth. The excess paper should extend up and over the sides of the pan by at least 2 inches. This “collar” contains the cheesecake as it puffs up dramatically in the oven. Take a second sheet of parchment and lay it in the pan perpendicular to the first one, creating a cross shape. This provides extra security against leaks. Lightly grease the pan before adding the parchment can help it stick in place.
In the bowl of a stand mixer fitted with the paddle attachment, or in a large bowl using a hand mixer, place the room temperature cream cheese. Beat on medium speed for about 2-3 minutes until it is completely smooth, creamy, and free of any lumps.
With the mixer on low speed, gradually stream in the granulated sugar. Once all the sugar is added, increase the speed to medium and beat for another 2 minutes until the mixture is light and fluffy. Scrape down the sides and bottom of the bowl with a silicone spatula at least twice during this process to ensure everything is evenly incorporated.
With the mixer still on low speed, add the room temperature eggs one at a time, waiting for each egg to be fully incorporated before adding the next. This is a crucial step: do not overmix here. Mix just until the yellow yolk disappears. Overmixing after the eggs are added can incorporate too much air, leading to a texture that is too soufflé-like and prone to cracking excessively and falling. After the last egg is mixed in, scrape down the bowl one more time.
Pour in the heavy cream, vanilla extract, and salt. Mix on low speed just until the ingredients are combined. The batter will be quite thin and liquidy at this point; this is normal.
Finally, place a fine-mesh sieve over the bowl and sift the all-purpose flour directly into the batter. Mix on the lowest possible speed for about 15-20 seconds, just until the flour streaks disappear. One final scrape of the bowl is a good idea to catch any bits of flour or cream cheese at the bottom.
Pour the thin batter into your prepared springform pan. The batter should come up quite high in the pan. Place the pan on a baking sheet to catch any potential butter leakage from the springform seam.
Bake at 400°F (200°C) for 55 to 65 minutes. The cheesecake will puff up significantly, rise above the pan’s rim (held in by the parchment collar), and the top will turn a very deep brown, even appearing black in spots. The edges should be set, but the center will still be extremely jiggly when you gently nudge the pan. It should look like a loosely set pudding in the middle. This is the sign of a perfect Basque Cheesecake. Don’t be afraid of the color—it’s not burnt, it’s caramelized!
Remove the cheesecake from the oven and place it on a wire rack. It will be very puffed up and will sink dramatically as it cools; this is what creates the classic slumped, rustic appearance.
Let it cool completely to room temperature in the pan, which will take about 2-3 hours. Do not rush this step. Once it’s at room temperature, you can serve it for a truly soft, molten-center experience. For a firmer, more traditional (but still incredibly creamy) cheesecake texture, cover it loosely with plastic wrap and transfer it to the refrigerator to chill for at least 4 hours, or preferably overnight.
Nutrition
- Serving Size: One Normal Portion