It’s hard to believe Easter is just around the corner! As the days get longer and the first signs of spring emerge, my family and I start planning our Easter feast. This year, I wanted to try something a little different for dessert, moving away from our usual carrot cake and opting for a show-stopping centrepiece that would be as fun to make as it is to eat. Enter the Checkerboard Cake. I’d seen pictures online and always thought it looked incredibly impressive, but also intimidatingly difficult. Turns out, with a little patience and the right recipe, it’s surprisingly achievable! The kids absolutely loved helping with this one, especially assembling the different coloured layers to reveal that amazing checkerboard pattern. And the taste? Classic vanilla cake with a rich, creamy frosting – a guaranteed crowd-pleaser. It was a huge hit at our Easter gathering, not only for its visual appeal but also for its delicious, moist crumb. If you’re looking to impress this Easter, ditch the ordinary and give this Checkerboard Cake a go – you won’t regret it!
Ingredients
Creating a Checkerboard Cake that not only looks spectacular but also tastes divine starts with gathering the right ingredients. Don’t be intimidated by the slightly longer list – many of these are pantry staples, and the payoff is well worth the effort. We’ll break down the ingredients into sections for the cake itself and then for the luscious frosting that brings it all together.
For the Cake
The foundation of our Checkerboard Cake lies in two distinct cake batters, traditionally vanilla and chocolate. This contrast is what creates that striking visual effect. However, for Easter, we’re going to add a festive twist by using vanilla and a pastel-coloured batter, such as pink or blue, to enhance the spring theme. Here’s what you’ll need for both batters:
- All-Purpose Flour: 3 cups (375 grams). Flour forms the structure of our cake. Make sure to measure it correctly – spoon it into your measuring cup and level it off with a knife. Too much flour can result in a dry cake, while too little can make it too crumbly.
- Granulated Sugar: 2 cups (400 grams). Sugar not only sweetens the cake but also contributes to its moisture and tenderness. It also aids in browning and caramelization during baking.
- Baking Powder: 3 ½ teaspoons. This is our leavening agent, responsible for making the cake rise and become light and airy. Ensure your baking powder is fresh; old baking powder might not be as effective.
- Salt: 1 teaspoon. Salt enhances the flavours of the other ingredients and balances the sweetness. Don’t skip it!
- Unsalted Butter, softened: 1 cup (2 sticks, 226 grams). Using unsalted butter gives you control over the total salt content. Softened butter is crucial for creaming properly with sugar, creating a light and fluffy batter. It should be soft enough to easily press with your finger but not melted.
- Vegetable Oil: ½ cup (120 ml). Oil adds moisture and richness to the cake, contributing to its tender crumb. Vegetable oil is flavourless, allowing the other cake flavours to shine through.
- Eggs: 4 large. Eggs bind the ingredients together, add richness, and contribute to the structure of the cake. Use large eggs and ensure they are at room temperature, as this helps them emulsify better into the batter.
- Vanilla Extract: 2 teaspoons. Vanilla extract enhances the overall flavour of the vanilla batter and provides a warm, comforting aroma. Use good quality vanilla extract for the best flavour.
- Whole Milk: 1 cup (240 ml). Milk adds moisture and richness to the cake. Whole milk is preferred for its higher fat content, which contributes to a more tender cake. Room temperature milk is also ideal for better incorporation into the batter.
- Pink or Blue Food Colouring (Gel food colouring recommended): For the coloured batter. Gel food colouring is more concentrated than liquid food colouring and won’t thin out your batter as much. Start with a small amount and add more until you achieve your desired pastel shade.
For the Frosting
A delicious frosting is the perfect finishing touch to our Checkerboard Cake. A classic vanilla buttercream is a wonderful complement to the vanilla and coloured cakes, providing a sweet and creamy contrast.
- Unsalted Butter, softened: 1 cup (2 sticks, 226 grams). Again, softened unsalted butter is key for a smooth and creamy buttercream.
- Powdered Sugar: 4 cups (480 grams). Powdered sugar provides sweetness and structure to the buttercream. Sift it before measuring to remove any lumps and ensure a smooth frosting.
- Vanilla Extract: 2 teaspoons. Enhances the vanilla flavour of the buttercream, complementing the cake beautifully.
- Heavy Cream or Milk: 2-4 tablespoons. Used to adjust the consistency of the buttercream. Start with 2 tablespoons and add more gradually until you reach your desired spreading consistency. Heavy cream will create a richer frosting, while milk will make it slightly lighter.
Instructions
Now for the fun part – bringing our Checkerboard Cake to life! While it might seem complicated, breaking it down into steps makes it manageable and even enjoyable. We’ll go through the process in detail, ensuring you have all the guidance you need to create a stunning Easter dessert.
Step 1: Prepare the Cake Pans and Preheat Oven
Proper preparation is key to a successful cake. Start by preheating your oven to 350°F (175°C). This ensures the oven is at the correct temperature when you place the cakes in, promoting even baking.
Next, prepare your cake pans. You’ll need three 9-inch round cake pans. Grease the bottom and sides of each pan thoroughly with butter or cooking spray. This prevents the cakes from sticking and ensures they release cleanly after baking. After greasing, dust the pans with flour, tapping out any excess. Alternatively, you can line the bottoms of the pans with parchment paper rounds for extra insurance against sticking. This is particularly helpful for delicate cakes.
Step 2: Make the Vanilla Cake Batter
In a large bowl, whisk together the dry ingredients for the vanilla cake: flour, granulated sugar, baking powder, and salt. Whisk for about 30 seconds to ensure everything is evenly combined and there are no lumps of baking powder. This step is crucial for even leavening throughout the cake.
In a separate large bowl, or the bowl of a stand mixer, cream together the softened butter and vegetable oil until light and fluffy. This process incorporates air into the butter and oil, which contributes to a tender cake. Beat for about 2-3 minutes on medium speed.
Gradually add the sugar to the butter mixture, creaming until light and fluffy. Scrape down the sides of the bowl occasionally to ensure everything is evenly incorporated. This step is essential for a smooth batter and a tender cake texture.
Beat in the eggs one at a time, mixing well after each addition. Make sure each egg is fully incorporated before adding the next. This ensures proper emulsification and prevents the batter from curdling.
Stir in the vanilla extract. This enhances the vanilla flavour of the cake.
Gradually add the dry ingredients to the wet ingredients, alternating with the milk, beginning and ending with the dry ingredients. Start by adding about one-third of the dry ingredients, then half of the milk, then another third of the dry ingredients, the remaining milk, and finally the last third of the dry ingredients. Mix on low speed until just combined. Be careful not to overmix, as this can develop the gluten in the flour and result in a tough cake. Mix until just no streaks of flour are visible.
Step 3: Make the Coloured Cake Batter
Divide the vanilla cake batter evenly into two bowls. In one bowl, leave the batter as is for the vanilla cake layers. In the other bowl, add your chosen food colouring (pink or blue gel food colouring works beautifully for Easter). Start with a small amount and gradually add more, mixing well until you achieve your desired pastel shade. Remember, gel food colouring is more concentrated, so a little goes a long way.
Step 4: Bake the Cake Layers
Divide the vanilla batter evenly among two of the prepared 9-inch cake pans. Divide the coloured batter evenly into the remaining prepared 9-inch cake pan. You will have two vanilla layers and one coloured layer.
Bake for 25-30 minutes, or until a toothpick inserted into the centre comes out clean. The baking time may vary slightly depending on your oven. Start checking for doneness around 25 minutes. The cakes should be lightly golden brown on top and spring back lightly when gently pressed.
Let the cakes cool in the pans for 10-15 minutes before inverting them onto a wire rack to cool completely. Cooling in the pans slightly allows the cakes to set and prevents them from breaking when you invert them. Make sure the cakes are completely cool before frosting and assembling the checkerboard pattern. This is crucial for preventing the frosting from melting and the cake layers from sliding.
Step 5: Make the Vanilla Buttercream Frosting
While the cakes are cooling, prepare the vanilla buttercream frosting. In a large bowl, or the bowl of a stand mixer, beat the softened butter until light and creamy. Beat for about 2-3 minutes on medium speed until the butter is pale and fluffy.
Gradually add the powdered sugar, one cup at a time, beating on low speed until incorporated. Once all the powdered sugar is added, increase the speed to medium and beat for 2-3 minutes until the frosting is light and fluffy. Scrape down the sides of the bowl as needed to ensure everything is evenly mixed.
Stir in the vanilla extract.
Add heavy cream or milk, one tablespoon at a time, until you reach your desired consistency. You want a frosting that is spreadable but not too thin. If you add too much liquid, you can thicken the frosting by adding a bit more powdered sugar.
Step 6: Assemble the Checkerboard Cake
Once the cakes are completely cool, level the tops of each cake layer using a serrated knife. This will ensure your cake layers are even and the checkerboard pattern is clean and defined. Use a long serrated knife and gently saw across the top of each cake layer to remove any domes.
Using a 4-inch round cookie cutter and a 2-inch round cookie cutter (or similar sizes), cut concentric circles out of each cake layer. You will end up with three rings from each layer: an outer ring, a middle ring, and a centre circle.
Now for the fun part – assembling the checkerboard pattern! On a cake stand or serving plate, place the outer ring of the vanilla cake layer first. Fill it with the middle ring of the coloured cake layer, and finally, place the centre circle of the vanilla cake layer in the middle. You’ve created your first checkerboard layer!
Frost the top of this layer with a generous layer of vanilla buttercream.
For the next layer, reverse the pattern. Start with the outer ring of the coloured cake layer, then fill with the middle ring of the vanilla cake layer, and finally, the centre circle of the coloured cake layer. Carefully place this assembled layer on top of the frosted first layer.
Frost the top of this second layer with vanilla buttercream.
For the final layer, repeat the pattern of the first layer (vanilla outer ring, coloured middle ring, vanilla centre circle). Carefully place this layer on top of the frosted second layer.
Step 7: Frost the Entire Cake
Frost the entire cake with the remaining vanilla buttercream. You can create a smooth finish using an offset spatula, or you can create swirls and decorative patterns for a more rustic or elegant look. Get creative!
Step 8: Decorate (Optional)
For an extra Easter touch, you can decorate your Checkerboard Cake. Consider:
- Pastel Sprinkles: Add a festive sprinkle of pastel-coloured sprinkles around the base of the cake or on top.
- Easter Candies: Decorate with mini Easter eggs, jelly beans, or other Easter candies.
- Edible Flowers: For a more elegant look, use edible flowers like pansies or violets.
- Chocolate Shavings: White chocolate shavings would complement the pastel colours beautifully.
Step 9: Chill and Serve
Refrigerate the assembled and frosted Checkerboard Cake for at least 30 minutes before serving. This allows the frosting to set and the cake layers to firm up, making it easier to slice and serve. Chilling also enhances the flavour and texture of the cake.
Nutrition Facts
Understanding the nutritional content of your Easter Checkerboard Cake is helpful, especially if you are mindful of dietary considerations. Please note that these are estimated values and can vary based on specific ingredient brands and portion sizes.
- Servings: Approximately 12-16 servings. This recipe makes a standard 9-inch, three-layer cake, which can comfortably serve 12-16 people, depending on slice size. For larger gatherings, you might consider making a double batch or a sheet cake version.
- Calories per Serving (estimated): 450-550 calories per serving. This is an approximate range. A slice of Checkerboard Cake is a decadent treat, and calorie counts will vary based on frosting thickness and slice size. The primary contributors to calories are sugar, butter, oil, and flour.
Disclaimer: These nutritional facts are estimates only. Actual values may vary. For precise nutritional information, you can use online nutritional calculators and input the specific brands and quantities of ingredients used.
Preparation Time
Planning your time is essential, especially when preparing a cake like the Checkerboard Cake that involves multiple steps. Here’s a breakdown of the estimated time required:
- Prep Time: 1 hour 30 minutes – 2 hours. This includes:
- Gathering ingredients: 15 minutes
- Making cake batters (vanilla and coloured): 30 minutes
- Preparing cake pans: 10 minutes
- Making buttercream frosting: 20 minutes
- Cutting cake layers and assembling checkerboard pattern: 30-45 minutes. This step can take a bit longer the first time you make it, as it requires precision and patience.
- Bake Time: 25-30 minutes. This is the time the cakes spend in the oven.
- Cooling Time: 2-3 hours (including cake cooling and frosting chilling). Cakes need to cool completely before frosting and assembling. Frosting the cake and then chilling it allows it to set properly.
- Total Time: Approximately 4-5 hours. While this might seem like a long time, much of it is passive time (baking and cooling). The active preparation time is around 2-3 hours, spread out over the process.
Tips for Time Management:
- Bake the cake layers ahead of time: You can bake the cake layers a day in advance and store them tightly wrapped at room temperature or in the refrigerator. This breaks down the preparation and makes assembly easier on the day you plan to serve the cake.
- Make the frosting in advance: The buttercream frosting can also be made a day ahead and stored in an airtight container in the refrigerator. Bring it to room temperature and re-whip it briefly before using.
- Read the recipe thoroughly: Familiarize yourself with all the steps before you begin. This will help you plan your time efficiently and avoid any last-minute surprises.
- Enlist help: Baking is more fun with company! Get your family involved, especially for tasks like measuring ingredients or assembling the checkerboard pattern.
How to Serve
The Checkerboard Cake is a showstopper on its own, but thoughtful serving suggestions can elevate the experience even further. Here are some ideas to consider:
- Classic Dessert: Serve slices of the Checkerboard Cake as a delightful dessert after your Easter meal. It pairs wonderfully with coffee, tea, or a glass of milk.
- Easter Brunch Centrepiece: Make the Checkerboard Cake the star of your Easter brunch buffet. Its vibrant colours and impressive pattern will be a focal point.
- Dessert Table Highlight: Include the Checkerboard Cake as part of a larger dessert table spread. Surround it with other Easter treats like cookies, cupcakes, and fruit tarts for a festive display.
- With Fresh Berries: Serve slices of cake alongside a small bowl of fresh berries like strawberries, raspberries, or blueberries. The tartness of the berries complements the sweetness of the cake and frosting.
- Whipped Cream or Ice Cream: Offer a dollop of freshly whipped cream or a scoop of vanilla ice cream with each slice of cake. This adds an extra layer of richness and coolness.
- Chocolate Sauce Drizzle: For chocolate lovers, a light drizzle of warm chocolate sauce over the cake slice can be a decadent addition.
- Presentation is Key: Arrange the cake beautifully on a cake stand or serving platter. Consider adding fresh flowers or Easter-themed decorations around the base for an extra touch of elegance.
- Slice and Display: When slicing the cake, cut clean, even slices to showcase the checkerboard pattern. Arrange the slices neatly on a serving plate to highlight the visual appeal.
Additional Tips for Success
Creating a perfect Checkerboard Cake is achievable with a few helpful tips and tricks. Here are five essential tips to ensure your Easter Checkerboard Cake is a resounding success:
- Measure Ingredients Accurately: Baking is a science, and precise measurements are crucial, especially for cakes. Use measuring cups and spoons for dry and liquid ingredients. For flour, spoon it into the measuring cup and level it off with a knife. Too much or too little of certain ingredients can significantly affect the cake’s texture and rise. Investing in a kitchen scale for weighing ingredients (especially flour) can further improve accuracy and consistency.
- Don’t Overmix the Batter: Overmixing the cake batter develops the gluten in the flour, resulting in a tough cake. Mix the wet and dry ingredients until just combined. A few streaks of flour are okay; they will disappear as you gently fold the batter. Once you add the liquid ingredients, mix on low speed and only until everything is just incorporated.
- Ensure Cakes are Completely Cool Before Frosting and Assembling: Frosting a warm cake will cause the frosting to melt and slide off, making assembly messy and difficult. Allow the cake layers to cool completely to room temperature before you start frosting and assembling the checkerboard pattern. Patience is key here! Cooling racks help speed up the cooling process by allowing air to circulate around the cakes.
- Use Gel Food Colouring for Vibrant Pastel Colours: Gel food colouring is more concentrated than liquid food colouring, so you need less to achieve vibrant colours. It also won’t thin out your batter as much as liquid food colouring can. Start with a small amount of gel food colouring and gradually add more until you reach your desired pastel shade. For Easter, soft pastel pink, blue, or even lavender colours work beautifully.
- Practice Makes Perfect (But Don’t Stress!): The first time you make a Checkerboard Cake, it might seem a little daunting, especially the assembly process. Don’t be discouraged if it’s not absolutely perfect on your first try. Each time you make it, you’ll become more comfortable with the technique. The most important thing is to have fun and enjoy the process! Even if the pattern isn’t perfectly symmetrical, the cake will still be delicious and impressive.
FAQ Section
Have questions about making a Checkerboard Cake? Here are some frequently asked questions to help you along the way:
Q1: Can I use different cake flavours for the checkerboard pattern?
A: Absolutely! While vanilla and coloured (or vanilla and chocolate) are classic choices, you can definitely experiment with other flavour combinations. Lemon and vanilla, strawberry and vanilla, or even spice cake and vanilla could create interesting and delicious checkerboard cakes. Just ensure the flavours complement each other.
Q2: I don’t have 9-inch cake pans. Can I use a different size?
A: Yes, you can use different sized pans, but you might need to adjust the baking time and the number of layers. If using 8-inch pans, the baking time might be slightly longer. You may also get slightly thicker cake layers. The key is to divide the batter evenly among the pans you are using. You can also make a sheet cake version if you prefer, but the checkerboard pattern will be a bit different.
Q3: My cake layers are domed on top. How do I level them?
A: It’s common for cake layers to dome slightly in the oven. To level them, use a long serrated knife. Once the cakes are completely cool, gently saw across the top of each cake layer to remove the dome, making them flat and even. This ensures a stable and even checkerboard cake.
Q4: Can I make the Checkerboard Cake ahead of time?
A: Yes, you can definitely prepare parts of the cake in advance. The cake layers can be baked a day ahead and stored tightly wrapped at room temperature or in the refrigerator. The buttercream frosting can also be made a day ahead and stored in an airtight container in the refrigerator. Assemble and frost the cake on the day you plan to serve it, or even the day before, and store it in the refrigerator.
Q5: What if my checkerboard pattern isn’t perfect?
A: Don’t worry if your checkerboard pattern isn’t perfectly symmetrical, especially on your first attempt! It’s a handmade cake, and imperfections are part of its charm. The most important thing is that it tastes delicious. With practice, you’ll get better at assembling the pattern. Even a slightly imperfect checkerboard cake is still incredibly impressive and will be enjoyed by everyone. The delicious flavour and the surprise of the pattern will more than make up for any minor imperfections.
Print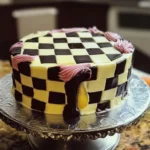
Checkerboard Cake Recipe
Ingredients
For the Cake
The foundation of our Checkerboard Cake lies in two distinct cake batters, traditionally vanilla and chocolate. This contrast is what creates that striking visual effect. However, for Easter, we’re going to add a festive twist by using vanilla and a pastel-coloured batter, such as pink or blue, to enhance the spring theme. Here’s what you’ll need for both batters:
- All-Purpose Flour: 3 cups (375 grams). Flour forms the structure of our cake. Make sure to measure it correctly – spoon it into your measuring cup and level it off with a knife. Too much flour can result in a dry cake, while too little can make it too crumbly.
- Granulated Sugar: 2 cups (400 grams). Sugar not only sweetens the cake but also contributes to its moisture and tenderness. It also aids in browning and caramelization during baking.
- Baking Powder: 3 ½ teaspoons. This is our leavening agent, responsible for making the cake rise and become light and airy. Ensure your baking powder is fresh; old baking powder might not be as effective.
- Salt: 1 teaspoon. Salt enhances the flavours of the other ingredients and balances the sweetness. Don’t skip it!
- Unsalted Butter, softened: 1 cup (2 sticks, 226 grams). Using unsalted butter gives you control over the total salt content. Softened butter is crucial for creaming properly with sugar, creating a light and fluffy batter. It should be soft enough to easily press with your finger but not melted.
- Vegetable Oil: ½ cup (120 ml). Oil adds moisture and richness to the cake, contributing to its tender crumb. Vegetable oil is flavourless, allowing the other cake flavours to shine through.
- Eggs: 4 large. Eggs bind the ingredients together, add richness, and contribute to the structure of the cake. Use large eggs and ensure they are at room temperature, as this helps them emulsify better into the batter.
- Vanilla Extract: 2 teaspoons. Vanilla extract enhances the overall flavour of the vanilla batter and provides a warm, comforting aroma. Use good quality vanilla extract for the best flavour.
- Whole Milk: 1 cup (240 ml). Milk adds moisture and richness to the cake. Whole milk is preferred for its higher fat content, which contributes to a more tender cake. Room temperature milk is also ideal for better incorporation into the batter.
- Pink or Blue Food Colouring (Gel food colouring recommended): For the coloured batter. Gel food colouring is more concentrated than liquid food colouring and won’t thin out your batter as much. Start with a small amount and add more until you achieve your desired pastel shade.
For the Frosting
A delicious frosting is the perfect finishing touch to our Checkerboard Cake. A classic vanilla buttercream is a wonderful complement to the vanilla and coloured cakes, providing a sweet and creamy contrast.
- Unsalted Butter, softened: 1 cup (2 sticks, 226 grams). Again, softened unsalted butter is key for a smooth and creamy buttercream.
- Powdered Sugar: 4 cups (480 grams). Powdered sugar provides sweetness and structure to the buttercream. Sift it before measuring to remove any lumps and ensure a smooth frosting.
- Vanilla Extract: 2 teaspoons. Enhances the vanilla flavour of the buttercream, complementing the cake beautifully.
- Heavy Cream or Milk: 2-4 tablespoons. Used to adjust the consistency of the buttercream. Start with 2 tablespoons and add more gradually until you reach your desired spreading consistency. Heavy cream will create a richer frosting, while milk will make it slightly lighter.
Instructions
Step 1: Prepare the Cake Pans and Preheat Oven
Proper preparation is key to a successful cake. Start by preheating your oven to 350°F (175°C). This ensures the oven is at the correct temperature when you place the cakes in, promoting even baking.
Next, prepare your cake pans. You’ll need three 9-inch round cake pans. Grease the bottom and sides of each pan thoroughly with butter or cooking spray. This prevents the cakes from sticking and ensures they release cleanly after baking. After greasing, dust the pans with flour, tapping out any excess. Alternatively, you can line the bottoms of the pans with parchment paper rounds for extra insurance against sticking. This is particularly helpful for delicate cakes.
Step 2: Make the Vanilla Cake Batter
In a large bowl, whisk together the dry ingredients for the vanilla cake: flour, granulated sugar, baking powder, and salt. Whisk for about 30 seconds to ensure everything is evenly combined and there are no lumps of baking powder. This step is crucial for even leavening throughout the cake.
In a separate large bowl, or the bowl of a stand mixer, cream together the softened butter and vegetable oil until light and fluffy. This process incorporates air into the butter and oil, which contributes to a tender cake. Beat for about 2-3 minutes on medium speed.
Gradually add the sugar to the butter mixture, creaming until light and fluffy. Scrape down the sides of the bowl occasionally to ensure everything is evenly incorporated. This step is essential for a smooth batter and a tender cake texture.
Beat in the eggs one at a time, mixing well after each addition. Make sure each egg is fully incorporated before adding the next. This ensures proper emulsification and prevents the batter from curdling.
Stir in the vanilla extract. This enhances the vanilla flavour of the cake.
Gradually add the dry ingredients to the wet ingredients, alternating with the milk, beginning and ending with the dry ingredients. Start by adding about one-third of the dry ingredients, then half of the milk, then another third of the dry ingredients, the remaining milk, and finally the last third of the dry ingredients. Mix on low speed until just combined. Be careful not to overmix, as this can develop the gluten in the flour and result in a tough cake. Mix until just no streaks of flour are visible.
Step 3: Make the Coloured Cake Batter
Divide the vanilla cake batter evenly into two bowls. In one bowl, leave the batter as is for the vanilla cake layers. In the other bowl, add your chosen food colouring (pink or blue gel food colouring works beautifully for Easter). Start with a small amount and gradually add more, mixing well until you achieve your desired pastel shade. Remember, gel food colouring is more concentrated, so a little goes a long way.
Step 4: Bake the Cake Layers
Divide the vanilla batter evenly among two of the prepared 9-inch cake pans. Divide the coloured batter evenly into the remaining prepared 9-inch cake pan. You will have two vanilla layers and one coloured layer.
Bake for 25-30 minutes, or until a toothpick inserted into the centre comes out clean. The baking time may vary slightly depending on your oven. Start checking for doneness around 25 minutes. The cakes should be lightly golden brown on top and spring back lightly when gently pressed.
Let the cakes cool in the pans for 10-15 minutes before inverting them onto a wire rack to cool completely. Cooling in the pans slightly allows the cakes to set and prevents them from breaking when you invert them. Make sure the cakes are completely cool before frosting and assembling the checkerboard pattern. This is crucial for preventing the frosting from melting and the cake layers from sliding.
Step 5: Make the Vanilla Buttercream Frosting
While the cakes are cooling, prepare the vanilla buttercream frosting. In a large bowl, or the bowl of a stand mixer, beat the softened butter until light and creamy. Beat for about 2-3 minutes on medium speed until the butter is pale and fluffy.
Gradually add the powdered sugar, one cup at a time, beating on low speed until incorporated. Once all the powdered sugar is added, increase the speed to medium and beat for 2-3 minutes until the frosting is light and fluffy. Scrape down the sides of the bowl as needed to ensure everything is evenly mixed.
Stir in the vanilla extract.
Add heavy cream or milk, one tablespoon at a time, until you reach your desired consistency. You want a frosting that is spreadable but not too thin. If you add too much liquid, you can thicken the frosting by adding a bit more powdered sugar.
Step 6: Assemble the Checkerboard Cake
Once the cakes are completely cool, level the tops of each cake layer using a serrated knife. This will ensure your cake layers are even and the checkerboard pattern is clean and defined. Use a long serrated knife and gently saw across the top of each cake layer to remove any domes.
Using a 4-inch round cookie cutter and a 2-inch round cookie cutter (or similar sizes), cut concentric circles out of each cake layer. You will end up with three rings from each layer: an outer ring, a middle ring, and a centre circle.
Now for the fun part – assembling the checkerboard pattern! On a cake stand or serving plate, place the outer ring of the vanilla cake layer first. Fill it with the middle ring of the coloured cake layer, and finally, place the centre circle of the vanilla cake layer in the middle. You’ve created your first checkerboard layer!
Frost the top of this layer with a generous layer of vanilla buttercream.
For the next layer, reverse the pattern. Start with the outer ring of the coloured cake layer, then fill with the middle ring of the vanilla cake layer, and finally, the centre circle of the coloured cake layer. Carefully place this assembled layer on top of the frosted first layer.
Frost the top of this second layer with vanilla buttercream.
For the final layer, repeat the pattern of the first layer (vanilla outer ring, coloured middle ring, vanilla centre circle). Carefully place this layer on top of the frosted second layer.
Step 7: Frost the Entire Cake
Frost the entire cake with the remaining vanilla buttercream. You can create a smooth finish using an offset spatula, or you can create swirls and decorative patterns for a more rustic or elegant look. Get creative!
Step 8: Decorate (Optional)
For an extra Easter touch, you can decorate your Checkerboard Cake. Consider:
- Pastel Sprinkles: Add a festive sprinkle of pastel-coloured sprinkles around the base of the cake or on top.
- Easter Candies: Decorate with mini Easter eggs, jelly beans, or other Easter candies.
- Edible Flowers: For a more elegant look, use edible flowers like pansies or violets.
- Chocolate Shavings: White chocolate shavings would complement the pastel colours beautifully.
Step 9: Chill and Serve
Refrigerate the assembled and frosted Checkerboard Cake for at least 30 minutes before serving. This allows the frosting to set and the cake layers to firm up, making it easier to slice and serve. Chilling also enhances the flavour and texture of the cake.
Nutrition
- Serving Size: one normal portion
- Calories: 450-550