
Of all the culinary discoveries I’ve made in my kitchen, few have brought as much consistent joy and convenience to my family as mastering the art of homemade onigiri. For years, these perfect little rice parcels were something we only enjoyed at Japanese restaurants or picked up from specialty grocers. The idea of making them myself seemed intimidating, a craft reserved for seasoned chefs. But one weekend, fueled by a desire for a healthier, more exciting lunchbox option for the kids, I decided to tackle it. This Delicious Salmon Onigiri recipe is the culmination of that journey. The first time I successfully shaped a warm, perfectly triangular rice ball filled with savory, creamy salmon, it felt like unlocking a secret. When my kids came home from school with empty lunchboxes, raving about their “cool rice triangles,” I knew I had a winner. It has since become our go-to for picnics, road trips, and even quick, satisfying weeknight dinners. It’s more than just a recipe; it’s a comforting, versatile, and genuinely fun food to make and eat, bringing a touch of Japanese comfort right into our home.
Beyond the Bento Box: What Exactly is Salmon Onigiri?
Before we dive into the delicious details, let’s talk about what onigiri is—and what it isn’t. Often mistaken for a type of sushi, onigiri (お握り) is a quintessentially Japanese comfort food with a history stretching back over a thousand years. The name itself translates to “to grasp” or “to hold,” perfectly describing how these rice balls are made.
At its core, onigiri is a ball or triangle of steamed Japanese rice, often lightly salted and filled with a savory ingredient, and sometimes wrapped in a piece of nori (dried seaweed). Unlike sushi, which is made with vinegared rice, onigiri rice is typically plain or lightly salted. This simple distinction is key. Onigiri was born out of practicality; it was the original portable meal for samurai, farmers, and travelers who needed sustenance on the go. The salt on the rice acted as a natural preservative, and the compact shape made it easy to transport and eat without utensils.
The filling is where onigiri truly shines. While traditional fillings include pickled plum (umeboshi), salted cod roe (tarako), or seasoned kelp (kombu), the modern onigiri world is vast and creative. This brings us to salmon onigiri. By using cooked, flaked salmon—often mixed with creamy Japanese mayonnaise and other seasonings—we create a filling that is rich, savory, and incredibly satisfying. It’s a modern classic that appeals to palates worldwide, offering a perfect balance of fluffy rice, umami-rich fish, and the subtle, oceanic crunch of nori. It’s a snack, a lunch, and a piece of culinary history all rolled into one perfect package.
Why This Salmon Onigiri Recipe Will Become Your New Go-To
In a world of complicated recipes, the beauty of this Salmon Onigiri lies in its elegant simplicity and incredible versatility. Here’s why you’ll find yourself returning to this recipe again and again:
- Incredibly Delicious: The combination of perfectly cooked, sticky Japanese rice with a rich, savory, and slightly creamy salmon filling is simply irresistible. It’s a symphony of textures and umami flavors in every bite.
- Perfect for Meal Prep: Onigiri are the ultimate make-ahead meal. You can prepare a large batch at the beginning of the week for grab-and-go lunches, quick snacks, or light dinners. They save time and ensure you always have a healthy, homemade option on hand.
- Customizable and Fun: While this recipe focuses on a classic creamy salmon filling, it’s a fantastic base for experimentation. You can make it spicy, add different herbs, or even grill the onigiri for a crispy exterior (known as Yaki Onigiri). The shaping process is also a fun activity for kids and adults alike.
- Healthy and Wholesome: Made with whole-food ingredients like rice and salmon, onigiri is a balanced and nutritious choice. Salmon is packed with omega-3 fatty acids, and rice provides sustained energy, making it far superior to most processed snacks.
- Budget-Friendly: This recipe is a fantastic way to use leftover cooked salmon, stretching a single fillet into multiple satisfying meals. Even when starting from scratch, the ingredients are accessible and affordable.
The Heart of Onigiri: Key Ingredients Explained
The magic of a perfect onigiri lies in using the right ingredients. Each component plays a crucial role in the final taste and texture. Understanding them is the first step to becoming an onigiri master.
The Rice: The Soul of Onigiri
This is the most important ingredient, and there is no substitute. You must use Japanese short-grain rice. Brands like Koshihikari, Akita Komachi, or Tamanishiki are ideal. This type of rice has a high starch content, which makes it sticky and plump when cooked, allowing it to be molded and hold its shape. Using long-grain rice like Basmati or Jasmine will result in a dry, crumbly onigiri that falls apart. While often called “sushi rice,” for onigiri, you are just cooking the rice plainly, not seasoning it with the vinegar mixture used for sushi.
The Salmon: The Savory Center
You have a few excellent options here, depending on your time and preference.
- Fresh Salmon Fillet: A 6-ounce (170g) fillet, either pan-seared or baked, yields a wonderfully moist and flavorful filling. Seasoning it simply with salt and pepper before cooking is all you need.
- High-Quality Canned Salmon: This is a fantastic, convenient, and budget-friendly alternative. Ensure you buy boneless, skinless salmon packed in water and drain it thoroughly to avoid a soggy filling.
The Seasoning: The Flavor Boosters
This is where you build the umami bomb at the center of your onigiri.
- Japanese Mayonnaise (Kewpie): This is highly recommended over standard American mayonnaise. Kewpie is made with only egg yolks (not whole eggs), and rice vinegar, giving it a richer, creamier texture and a distinct, tangy flavor that beautifully complements the salmon.
- Soy Sauce: A splash of soy sauce adds depth and a salty, umami kick. Use a low-sodium version if you are watching your salt intake.
- Sriracha or Chili Garlic Sauce (Optional): For those who enjoy a bit of heat, a small amount of sriracha or chili sauce transforms the filling into a delicious spicy salmon onigiri.
- Furikake (Optional, for seasoning rice): Furikake is a dry Japanese seasoning blend typically made of toasted sesame seeds, nori flakes, salt, and sugar. Mixing this into the rice before shaping adds another layer of flavor and visual appeal.
The Wrap: The Finishing Touch
Nori (Dried Seaweed Sheets): These are the crisp, dark green sheets used to wrap onigiri and sushi. They add a savory, oceanic flavor and make the onigiri easier to hold without getting your fingers sticky. You can buy full sheets and cut them into strips, or find pre-cut onigiri-specific strips.
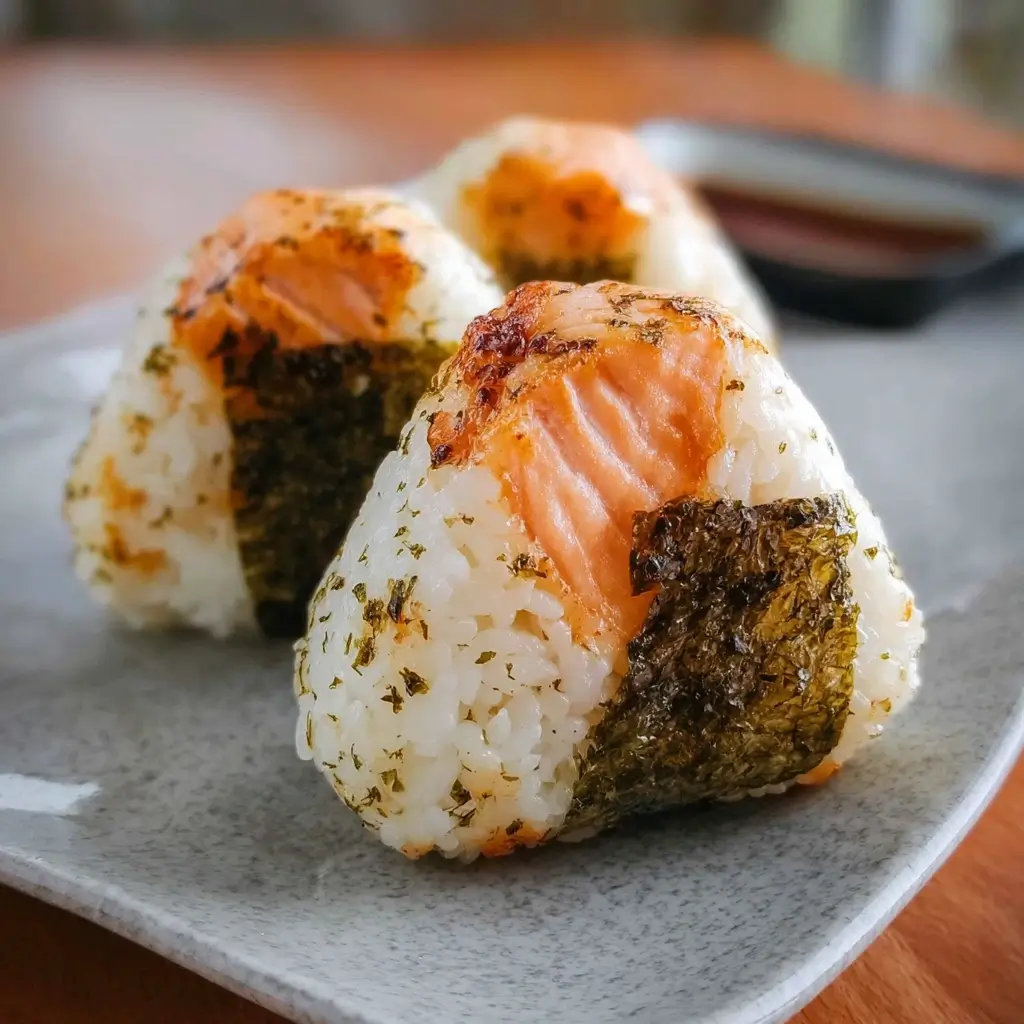
Delicious Salmon Onigiri: The Complete Recipe
This recipe will guide you through creating classic, triangular onigiri with a creamy and savory salmon filling. It yields approximately 8 medium-sized onigiri.
Ingredients
For the Rice:
- 2 cups (uncooked) Japanese short-grain rice
- 2 ½ cups cold water
- ½ teaspoon salt
For the Salmon Filling:
- 6 oz (170g) salmon fillet, skinless
- 1 teaspoon olive oil or neutral oil
- Salt and black pepper to taste
- 3 tablespoons Japanese mayonnaise (Kewpie recommended)
- 1 teaspoon soy sauce
- ½ teaspoon sriracha (optional, or to taste)
- 1 tablespoon chopped scallions or chives (optional)
For Assembly:
- Nori (dried seaweed sheets), cut into 1-inch x 3-inch strips
- A small bowl of water (for your hands)
- A small bowl with ½ teaspoon of salt (for your hands)
- Toasted sesame seeds or furikake for garnish (optional)
Step-by-Step Instructions
This process is broken down into four main stages: cooking the rice, preparing the filling, seasoning the rice, and finally, shaping your beautiful onigiri.
Stage 1: Cook the Perfect Onigiri Rice
- Rinse the Rice: Place the 2 cups of uncooked rice in a large bowl. Cover with cold water and swish the rice around with your hand. The water will become cloudy. Carefully pour out the cloudy water, using your hand as a strainer to keep the rice from falling out. Repeat this process 3-4 times, or until the water runs mostly clear. This step is crucial; it removes excess surface starch and prevents the rice from becoming gummy.
- Soak the Rice (Optional but Recommended): After the final rinse, drain the rice completely. Add the 2 ½ cups of fresh, cold water. Let the rice soak for at least 30 minutes. This allows the grains to hydrate evenly, resulting in a fluffier texture.
- Cook the Rice: Transfer the rice and its soaking water to a rice cooker and cook according to the manufacturer’s instructions. If cooking on the stovetop, bring the rice and water to a boil in a medium saucepan. Once boiling, reduce the heat to the lowest setting, cover with a tight-fitting lid, and let it simmer for 15 minutes. Do not lift the lid.
- Steam the Rice: After 15 minutes, remove the pot from the heat (or once the rice cooker switches to “keep warm”). Let it stand, covered, for another 10-15 minutes. This allows the rice to steam and finish cooking, absorbing any remaining moisture.
- Fluff and Cool: Gently fluff the cooked rice with a rice paddle or spatula using a cutting motion to separate the grains without mashing them. Transfer the rice to a large, non-metallic bowl to cool down slightly. It should be warm enough to handle but not piping hot.
Stage 2: Prepare the Savory Salmon Filling
- Cook the Salmon: While the rice is cooking, prepare the salmon. Pat the salmon fillet dry with a paper towel and season both sides with a pinch of salt and pepper.
- Pan-Sear Method: Heat 1 teaspoon of oil in a non-stick skillet over medium-high heat. Place the salmon fillet in the hot pan and cook for 4-5 minutes per side, or until it’s cooked through and flakes easily with a fork.
- Baking Method: Alternatively, preheat your oven to 400°F (200°C). Place the seasoned salmon on a baking sheet lined with parchment paper and bake for 12-15 minutes, or until cooked through.
- Flake and Mix: Once the salmon has cooled slightly, use a fork to flake it into small pieces in a medium bowl. Discard any stray bones.
- Combine Ingredients: To the flaked salmon, add the Japanese mayonnaise, soy sauce, and optional sriracha and chopped scallions. Mix gently until everything is well combined and the salmon is coated in a creamy dressing. Set aside.
Stage 3: Season the Rice
- Salt the Rice: Once the rice has cooled to a warm, handleable temperature, sprinkle the ½ teaspoon of salt over it. Use your wet rice paddle to gently fold and mix the salt in, ensuring it’s evenly distributed. The rice should now be perfectly seasoned and wonderfully sticky.
Stage 4: Assemble and Shape the Onigiri
This is the fun part! You can shape the onigiri by hand or use a triangular onigiri mold for perfect, uniform shapes.
Using an Onigiri Mold (Easiest Method):
- Prepare the Mold: Briefly dip the mold in the bowl of water to prevent the rice from sticking.
- First Layer of Rice: Fill the mold about halfway with the seasoned rice. Don’t pack it down too hard.
- Add the Filling: Use your thumb or a small spoon to create a small indent in the center of the rice. Add about 1 heaping teaspoon of the salmon filling into the indent. Be careful not to overfill.
- Second Layer of Rice: Cover the filling with more rice until the mold is full.
- Press and Shape: Place the top of the mold on and press down firmly but gently to compact the rice and form the triangle.
- Release: Remove the top of the mold and gently push the onigiri out from the bottom.
Shaping by Hand (Traditional Method):
- Prepare Your Hands: Dip your hands in the bowl of water, then rub a pinch of salt from the second bowl all over your palms. This prevents the rice from sticking and seasons the outside of the onigiri.
- Take a Scoop of Rice: Scoop about ½ cup of warm rice into one hand and gently flatten it into a thick disc.
- Add the Filling: Create a small well in the center of the rice with your thumb and place about 1 heaping teaspoon of the salmon filling inside.
- Enclose the Filling: Gently fold the edges of the rice disc up and around the filling, adding a little more rice on top if needed to fully enclose it.
- Shape the Onigiri: Cup your hands and begin to gently press the rice ball together, rotating it as you go. To form the classic triangle, shape your dominant hand into a V-shape and use the palm of your other hand as a flat base. Gently press and rotate the ball against your hands until you have a firm, triangular shape with three distinct corners. The key is to be firm enough to hold it together, but not so hard that you crush the rice grains.
- Final Touch: Place a strip of nori on the bottom of the onigiri. The moisture from the rice will help it adhere. Garnish with a sprinkle of toasted sesame seeds or furikake, if desired. Repeat with the remaining rice and filling.
Nutrition Facts
- Servings: 8 onigiri
- Calories per serving (1 onigiri): Approximately 265 kcal
Please note that this is an estimate. The final nutrition values can vary based on the specific ingredients used, such as the type of mayonnaise and the exact size of the onigiri.
Preparation Time
- Prep Time: 20 minutes (includes making the filling)
- Cook Time: 30 minutes (for the rice and salmon)
- Soaking/Cooling Time: 45 minutes
- Total Time: Approximately 1 hour 35 minutes
How to Serve Your Masterpiece: Onigiri Serving Suggestions
Onigiri are wonderfully versatile. While perfect on their own, they can be the star of a meal or a humble companion. Here are some fantastic ways to serve them:
- The Classic Bento Box:
- Place two salmon onigiri in a bento box.
- Fill the other compartments with classic accompaniments like:
- Tamagoyaki (Japanese rolled omelet)
- Blanched broccoli or edamame
- Pickled ginger (gari) or pickled daikon (takuan)
- A few cherry tomatoes for a pop of color.
- A Light and Comforting Lunch:
- Serve one or two onigiri alongside a steaming bowl of miso soup.
- Add a simple side salad with a ginger or sesame dressing for a complete and balanced meal.
- As a Hearty Snack:
- Onigiri are the ultimate portable snack for school, work, or after a workout. Wrap them individually in plastic wrap to maintain their moisture.
- For Picnics and Road Trips:
- Their portability makes them ideal for outdoor dining. Pack them in a cooler and they are ready to eat anytime, anywhere, with no mess.
- Elevate it with Grilling (Yaki Onigiri):
- For a truly special treat, turn your onigiri into Yaki Onigiri!
- Lightly brush both sides of a plain (unwrapped) onigiri with a mixture of soy sauce and a little mirin.
- Pan-fry them on a lightly oiled non-stick skillet over medium heat for 2-3 minutes per side, or until a golden-brown, crispy crust forms.
- The result is a wonderfully crispy, savory exterior with a soft, fluffy interior.
Additional Tips for Perfect Onigiri Every Time
- The “Wet Hands” Rule is Non-Negotiable: Rice is incredibly sticky. Always keep a bowl of water nearby to wet your hands or your onigiri mold before handling the rice. This is the single most important trick for a smooth, non-frustrating experience. Adding a little salt to your hands not only helps prevent sticking but also perfectly seasons the exterior of each rice ball.
- The Right Rice Temperature is Key: Don’t try to shape onigiri with rice that is fresh-off-the-stove hot—you’ll burn your hands. Conversely, don’t use cold, refrigerated rice, as it will be too hard and won’t stick together. The ideal temperature is warm to the touch, which makes the rice pliable and easy to mold.
- Gentle but Firm Pressure: When shaping the onigiri, you’re looking for a balance. You need to apply enough pressure so the rice ball is compact and won’t fall apart, but not so much that you mash the individual grains of rice. The goal is a firm exterior with a light, fluffy texture on the inside.
- Don’t Overfill: It can be tempting to pack as much of the delicious salmon filling in as possible, but overfilling is a common cause of onigiri explosions. A teaspoon or two is usually perfect. Ensure the filling is completely encased in rice to prevent it from leaking out.
- Wrap the Nori Just Before Serving for Maximum Crunch: If you wrap your onigiri in nori hours before you plan to eat them, the seaweed will absorb moisture from the rice and become soft and chewy. For the best texture, wrap them right before serving. If you’re packing them for lunch, wrap the onigiri in plastic wrap and pack the nori strip separately. You can then wrap it fresh for that satisfying textural contrast.
Your Salmon Onigiri Questions Answered (FAQ)
1. Can I use a different type of rice, like Jasmine or Basmati?
It is strongly advised against. The success of onigiri depends entirely on the high starch content and sticky nature of Japanese short-grain rice. Long-grain varieties like Jasmine or Basmati cook up into separate, fluffy grains and lack the glutenous properties needed to bind together into a ball. Using them will result in a crumbly mess that falls apart.
2. How do I properly store leftover onigiri?
Wrap each onigiri individually and tightly in plastic wrap to prevent them from drying out. They can be stored at room temperature for up to one day. For longer storage, you can refrigerate them for up to 2-3 days. However, be aware that refrigeration causes the rice to harden. To refresh a refrigerated onigiri, you can microwave it for 15-20 seconds to soften the rice.
3. Can I freeze salmon onigiri?
Yes, onigiri freezes surprisingly well! For best results, do not add the nori wrapper. Wrap each onigiri tightly in plastic wrap, then place them in a freezer-safe bag or container. They can be frozen for up to a month. To thaw, leave them at room temperature for a few hours or microwave them on a low power setting until softened.
4. My onigiri keeps falling apart. What am I doing wrong?
There are a few common culprits:
- Wrong Rice: You must be using Japanese short-grain rice.
- Rice-to-Water Ratio: Your rice might be too dry (not enough water) or too wet (too much water). Follow the package directions carefully.
- Not Enough Pressure: You may not be pressing firmly enough when shaping.
- Rice Temperature: The rice might be too cold. Ensure it’s warm when you are shaping.
5. What are some other popular onigiri filling ideas?
The possibilities are endless! Once you’ve mastered this salmon recipe, you can experiment with other classic and modern fillings. Some popular choices include:
- Tuna Mayo: A simple mix of canned tuna, Japanese mayonnaise, and a little soy sauce.
- Umeboshi: A single, salty pickled Japanese plum placed in the center (an acquired but very traditional taste).
- Katsuobushi Okaka: Bonito flakes (katsuobushi) mixed with soy sauce.
- Chicken Teriyaki: Small, diced pieces of chicken cooked in teriyaki sauce.
- Salted Cod Roe (Tarako): A salty, popular filling often enjoyed cooked.

Delicious Salmon Onigiri Recipe
Ingredients
For the Rice:
- 2 cups (uncooked) Japanese short-grain rice
- 2 ½ cups cold water
- ½ teaspoon salt
For the Salmon Filling:
- 6 oz (170g) salmon fillet, skinless
- 1 teaspoon olive oil or neutral oil
- Salt and black pepper to taste
- 3 tablespoons Japanese mayonnaise (Kewpie recommended)
- 1 teaspoon soy sauce
- ½ teaspoon sriracha (optional, or to taste)
- 1 tablespoon chopped scallions or chives (optional)
For Assembly:
- Nori (dried seaweed sheets), cut into 1-inch x 3-inch strips
- A small bowl of water (for your hands)
- A small bowl with ½ teaspoon of salt (for your hands)
- Toasted sesame seeds or furikake for garnish (optional)
Instructions
Stage 1: Cook the Perfect Onigiri Rice
- Rinse the Rice: Place the 2 cups of uncooked rice in a large bowl. Cover with cold water and swish the rice around with your hand. The water will become cloudy. Carefully pour out the cloudy water, using your hand as a strainer to keep the rice from falling out. Repeat this process 3-4 times, or until the water runs mostly clear. This step is crucial; it removes excess surface starch and prevents the rice from becoming gummy.
- Soak the Rice (Optional but Recommended): After the final rinse, drain the rice completely. Add the 2 ½ cups of fresh, cold water. Let the rice soak for at least 30 minutes. This allows the grains to hydrate evenly, resulting in a fluffier texture.
- Cook the Rice: Transfer the rice and its soaking water to a rice cooker and cook according to the manufacturer’s instructions. If cooking on the stovetop, bring the rice and water to a boil in a medium saucepan. Once boiling, reduce the heat to the lowest setting, cover with a tight-fitting lid, and let it simmer for 15 minutes. Do not lift the lid.
- Steam the Rice: After 15 minutes, remove the pot from the heat (or once the rice cooker switches to “keep warm”). Let it stand, covered, for another 10-15 minutes. This allows the rice to steam and finish cooking, absorbing any remaining moisture.
- Fluff and Cool: Gently fluff the cooked rice with a rice paddle or spatula using a cutting motion to separate the grains without mashing them. Transfer the rice to a large, non-metallic bowl to cool down slightly. It should be warm enough to handle but not piping hot.
Stage 2: Prepare the Savory Salmon Filling
- Cook the Salmon: While the rice is cooking, prepare the salmon. Pat the salmon fillet dry with a paper towel and season both sides with a pinch of salt and pepper.
- Pan-Sear Method: Heat 1 teaspoon of oil in a non-stick skillet over medium-high heat. Place the salmon fillet in the hot pan and cook for 4-5 minutes per side, or until it’s cooked through and flakes easily with a fork.
- Baking Method: Alternatively, preheat your oven to 400°F (200°C). Place the seasoned salmon on a baking sheet lined with parchment paper and bake for 12-15 minutes, or until cooked through.
- Flake and Mix: Once the salmon has cooled slightly, use a fork to flake it into small pieces in a medium bowl. Discard any stray bones.
- Combine Ingredients: To the flaked salmon, add the Japanese mayonnaise, soy sauce, and optional sriracha and chopped scallions. Mix gently until everything is well combined and the salmon is coated in a creamy dressing. Set aside.
Stage 3: Season the Rice
- Salt the Rice: Once the rice has cooled to a warm, handleable temperature, sprinkle the ½ teaspoon of salt over it. Use your wet rice paddle to gently fold and mix the salt in, ensuring it’s evenly distributed. The rice should now be perfectly seasoned and wonderfully sticky.
Stage 4: Assemble and Shape the Onigiri
This is the fun part! You can shape the onigiri by hand or use a triangular onigiri mold for perfect, uniform shapes.
Using an Onigiri Mold (Easiest Method):
- Prepare the Mold: Briefly dip the mold in the bowl of water to prevent the rice from sticking.
- First Layer of Rice: Fill the mold about halfway with the seasoned rice. Don’t pack it down too hard.
- Add the Filling: Use your thumb or a small spoon to create a small indent in the center of the rice. Add about 1 heaping teaspoon of the salmon filling into the indent. Be careful not to overfill.
- Second Layer of Rice: Cover the filling with more rice until the mold is full.
- Press and Shape: Place the top of the mold on and press down firmly but gently to compact the rice and form the triangle.
- Release: Remove the top of the mold and gently push the onigiri out from the bottom.
Shaping by Hand (Traditional Method):
- Prepare Your Hands: Dip your hands in the bowl of water, then rub a pinch of salt from the second bowl all over your palms. This prevents the rice from sticking and seasons the outside of the onigiri.
- Take a Scoop of Rice: Scoop about ½ cup of warm rice into one hand and gently flatten it into a thick disc.
- Add the Filling: Create a small well in the center of the rice with your thumb and place about 1 heaping teaspoon of the salmon filling inside.
- Enclose the Filling: Gently fold the edges of the rice disc up and around the filling, adding a little more rice on top if needed to fully enclose it.
- Shape the Onigiri: Cup your hands and begin to gently press the rice ball together, rotating it as you go. To form the classic triangle, shape your dominant hand into a V-shape and use the palm of your other hand as a flat base. Gently press and rotate the ball against your hands until you have a firm, triangular shape with three distinct corners. The key is to be firm enough to hold it together, but not so hard that you crush the rice grains.
- Final Touch: Place a strip of nori on the bottom of the onigiri. The moisture from the rice will help it adhere. Garnish with a sprinkle of toasted sesame seeds or furikake, if desired. Repeat with the remaining rice and filling.
Nutrition
- Serving Size: One Normal Portion
- Calories: 265