Ingredients
Scale
For the No-Bake Crust:
- 1 ½ cups (approx. 150g) vegan digestive biscuits or graham crackers, finely crushed
- ¼ cup (30g) almond flour or finely ground almonds (optional, for texture and flavor)
- 2 tablespoons (15g) unsweetened cocoa powder (for a deeper chocolate note)
- ⅓ cup (75g) vegan butter or coconut oil, melted
- 1–2 tablespoons maple syrup or agave nectar (optional, if your biscuits aren’t very sweet)
For the Creamy Cashew “Mascarpone” Filling:
- 1 ½ cups (225g) raw cashews, soaked for at least 4 hours or quick-soaked in boiling water for 30 minutes, then drained
- ¾ cup (180ml) full-fat coconut milk (from a can, use the thick cream part, refrigerate can overnight to help separation)
- ½ cup (120ml) maple syrup or agave nectar (adjust to taste)
- ¼ cup (60ml) freshly brewed strong coffee or espresso, cooled
- 2 tablespoons (30ml) refined coconut oil, melted (helps with setting)
- 1 tablespoon lemon juice (for a slight tang, mimicking mascarpone)
- 1 teaspoon pure vanilla extract
- Pinch of salt
For the Coffee Soak & Dusting:
- ½ cup (120ml) freshly brewed strong coffee or espresso, cooled
- 1–2 tablespoons coffee liqueur (like Kahlua or Tia Maria – ensure vegan, optional but recommended)
- 2–3 tablespoons unsweetened cocoa powder, for dusting
Instructions
Phase 1: Preparing the No-Bake Crust
- Crush the Biscuits: If you haven’t already, place your vegan digestive biscuits or graham crackers into a food processor and pulse until they form fine crumbs. Alternatively, place them in a ziplock bag and crush them with a rolling pin. You want a sandy texture.
- Combine Dry Ingredients: In a medium bowl, combine the biscuit crumbs, almond flour (if using), and cocoa powder. Whisk them together to ensure they are evenly distributed.
- Add Wet Ingredients: Pour the melted vegan butter (or coconut oil) and optional maple syrup over the dry ingredients. Mix thoroughly with a fork or spatula until the mixture resembles wet sand and holds together when pressed.
- Press into Pan: Transfer the crumb mixture to your 9-inch tart pan with a removable bottom. Using the back of a spoon or the flat bottom of a glass, firmly press the crumbs into the bottom and up the sides of the pan, creating an even crust. Pay special attention to the edges to ensure they are compact and neat.
- Chill the Crust: Place the tart pan with the crust into the freezer for at least 20-30 minutes (or the refrigerator for 1 hour) to firm up while you prepare the filling. This step is crucial for a crisp, well-set base.
Phase 2: Creating the Luscious Cashew “Mascarpone” Filling
- Drain Cashews: Thoroughly drain and rinse the soaked cashews. Soaking softens them, making them easier to blend into a silky-smooth cream.
- Blend Ingredients: In a high-speed blender, combine the drained cashews, the thick part of the full-fat coconut milk, maple syrup (or agave), cooled coffee/espresso, melted refined coconut oil, lemon juice, vanilla extract, and a pinch of salt.
- Achieve Silky Smoothness: Blend on high speed for several minutes until the mixture is completely smooth and creamy, with no grittiness from the cashews. You may need to stop and scrape down the sides of the blender a few times to ensure everything is incorporated. Patience is key here for the perfect texture. Taste and adjust sweetness or coffee flavor if desired.
Phase 3: Assembling Your Vegan Tiramisu Tart
- Retrieve Chilled Crust: Take the firmed-up crust out of the freezer or refrigerator.
- Coffee Soak the Base (Optional but Recommended): Gently brush or drizzle about half (¼ cup) of the cooled coffee/espresso (mixed with liqueur, if using) over the bottom of the chilled crust. Don’t oversaturate it, but ensure a light, even coating for that classic tiramisu flavor infusion.
- Pour the Filling: Carefully pour the prepared cashew “mascarpone” filling into the coffee-brushed crust. Spread it evenly using a spatula, smoothing the top.
- Tap to Settle: Gently tap the tart pan on the counter a few times to release any air bubbles and help the filling settle evenly.
Phase 4: Chilling and Setting
- Crucial Chilling Time: Cover the tart loosely with plastic wrap (try not to let it touch the surface of the filling) or a reusable silicone lid. Refrigerate for at least 6-8 hours, or preferably overnight. This extended chilling time is essential for the filling to firm up properly and for the flavors to meld beautifully. The coconut oil in the filling will solidify, giving it that perfect, sliceable consistency.
Phase 5: The Finishing Touch
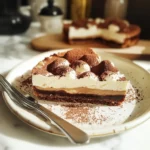
- Dust with Cocoa: Just before serving, generously dust the top of the set tart with unsweetened cocoa powder using a fine-mesh sieve. This creates the iconic tiramisu look and adds a touch of bitterness to balance the sweetness.
- Serve and Amaze: Carefully remove the outer ring of the tart pan. If it’s a bit stuck, you can gently warm the sides of the pan with your hands for a few seconds. Slice with a sharp knife, wiping the blade clean between cuts for neat slices.
Nutrition
- Serving Size: One Normal Portion
- Calories: 380-450 kcal