

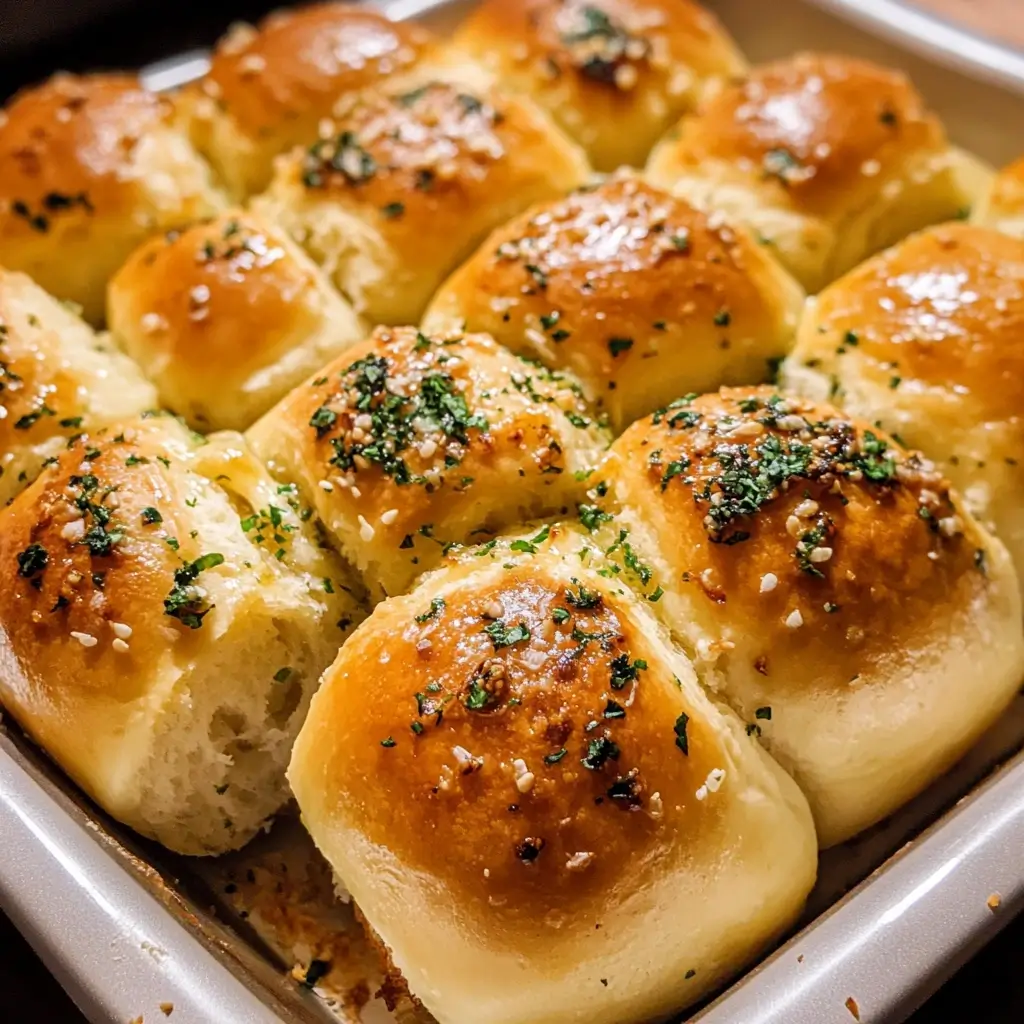

There are certain smells that instantly transport you to a place of comfort, warmth, and utter satisfaction. For me, and undoubtedly for my family, the aroma of freshly baked garlic bread rolls wafting from the oven is right at the top of that list. These aren’t just any garlic bread rolls; these are the kind that elicit audible “oohs” and “aahs” before they even hit the table. Soft, pillowy clouds of dough, enriched just enough to be tender but still satisfyingly bread-like, generously slathered in a vibrant, potent garlic-herb butter that melts into every nook and cranny. The first time I perfected this recipe, the batch disappeared in record time. My kids, usually picky eaters, were clamoring for seconds (and thirds!), and my partner declared them “restaurant-quality, but better.” Since then, they’ve become a non-negotiable staple for pasta nights, soup dinners, holiday feasts, or frankly, any occasion that calls for a little extra deliciousness. Making them from scratch might seem daunting, but trust me, the process is deeply rewarding, and the result is infinitely superior to anything store-bought. Prepare to fall in love with the ultimate homemade garlic bread rolls – your kitchen will smell divine, and your taste buds will thank you profusely.
The Ultimate Garlic Bread Rolls: Ingredients You’ll Need
Crafting bakery-worthy garlic bread rolls at home starts with quality ingredients. While the process involves standard pantry staples, understanding their role can elevate your final product. Here’s a breakdown of what you’ll need, with precise measurements for consistently delicious results:
For the Dough:
- Warm Water (105-115°F / 40-46°C): 1 cup (240ml) – Crucial for activating the yeast. Too hot kills it, too cold makes it sluggish.
- Active Dry Yeast: 2 ¼ teaspoons (7g) – Equivalent to one standard packet. Ensure your yeast is fresh for the best rise. (Instant yeast can also be used; see FAQ).
- Granulated Sugar: 2 tablespoons (25g) – Feeds the yeast and adds a touch of sweetness to balance the dough.
- Unsalted Butter, Melted: ¼ cup (57g) – Adds richness, tenderness, and flavor to the dough.
- Large Egg: 1 – Provides structure, richness, and color.
- Salt: 1 teaspoon (6g) – Controls yeast activity and enhances overall flavor. Don’t skip it!
- All-Purpose Flour or Bread Flour: 3 ½ to 4 cups (420g – 480g) – Start with 3 ½ cups and add more as needed. Bread flour will yield a slightly chewier roll due to higher protein content, while all-purpose works perfectly well for a softer texture.
For the Garlic Herb Butter Topping:
- Unsalted Butter, Softened: ½ cup (113g) – Using softened, not melted, butter helps it cling better to the rolls initially.
- Fresh Garlic, Minced: 4-6 cloves (about 2 tablespoons) – Adjust to your garlic preference! Fresh garlic provides the best, most vibrant flavor.
- Fresh Parsley, Finely Chopped: ¼ cup – Adds freshness and color. Dried parsley can be substituted (use about 1.5 tablespoons), but fresh is recommended.
- Grated Parmesan Cheese (Optional but Recommended): ¼ cup (25g) – Adds a salty, umami depth.
- Salt: ½ teaspoon (3g) – Enhances the garlic and herb flavors.
- Black Pepper, Freshly Ground (Optional): ¼ teaspoon – Adds a subtle warmth.
- Dried Oregano or Italian Seasoning (Optional): ½ teaspoon – For an extra layer of herbaceous flavor.
Equipment Notes:
While not ingredients, having the right tools helps:
- Large mixing bowl
- Stand mixer with dough hook (optional, but helpful)
- Measuring cups and spoons
- Whisk
- Spatula or wooden spoon
- Plastic wrap or clean kitchen towel
- Baking sheet (9×13 inch pan works well for pull-apart style)
- Parchment paper (optional, for easy cleanup)
- Small bowl (for garlic butter)
- Pastry brush
Having everything measured and ready (mise en place) before you begin makes the bread-making process smoother and more enjoyable. The quality of your butter and freshness of your garlic and herbs will significantly impact the final flavor profile, so use the best you can access.
Step-by-Step Guide: Crafting Your Perfect Garlic Bread Rolls
Making these rolls is a journey of transformation – simple ingredients becoming something truly special. Follow these steps carefully for foolproof, fluffy, and flavorful results.
Phase 1: Making and Kneading the Dough
- Activate the Yeast (Proofing): In the bowl of your stand mixer or a large mixing bowl, combine the warm water, granulated sugar, and active dry yeast. Gently whisk together. Let the mixture sit for 5-10 minutes. It should become foamy or bubbly on the surface. This indicates the yeast is alive and active. If it doesn’t foam, your yeast may be old or the water temperature was incorrect – discard and start again with fresh yeast and correctly tempered water. This step is crucial for ensuring your dough will rise.
- Combine Wet Ingredients: Once the yeast is proofed, whisk in the melted butter and the large egg until well combined. The mixture should be smooth.
- Add Dry Ingredients (Initial Mix): Add the salt and 3 ½ cups (420g) of flour to the wet ingredients. If using a stand mixer, fit it with the dough hook attachment. Mix on low speed until a shaggy dough begins to form. If mixing by hand, use a sturdy wooden spoon or spatula to combine the ingredients until you can no longer stir easily.
- Kneading the Dough:
- Stand Mixer Method: Increase the speed to medium-low and knead the dough for 7-10 minutes. The dough should start pulling away from the sides of the bowl and become smooth and elastic. If the dough seems excessively sticky after 5 minutes, add more flour, one tablespoon at a time, allowing it to incorporate fully before adding more. Be cautious not to add too much flour, as this can make the rolls dense.
- Hand Kneading Method: Turn the shaggy dough out onto a lightly floured surface. Knead the dough by folding it over onto itself and pushing down and away with the heel of your hand. Rotate the dough a quarter turn and repeat. Continue kneading for 10-15 minutes. The dough will start sticky but will become smoother and more elastic as you work it. Add minimal flour to the surface only as needed to prevent sticking. The goal is a dough that is soft, pliable, and slightly tacky, but doesn’t stick excessively to your hands.
- Check for Gluten Development (Windowpane Test): A well-kneaded dough will be smooth and elastic. To check, pinch off a small piece of dough and gently stretch it between your fingers. If you can stretch it thin enough to see light through it without tearing easily (like a windowpane), the gluten is sufficiently developed. If it tears immediately, knead for a few more minutes.
Phase 2: First Rise (Bulk Fermentation)
- Prepare the Bowl: Lightly grease the mixing bowl you used (or a separate clean bowl) with a little oil or cooking spray.
- Shape and Place Dough: Form the kneaded dough into a smooth ball. Place it in the greased bowl and turn it over once so the top is also lightly greased. This prevents the surface from drying out.
- Cover and Rise: Cover the bowl tightly with plastic wrap or a clean, damp kitchen towel. Place the bowl in a warm, draft-free spot in your kitchen. Allow the dough to rise for 1 to 1.5 hours, or until it has doubled in size. The exact time will depend on the ambient temperature – warmer environments speed up yeast activity.
Phase 3: Shaping the Rolls
- Prepare the Baking Pan: Grease a 9×13 inch baking pan or line it with parchment paper. This size is ideal for creating soft, pull-apart rolls. You can also use a larger baking sheet, spacing the rolls further apart for crustier individual rolls.
- Punch Down and Divide: Gently punch down the risen dough to release the trapped gases. Transfer the dough to a lightly floured surface. Divide the dough into 12 equal portions (or 15 for slightly smaller rolls). Using a kitchen scale is the most accurate way to ensure uniform rolls, typically around 70-80g each for 12 rolls.
- Shape into Rolls: Take one portion of dough at a time. Gently flatten it slightly, then pull the edges towards the center and pinch them together at the bottom. Turn the dough over so the seam side is down. Cup your hand over the dough ball and roll it gently on the unfloured part of your work surface to create a smooth, taut ball. Repeat with the remaining dough portions.
- Arrange in Pan: Place the shaped rolls into the prepared baking pan. They should be close together but not tightly packed for pull-apart style, or spaced about 1-2 inches apart on a baking sheet for individual rolls.
Phase 4: Second Rise (Proofing)
- Cover and Rise Again: Loosely cover the pan with greased plastic wrap or a clean kitchen towel. Let the rolls rise in a warm place for another 30-60 minutes, or until they have puffed up noticeably and look almost doubled again. They should feel light and airy. Don’t over-proof, as this can lead to collapsed rolls or a yeasty flavor. A gentle poke should leave a slight indentation that slowly springs back.
Phase 5: Baking and Finishing
- Preheat Oven: About 15-20 minutes before the second rise is complete, preheat your oven to 375°F (190°C). Position an oven rack in the center.
- Bake the Rolls: Uncover the risen rolls. Place the pan in the preheated oven. Bake for 15-20 minutes, or until the tops are beautifully golden brown and sound hollow when gently tapped. An instant-read thermometer inserted into the center of a roll should register around 190-200°F (88-93°C). If they start browning too quickly, you can loosely tent the pan with aluminum foil.
- Prepare Garlic Butter Topping: While the rolls are baking, prepare the garlic herb butter. In a small bowl, combine the softened butter, minced fresh garlic, chopped fresh parsley, optional Parmesan cheese, salt, optional pepper, and optional dried herbs. Stir everything together until well combined.
- Apply Garlic Butter: As soon as the rolls come out of the oven, immediately brush the tops generously with the prepared garlic herb butter. The heat from the rolls will melt the butter, allowing it to seep down and infuse every bite with incredible flavor. Be thorough!
- Cool Slightly and Serve: Let the rolls cool in the pan for a few minutes before serving. They are best enjoyed warm, fresh from the oven, when the butter is melty and the bread is pillowy soft.
Enjoy the fruits (or rather, rolls) of your labor! The combination of the soft, enriched dough and the potent garlic butter is truly irresistible.
Understanding the Nutrition: Garlic Bread Roll Facts
While these garlic bread rolls are undoubtedly a treat, it’s helpful to have an approximate understanding of their nutritional content. Please note that these values are estimates and can vary based on specific ingredients used (like the type of flour or amount of butter) and the final size of your rolls.
- Servings: This recipe typically yields 12 standard-sized rolls.
- Calories Per Serving (Approximate): Each roll contains roughly 250-300 calories.
Breakdown Considerations:
- Dough: The primary contributors to calories in the dough are the flour, butter, sugar, and egg. Using bread flour might slightly increase protein content but calorie difference compared to all-purpose is minimal.
- Garlic Butter Topping: A significant portion of the calories comes from the butter in the topping. The garlic, herbs, and even the optional Parmesan contribute relatively fewer calories but add significant flavor and some nutrients (like calcium from Parmesan).
- Variations: Adding more cheese, using whole milk instead of water (if experimenting), or making larger rolls will increase the calorie count per serving. Reducing the amount of butter in the topping can lower calories and fat content, but will also impact the classic rich flavor.
Disclaimer: This nutritional information is provided as a guideline only. For precise nutritional data, it’s recommended to use an online calculator and input your specific ingredients and measurements. Enjoy these rolls as part of a balanced meal!
Timing is Everything: Preparation and Cooking Time
Making yeast bread requires patience, as the dough needs time to develop flavor and texture through rising. Here’s a realistic breakdown of the time commitment for these garlic bread rolls:
- Active Preparation Time: Approximately 25-35 minutes. This includes:
- Mixing the dough ingredients: 5-10 minutes
- Kneading the dough (by hand or mixer): 10-15 minutes
- Shaping the rolls: 10 minutes
- Preparing the garlic butter: 5 minutes
- First Rise (Bulk Fermentation): 1 hour to 1 hour 30 minutes. This is largely hands-off time, but crucial for dough development. The duration depends heavily on the warmth of your kitchen.
- Second Rise (Proofing): 30 minutes to 1 hour. Again, this is hands-off time and depends on ambient temperature. The rolls need to become visibly puffy.
- Baking Time: 15 to 20 minutes. Keep an eye on them to achieve that perfect golden brown.
- Total Time: Approximately 2 hours 10 minutes to 3 hours 25 minutes from start to finish.
Key Time Factors:
- Ambient Temperature: A warmer environment (around 75-80°F / 24-27°C) will significantly speed up both rising times. Colder kitchens will require longer rising periods.
- Yeast Freshness: Fresh, active yeast works more efficiently.
- Kneading Efficiency: Proper kneading develops gluten structure faster.
While the total time seems long, remember that most of it is inactive rising time where the dough does its magic. Plan accordingly – start the dough a few hours before you plan to serve dinner, and you’ll be rewarded with warm, fresh-baked rolls.
Serving Suggestions: Elevate Your Garlic Bread Rolls
These garlic bread rolls are incredibly versatile and complement a wide array of dishes. Here are some delicious ways to serve them:
- Classic Pasta Companion:
- Serve alongside hearty Spaghetti Bolognese or Lasagna to soak up that delicious sauce.
- Pair with creamy pasta dishes like Fettuccine Alfredo or Creamy Tomato Pasta – the garlic flavor cuts through the richness beautifully.
- Excellent with lighter pasta dishes too, such as Pasta Aglio e Olio (double garlic!) or Pasta Primavera.
- Soup Dippers:
- Perfect for dunking into robust Tomato Soup.
- A comforting sidekick to Minestrone, Lentil Soup, or Chicken Noodle Soup.
- Complements creamy soups like Broccoli Cheddar or Creamy Mushroom Soup.
- Salad Sidekick:
- Serve alongside a large Caesar Salad or Greek Salad for a satisfying lunch or light dinner.
- Offer them with a simple green salad dressed with vinaigrette.
- With Main Courses:
- A fantastic accompaniment to Roast Chicken, Pot Roast, or Braised Short Ribs.
- Serve with Steak dinners instead of traditional garlic bread.
- Pair with Grilled Meats or Fish for a flavorful carbohydrate addition.
- Excellent with Chili con Carne or hearty Stews.
- As an Appetizer:
- Serve them warm in a basket as guests arrive, perhaps with a side of marinara sauce for dipping.
- Holiday Feasts:
- A guaranteed crowd-pleaser on Thanksgiving, Christmas, or Easter dinner tables, replacing standard dinner rolls.
Presentation Tips:
- Serve Warm: Always aim to serve these rolls warm for the best texture and flavor. Reheat gently if needed (see FAQ).
- Basket Presentation: Line a bread basket with a clean napkin or tea towel to keep the rolls warm and add a rustic touch.
- Garnish: Sprinkle a little extra fresh parsley or Parmesan cheese over the top just before serving for visual appeal.
- Pull-Apart Fun: If baked in a 9×13 pan, present the entire pan and let guests pull their own rolls apart.
No matter how you serve them, these homemade garlic bread rolls are sure to be a highlight of the meal!
Pro Tips for Bakery-Worthy Garlic Bread Rolls
Ready to take your garlic bread rolls from great to absolutely phenomenal? Here are five pro tips to ensure fluffy texture, amazing flavor, and consistent results every time:
- Flour Power – Choose Wisely & Measure Correctly: While all-purpose flour works well for a softer roll, using bread flour will give your rolls a slightly chewier texture and better structure due to its higher protein content, which develops more gluten. Whichever you choose, measure your flour accurately. The best method is using a kitchen scale (grams are provided in the ingredients). If using measuring cups, use the “spoon and level” method: fluff the flour in its container, gently spoon it into the measuring cup until overflowing, then level it off with a straight edge. Scooping directly from the bag compacts the flour, leading to using too much and resulting in dense, dry rolls.
- Master the Kneading – Don’t Underdo It: Kneading is arguably the most critical step for achieving a light, airy texture. It develops the gluten network that traps the gases produced by the yeast. Whether using a stand mixer or your hands, ensure you knead for the full recommended time, or until the dough passes the windowpane test (see Instructions, Step 5). Undermining leads to dense rolls that don’t rise well. Conversely, be cautious not to add too much extra flour during kneading, as this also leads to density. Aim for a dough that is smooth, elastic, and only slightly tacky.
- Embrace the Garlic Variations: Don’t be afraid to customize the garlic element! For a deeper, sweeter, less pungent garlic flavor, try using roasted garlic. Simply roast whole garlic heads until soft, squeeze out the cloves, mash them, and incorporate them into the softened butter. You can also supplement fresh garlic with a teaspoon of garlic powder in the butter mixture for an extra layer of garlic intensity. For garlic lovers, adding a clove or two of minced garlic into the dough itself along with the dry ingredients can infuse flavor from within.
- Control the Rise – Temperature Matters: Yeast activity is highly dependent on temperature. For consistent results, find a reliably warm (but not hot), draft-free spot for both the first and second rises. Ideal temperature is around 75-80°F (24-27°C). This could be inside a turned-off oven with the light on, near a warm appliance (but not directly on it), or simply in a warmer room. A controlled rise ensures even fermentation, leading to better flavor and texture. Rushing the rise in excessive heat or letting it go too long (over-proofing) can negatively impact the final product.
- The Finishing Touch – Don’t Skimp on the Butter & Consider an Egg Wash: The garlic herb butter is key! Use good quality unsalted butter and apply it generously immediately after the rolls come out of the oven. The residual heat melts the butter perfectly, allowing it to soak in. For an extra golden, slightly shiny crust before baking, consider an egg wash. Whisk one large egg with a tablespoon of water or milk. Gently brush this mixture over the rolls after the second rise and before they go into the oven. This adds color and a slight sheen, making them look even more professional (then apply the garlic butter after baking as usual).
By incorporating these tips, you’ll gain more control over the process and achieve garlic bread rolls that rival those from your favorite bakery or restaurant. Happy baking!
Frequently Asked Questions (FAQ) About Garlic Bread Rolls
Here are answers to some common questions you might have while making these delicious garlic bread rolls:
- Can I use Instant Yeast instead of Active Dry Yeast?
- Yes, you absolutely can! Instant yeast (also known as rapid-rise or bread machine yeast) generally doesn’t require separate proofing in warm water. You can typically mix it directly in with the dry ingredients (flour, salt). However, you still need the warm water (105-115°F / 40-46°C) added with the other wet ingredients to hydrate the dough and provide the right environment for the yeast. Some bakers still prefer to proof instant yeast for a few minutes with the sugar and water just to be 100% sure it’s active, especially if the package has been open for a while. Rise times might be slightly shorter with instant yeast, so keep an eye on the dough. Use the same amount (2 ¼ teaspoons).
- My dough didn’t rise! What went wrong?
- This is a common issue with several potential causes:
- Dead Yeast: Your yeast might be expired or was stored improperly. Always check the expiration date.
- Water Temperature: Water that was too hot (above 120°F/49°C) likely killed the yeast. Water that was too cold wouldn’t activate it properly. Use a thermometer for accuracy.
- Too Much Salt or Sugar: While necessary, excessive amounts can inhibit or kill yeast. Ensure accurate measurements.
- Cold Environment: The dough needs warmth to rise effectively. If your kitchen is cold, find a warmer spot (like a slightly warmed, turned-off oven with the light on).
- Not Enough Kneading: Insufficient gluten development means the dough structure can’t trap the gases produced by the yeast.
- Dough Dried Out: Ensure the bowl/pan is covered properly during rising to prevent a dry crust from forming, which can restrict rising.
- This is a common issue with several potential causes:
- Can I prepare these garlic bread rolls ahead of time?
- Yes, there are a few ways to make these ahead:
- Refrigerate After First Rise: After the first rise, punch down the dough, shape it into rolls, place them in the prepared pan, cover tightly with greased plastic wrap, and refrigerate for up to 18-24 hours. When ready to bake, let the rolls sit at room temperature for about 1-2 hours (they need to complete their second rise and lose the chill) before baking as directed. This slow cold fermentation can actually enhance flavor.
- Freeze Shaped, Unbaked Rolls: Shape the rolls after the first rise, place them on a baking sheet (not touching), and freeze until solid. Transfer the frozen dough balls to a freezer bag for up to 2-3 months. To bake, place frozen rolls in the prepared pan, cover loosely, and let them thaw and rise at room temperature (this can take 3-5 hours). Once puffed, bake as directed.
- Freeze Baked Rolls: Bake the rolls completely and let them cool fully. Wrap them tightly in plastic wrap and then foil, or place them in a freezer bag. Freeze for up to 2-3 months. To serve, thaw at room temperature or reheat directly from frozen in a 350°F (175°C) oven for 10-15 minutes, or until heated through. You might want to brush with a little extra melted garlic butter after reheating.
- Yes, there are a few ways to make these ahead:
- How should I store leftover garlic bread rolls?
- Leftover garlic bread rolls are best stored once they have cooled completely. Place them in an airtight container or a resealable plastic bag. They will stay fresh at room temperature for about 2-3 days. Storing them in the refrigerator can actually make them go stale faster, although it extends their shelf life slightly if mold is a concern in humid environments. For longer storage, freezing (as described in the previous question) is the best option.
- Can I make these garlic bread rolls vegan?
- Yes, you can adapt this recipe to be vegan with a few substitutions:
- Butter: Replace the dairy butter in both the dough and the topping with a good quality plant-based butter alternative (stick form usually works best for baking and for the topping).
- Egg: You can often omit the egg entirely for a slightly less rich roll, or replace it with a commercial egg replacer, a “flax egg” (1 tablespoon ground flaxseed mixed with 3 tablespoons water, let sit for 5 minutes), or about ¼ cup of unsweetened applesauce or mashed banana (though the latter might impart a slight flavor).
- Parmesan Cheese: Omit the Parmesan in the topping or replace it with a store-bought vegan Parmesan alternative or nutritional yeast for a cheesy, umami flavor.
- Water: Ensure you are using water, not milk (unless using plant-based milk), as the base liquid.
- Yes, you can adapt this recipe to be vegan with a few substitutions:
With these common questions answered, you should feel even more confident tackling this rewarding garlic bread roll recipe!
Print
Garlic Bread Rolls Recipe
Ingredients
For the Dough:
- Warm Water (105-115°F / 40-46°C): 1 cup (240ml) – Crucial for activating the yeast. Too hot kills it, too cold makes it sluggish.
- Active Dry Yeast: 2 ¼ teaspoons (7g) – Equivalent to one standard packet. Ensure your yeast is fresh for the best rise. (Instant yeast can also be used; see FAQ).
- Granulated Sugar: 2 tablespoons (25g) – Feeds the yeast and adds a touch of sweetness to balance the dough.
- Unsalted Butter, Melted: ¼ cup (57g) – Adds richness, tenderness, and flavor to the dough.
- Large Egg: 1 – Provides structure, richness, and color.
- Salt: 1 teaspoon (6g) – Controls yeast activity and enhances overall flavor. Don’t skip it!
- All-Purpose Flour or Bread Flour: 3 ½ to 4 cups (420g – 480g) – Start with 3 ½ cups and add more as needed. Bread flour will yield a slightly chewier roll due to higher protein content, while all-purpose works perfectly well for a softer texture.
For the Garlic Herb Butter Topping:
- Unsalted Butter, Softened: ½ cup (113g) – Using softened, not melted, butter helps it cling better to the rolls initially.
- Fresh Garlic, Minced: 4-6 cloves (about 2 tablespoons) – Adjust to your garlic preference! Fresh garlic provides the best, most vibrant flavor.
- Fresh Parsley, Finely Chopped: ¼ cup – Adds freshness and color. Dried parsley can be substituted (use about 1.5 tablespoons), but fresh is recommended.
- Grated Parmesan Cheese (Optional but Recommended): ¼ cup (25g) – Adds a salty, umami depth.
- Salt: ½ teaspoon (3g) – Enhances the garlic and herb flavors.
- Black Pepper, Freshly Ground (Optional): ¼ teaspoon – Adds a subtle warmth.
- Dried Oregano or Italian Seasoning (Optional): ½ teaspoon – For an extra layer of herbaceous flavor.
Instructions
Phase 1: Making and Kneading the Dough
- Activate the Yeast (Proofing): In the bowl of your stand mixer or a large mixing bowl, combine the warm water, granulated sugar, and active dry yeast. Gently whisk together. Let the mixture sit for 5-10 minutes. It should become foamy or bubbly on the surface. This indicates the yeast is alive and active. If it doesn’t foam, your yeast may be old or the water temperature was incorrect – discard and start again with fresh yeast and correctly tempered water. This step is crucial for ensuring your dough will rise.
- Combine Wet Ingredients: Once the yeast is proofed, whisk in the melted butter and the large egg until well combined. The mixture should be smooth.
- Add Dry Ingredients (Initial Mix): Add the salt and 3 ½ cups (420g) of flour to the wet ingredients. If using a stand mixer, fit it with the dough hook attachment. Mix on low speed until a shaggy dough begins to form. If mixing by hand, use a sturdy wooden spoon or spatula to combine the ingredients until you can no longer stir easily.
- Kneading the Dough:
- Stand Mixer Method: Increase the speed to medium-low and knead the dough for 7-10 minutes. The dough should start pulling away from the sides of the bowl and become smooth and elastic. If the dough seems excessively sticky after 5 minutes, add more flour, one tablespoon at a time, allowing it to incorporate fully before adding more. Be cautious not to add too much flour, as this can make the rolls dense.
- Hand Kneading Method: Turn the shaggy dough out onto a lightly floured surface. Knead the dough by folding it over onto itself and pushing down and away with the heel of your hand. Rotate the dough a quarter turn and repeat. Continue kneading for 10-15 minutes. The dough will start sticky but will become smoother and more elastic as you work it. Add minimal flour to the surface only as needed to prevent sticking. The goal is a dough that is soft, pliable, and slightly tacky, but doesn’t stick excessively to your hands.
- Check for Gluten Development (Windowpane Test): A well-kneaded dough will be smooth and elastic. To check, pinch off a small piece of dough and gently stretch it between your fingers. If you can stretch it thin enough to see light through it without tearing easily (like a windowpane), the gluten is sufficiently developed. If it tears immediately, knead for a few more minutes.
Phase 2: First Rise (Bulk Fermentation)
- Prepare the Bowl: Lightly grease the mixing bowl you used (or a separate clean bowl) with a little oil or cooking spray.
- Shape and Place Dough: Form the kneaded dough into a smooth ball. Place it in the greased bowl and turn it over once so the top is also lightly greased. This prevents the surface from drying out.
- Cover and Rise: Cover the bowl tightly with plastic wrap or a clean, damp kitchen towel. Place the bowl in a warm, draft-free spot in your kitchen. Allow the dough to rise for 1 to 1.5 hours, or until it has doubled in size. The exact time will depend on the ambient temperature – warmer environments speed up yeast activity.
Phase 3: Shaping the Rolls
- Prepare the Baking Pan: Grease a 9×13 inch baking pan or line it with parchment paper. This size is ideal for creating soft, pull-apart rolls. You can also use a larger baking sheet, spacing the rolls further apart for crustier individual rolls.
- Punch Down and Divide: Gently punch down the risen dough to release the trapped gases. Transfer the dough to a lightly floured surface. Divide the dough into 12 equal portions (or 15 for slightly smaller rolls). Using a kitchen scale is the most accurate way to ensure uniform rolls, typically around 70-80g each for 12 rolls.
- Shape into Rolls: Take one portion of dough at a time. Gently flatten it slightly, then pull the edges towards the center and pinch them together at the bottom. Turn the dough over so the seam side is down. Cup your hand over the dough ball and roll it gently on the unfloured part of your work surface to create a smooth, taut ball. Repeat with the remaining dough portions.
- Arrange in Pan: Place the shaped rolls into the prepared baking pan. They should be close together but not tightly packed for pull-apart style, or spaced about 1-2 inches apart on a baking sheet for individual rolls.
Phase 4: Second Rise (Proofing)
- Cover and Rise Again: Loosely cover the pan with greased plastic wrap or a clean kitchen towel. Let the rolls rise in a warm place for another 30-60 minutes, or until they have puffed up noticeably and look almost doubled again. They should feel light and airy. Don’t over-proof, as this can lead to collapsed rolls or a yeasty flavor. A gentle poke should leave a slight indentation that slowly springs back.
Phase 5: Baking and Finishing
- Preheat Oven: About 15-20 minutes before the second rise is complete, preheat your oven to 375°F (190°C). Position an oven rack in the center.
- Bake the Rolls: Uncover the risen rolls. Place the pan in the preheated oven. Bake for 15-20 minutes, or until the tops are beautifully golden brown and sound hollow when gently tapped. An instant-read thermometer inserted into the center of a roll should register around 190-200°F (88-93°C). If they start browning too quickly, you can loosely tent the pan with aluminum foil.
- Prepare Garlic Butter Topping: While the rolls are baking, prepare the garlic herb butter. In a small bowl, combine the softened butter, minced fresh garlic, chopped fresh parsley, optional Parmesan cheese, salt, optional pepper, and optional dried herbs. Stir everything together until well combined.
- Apply Garlic Butter: As soon as the rolls come out of the oven, immediately brush the tops generously with the prepared garlic herb butter. The heat from the rolls will melt the butter, allowing it to seep down and infuse every bite with incredible flavor. Be thorough!
- Cool Slightly and Serve: Let the rolls cool in the pan for a few minutes before serving. They are best enjoyed warm, fresh from the oven, when the butter is melty and the bread is pillowy soft.
Nutrition
- Serving Size: one normal portion
- Calories: 250-300


