Ingredients
For the Dough:
- Warm Water (105-115°F / 40-46°C): 1 cup (240ml) – Crucial for activating the yeast. Too hot kills it, too cold makes it sluggish.
- Active Dry Yeast: 2 ¼ teaspoons (7g) – Equivalent to one standard packet. Ensure your yeast is fresh for the best rise. (Instant yeast can also be used; see FAQ).
- Granulated Sugar: 2 tablespoons (25g) – Feeds the yeast and adds a touch of sweetness to balance the dough.
- Unsalted Butter, Melted: ¼ cup (57g) – Adds richness, tenderness, and flavor to the dough.
- Large Egg: 1 – Provides structure, richness, and color.
- Salt: 1 teaspoon (6g) – Controls yeast activity and enhances overall flavor. Don’t skip it!
- All-Purpose Flour or Bread Flour: 3 ½ to 4 cups (420g – 480g) – Start with 3 ½ cups and add more as needed. Bread flour will yield a slightly chewier roll due to higher protein content, while all-purpose works perfectly well for a softer texture.
For the Garlic Herb Butter Topping:
- Unsalted Butter, Softened: ½ cup (113g) – Using softened, not melted, butter helps it cling better to the rolls initially.
- Fresh Garlic, Minced: 4-6 cloves (about 2 tablespoons) – Adjust to your garlic preference! Fresh garlic provides the best, most vibrant flavor.
- Fresh Parsley, Finely Chopped: ¼ cup – Adds freshness and color. Dried parsley can be substituted (use about 1.5 tablespoons), but fresh is recommended.
- Grated Parmesan Cheese (Optional but Recommended): ¼ cup (25g) – Adds a salty, umami depth.
- Salt: ½ teaspoon (3g) – Enhances the garlic and herb flavors.
- Black Pepper, Freshly Ground (Optional): ¼ teaspoon – Adds a subtle warmth.
- Dried Oregano or Italian Seasoning (Optional): ½ teaspoon – For an extra layer of herbaceous flavor.
Instructions
Phase 1: Making and Kneading the Dough
- Activate the Yeast (Proofing): In the bowl of your stand mixer or a large mixing bowl, combine the warm water, granulated sugar, and active dry yeast. Gently whisk together. Let the mixture sit for 5-10 minutes. It should become foamy or bubbly on the surface. This indicates the yeast is alive and active. If it doesn’t foam, your yeast may be old or the water temperature was incorrect – discard and start again with fresh yeast and correctly tempered water. This step is crucial for ensuring your dough will rise.
- Combine Wet Ingredients: Once the yeast is proofed, whisk in the melted butter and the large egg until well combined. The mixture should be smooth.
- Add Dry Ingredients (Initial Mix): Add the salt and 3 ½ cups (420g) of flour to the wet ingredients. If using a stand mixer, fit it with the dough hook attachment. Mix on low speed until a shaggy dough begins to form. If mixing by hand, use a sturdy wooden spoon or spatula to combine the ingredients until you can no longer stir easily.
- Kneading the Dough:
- Stand Mixer Method: Increase the speed to medium-low and knead the dough for 7-10 minutes. The dough should start pulling away from the sides of the bowl and become smooth and elastic. If the dough seems excessively sticky after 5 minutes, add more flour, one tablespoon at a time, allowing it to incorporate fully before adding more. Be cautious not to add too much flour, as this can make the rolls dense.
- Hand Kneading Method: Turn the shaggy dough out onto a lightly floured surface. Knead the dough by folding it over onto itself and pushing down and away with the heel of your hand. Rotate the dough a quarter turn and repeat. Continue kneading for 10-15 minutes. The dough will start sticky but will become smoother and more elastic as you work it. Add minimal flour to the surface only as needed to prevent sticking. The goal is a dough that is soft, pliable, and slightly tacky, but doesn’t stick excessively to your hands.
- Check for Gluten Development (Windowpane Test): A well-kneaded dough will be smooth and elastic. To check, pinch off a small piece of dough and gently stretch it between your fingers. If you can stretch it thin enough to see light through it without tearing easily (like a windowpane), the gluten is sufficiently developed. If it tears immediately, knead for a few more minutes.
Phase 2: First Rise (Bulk Fermentation)
- Prepare the Bowl: Lightly grease the mixing bowl you used (or a separate clean bowl) with a little oil or cooking spray.
- Shape and Place Dough: Form the kneaded dough into a smooth ball. Place it in the greased bowl and turn it over once so the top is also lightly greased. This prevents the surface from drying out.
- Cover and Rise: Cover the bowl tightly with plastic wrap or a clean, damp kitchen towel. Place the bowl in a warm, draft-free spot in your kitchen. Allow the dough to rise for 1 to 1.5 hours, or until it has doubled in size. The exact time will depend on the ambient temperature – warmer environments speed up yeast activity.
Phase 3: Shaping the Rolls
- Prepare the Baking Pan: Grease a 9×13 inch baking pan or line it with parchment paper. This size is ideal for creating soft, pull-apart rolls. You can also use a larger baking sheet, spacing the rolls further apart for crustier individual rolls.
- Punch Down and Divide: Gently punch down the risen dough to release the trapped gases. Transfer the dough to a lightly floured surface. Divide the dough into 12 equal portions (or 15 for slightly smaller rolls). Using a kitchen scale is the most accurate way to ensure uniform rolls, typically around 70-80g each for 12 rolls.
- Shape into Rolls: Take one portion of dough at a time. Gently flatten it slightly, then pull the edges towards the center and pinch them together at the bottom. Turn the dough over so the seam side is down. Cup your hand over the dough ball and roll it gently on the unfloured part of your work surface to create a smooth, taut ball. Repeat with the remaining dough portions.
- Arrange in Pan: Place the shaped rolls into the prepared baking pan. They should be close together but not tightly packed for pull-apart style, or spaced about 1-2 inches apart on a baking sheet for individual rolls.
Phase 4: Second Rise (Proofing)
- Cover and Rise Again: Loosely cover the pan with greased plastic wrap or a clean kitchen towel. Let the rolls rise in a warm place for another 30-60 minutes, or until they have puffed up noticeably and look almost doubled again. They should feel light and airy. Don’t over-proof, as this can lead to collapsed rolls or a yeasty flavor. A gentle poke should leave a slight indentation that slowly springs back.
Phase 5: Baking and Finishing
- Preheat Oven: About 15-20 minutes before the second rise is complete, preheat your oven to 375°F (190°C). Position an oven rack in the center.
- Bake the Rolls: Uncover the risen rolls. Place the pan in the preheated oven. Bake for 15-20 minutes, or until the tops are beautifully golden brown and sound hollow when gently tapped. An instant-read thermometer inserted into the center of a roll should register around 190-200°F (88-93°C). If they start browning too quickly, you can loosely tent the pan with aluminum foil.
- Prepare Garlic Butter Topping: While the rolls are baking, prepare the garlic herb butter. In a small bowl, combine the softened butter, minced fresh garlic, chopped fresh parsley, optional Parmesan cheese, salt, optional pepper, and optional dried herbs. Stir everything together until well combined.
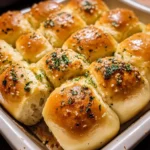
- Apply Garlic Butter: As soon as the rolls come out of the oven, immediately brush the tops generously with the prepared garlic herb butter. The heat from the rolls will melt the butter, allowing it to seep down and infuse every bite with incredible flavor. Be thorough!
- Cool Slightly and Serve: Let the rolls cool in the pan for a few minutes before serving. They are best enjoyed warm, fresh from the oven, when the butter is melty and the bread is pillowy soft.
Nutrition
- Serving Size: one normal portion
- Calories: 250-300