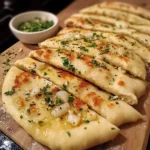
There’s something almost primal and deeply satisfying about tearing into a piece of warm, freshly made bread. And when that bread is infused with the pungent, aromatic allure of garlic, it transforms from a simple staple into an irresistible treat. I remember the first time I decided to tackle homemade garlic flatbreads; the skepticism in my family’s eyes was palpable. Store-bought was easy, predictable. But the moment the first flatbread hit the hot pan, and that intoxicating aroma of toasting dough and sizzling garlic began to waft through the kitchen, a hush fell. The kids, usually glued to their screens, drifted in, drawn by the scent. The first bite was a revelation – a slightly crisp exterior giving way to a soft, chewy interior, all bursting with savory garlic and a hint of fresh parsley. They were devoured in minutes, and “Can you make these again tomorrow?” became the new household refrain. These garlic flatbreads are now a beloved regular, perfect for mopping up saucy curries, accompanying vibrant salads, or simply enjoyed on their own, still warm from the pan. They are surprisingly easy to make, and the reward far outweighs the effort.
The Ultimate Homemade Garlic Flatbreads: A Step-by-Step Guide
This recipe will guide you through creating incredibly flavorful and satisfying garlic flatbreads from scratch. Prepare for your kitchen to be filled with the most amazing aroma, and for these to become a new family favorite.
Ingredients:
- For the Flatbread Dough:
- 3 ½ cups (approx. 420-450g) All-Purpose Flour, plus extra for dusting
- 1 teaspoon Granulated Sugar
- 1 packet (2 ¼ teaspoons or 7g) Active Dry Yeast
- 1 ½ cups (360ml) Warm Water (around 105-115°F or 40-46°C)
- ¼ cup (60ml) Olive Oil, plus extra for greasing and cooking
- 1 ½ teaspoons Fine Sea Salt
- 3-4 cloves Garlic, finely minced or grated
- For the Garlic Herb Butter Topping:
- ½ cup (113g) Unsalted Butter, melted
- 3-4 cloves Garlic, finely minced or grated
- ¼ cup fresh Parsley, finely chopped
- Pinch of Sea Salt Flakes (optional, for finishing)
Crafting Your Garlic Flatbreads: Instructions
Follow these detailed steps for flatbread perfection. The process is straightforward, and the results are well worth the little bit of patience required for the dough to rise.
- Activate the Yeast (Proofing):
In a large mixing bowl or the bowl of a stand mixer, combine the warm water and granulated sugar. Sprinkle the active dry yeast over the top. Let it sit for 5-10 minutes until the mixture becomes foamy and frothy. This indicates the yeast is active and ready. If it doesn’t foam, your yeast may be old, or the water might have been too hot or too cold; you’ll need to start over with fresh yeast. - Combine Wet Ingredients:
Once the yeast is proofed, add the ¼ cup of olive oil and the 3-4 cloves of minced garlic (for the dough) to the yeast mixture. Give it a gentle stir. - Add Dry Ingredients & Mix:
In a separate medium bowl, whisk together the 3 ½ cups of all-purpose flour and 1 ½ teaspoons of fine sea salt. Gradually add this dry mixture to the wet ingredients in the large bowl.- If using a stand mixer: Attach the dough hook and mix on low speed until a shaggy dough begins to form.
- If mixing by hand: Use a sturdy wooden spoon or spatula to combine the ingredients until a shaggy dough forms.
- Knead the Dough:
- Stand Mixer: Increase the speed to medium-low and knead for 5-7 minutes. The dough should become smooth, elastic, and pull away from the sides of the bowl. If it’s too sticky, add a tablespoon of flour at a time. If too dry, add a teaspoon of water.
- By Hand: Turn the shaggy dough out onto a lightly floured surface. Knead for 8-10 minutes until the dough is smooth, elastic, and supple. It should spring back slowly when poked. Avoid adding too much extra flour, as this can make the flatbreads tough. A slightly tacky dough is okay.
- First Rise (Bulk Fermentation):
Lightly grease a large, clean bowl with a little olive oil. Form the kneaded dough into a ball and place it in the greased bowl, turning it once to coat the entire surface with oil. This prevents a skin from forming. Cover the bowl tightly with plastic wrap or a damp kitchen towel. Place the bowl in a warm, draft-free spot to rise for 1 to 1.5 hours, or until the dough has doubled in size. The ideal temperature is around 75-80°F (24-27°C). - Prepare the Garlic Herb Butter:
While the dough is rising, prepare the garlic herb butter topping. In a small bowl, combine the melted unsalted butter, 3-4 cloves of finely minced or grated garlic, and the finely chopped fresh parsley. Stir well and set aside. - Punch Down and Divide Dough:
Once the dough has doubled, gently punch it down to release the air. Transfer the dough to a lightly floured surface. Divide the dough into 8 equal pieces for medium-sized flatbreads, or 6 pieces for larger ones. You can use a kitchen scale for precision if desired. - Shape the Dough Balls:
Take each piece of dough and gently roll it into a smooth ball. Place the dough balls on the floured surface and cover them loosely with a clean kitchen towel or plastic wrap. Let them rest for 10-15 minutes. This “bench rest” allows the gluten to relax, making the dough easier to roll out. - Roll Out the Flatbreads:
Working with one dough ball at a time (keeping the others covered), place it on a lightly floured surface. Use a rolling pin to roll it out into a roughly circular or oval shape, about ⅛ to ¼ inch (3-6mm) thick. Don’t worry about perfect shapes; rustic is part of their charm. If the dough resists rolling and springs back too much, let it rest for another 5 minutes before trying again. - Cook the Flatbreads:
You have a couple of options for cooking:- Stovetop (Recommended for classic texture):
Heat a large, heavy-bottomed skillet (cast iron works wonderfully) or a griddle over medium-high heat. You want it hot enough that a drop of water sizzles and evaporates quickly. Do not add oil to the pan for cooking the bread itself if using a well-seasoned cast iron or good non-stick pan. If your pan tends to stick, you can brush it very lightly with olive oil.
Carefully place one rolled-out flatbread onto the hot skillet. Cook for 1-3 minutes per side, or until it puffs up in places and develops golden-brown spots. The exact time will depend on your stove’s heat and the thickness of your flatbread. You might see large bubbles form – this is good! - Oven/Grill Method (Alternative):
Preheat your oven with a pizza stone or baking steel inside to 500°F (260°C) or your grill to high heat. Carefully place flatbreads onto the hot stone/steel or directly on grill grates. Bake/grill for 2-4 minutes, flipping once, until puffed and lightly charred.
- Stovetop (Recommended for classic texture):
- Brush with Garlic Herb Butter and Serve:
As soon as each flatbread comes off the skillet or out of the oven/grill, immediately brush it generously with the prepared garlic herb butter. If desired, sprinkle with a tiny pinch of sea salt flakes for an extra pop of flavor and texture. - Keep Warm:
Stack the cooked and buttered flatbreads on a plate and cover them with a clean kitchen towel to keep them warm and soft while you cook the remaining dough. - Serve and Enjoy:
Serve the warm garlic flatbreads immediately. They are best enjoyed fresh!
Nutrition Facts
- Servings: This recipe makes approximately 8 medium-sized flatbreads.
- Calories per serving (1 flatbread, approximate): Around 300-350 calories.
Disclaimer: Nutritional information is an estimate and can vary based on specific ingredients used, exact quantities, and portion sizes.
Preparation Time
- Active Preparation Time (mixing, kneading, shaping): 30-40 minutes
- Rising Time (proofing yeast + first rise + bench rest): 1 hour 20 minutes to 2 hours
- Cooking Time (per flatbread): 3-6 minutes (total cooking time approx. 25-45 minutes for all flatbreads)
- Total Time: Approximately 2 hours 30 minutes to 3 hours 20 minutes
This time investment is truly worth it for the delightful experience of homemade garlic flatbreads. The majority of this time is hands-off, allowing the yeast to work its magic.
How to Serve Your Delicious Garlic Flatbreads
These versatile garlic flatbreads are more than just a side; they can be the star or the perfect complement to a wide array of dishes. Here are some serving suggestions to inspire you:
- With Dips and Spreads:
- Hummus: Classic pairing. The warm, garlicky bread with creamy hummus is divine. Try different hummus flavors like roasted red pepper or spicy jalapeño.
- Baba Ghanoush: The smoky eggplant dip is another excellent Mediterranean partner.
- Tzatziki: The cool, refreshing cucumber and yogurt dip offers a lovely contrast to the warm bread.
- Spicy Feta Dip (Htipiti): For a zesty, creamy, and slightly spicy kick.
- Guacamole: While not traditional, warm garlic flatbread triangles are fantastic for scooping up fresh guacamole.
- Alongside Main Courses:
- Curries: Essential for soaking up rich, aromatic Indian, Thai, or other Asian curries. Chicken tikka masala, lentil dal, or a vibrant vegetable korma would be perfect.
- Stews and Soups: Use them to mop up hearty beef stews, lentil soups, tomato bisque, or a robust chili.
- Grilled Meats and Kebabs: Serve alongside grilled chicken, lamb koftas, or vegetable skewers. The flatbread can be used to wrap the grilled items.
- Salads: Offer a warm, satisfying carbohydrate element to substantial salads, like a Greek salad or a loaded chicken Caesar.
- As a Base:
- Mini Pizzas: Top with tomato sauce, cheese, and your favorite toppings for quick and easy individual pizzas. The garlic flavor in the crust adds an extra dimension.
- Wraps or Gyros: Use larger flatbreads as a base for wraps filled with falafel, shawarma-style chicken, or roasted vegetables.
- Open-Faced Sandwiches: Top with sliced avocado, a fried egg, and a sprinkle of chili flakes for a delicious breakfast or brunch.
- Simply on Their Own:
- Let’s be honest, these are so good they can be enjoyed as a standalone snack, especially when warm and freshly brushed with that irresistible garlic herb butter.
- A light sprinkle of extra Parmesan cheese on top of the garlic butter before serving can elevate them even further.
Experiment with these suggestions, or let your culinary creativity guide you. The soft, chewy texture and bold garlic flavor make these flatbreads a welcome addition to almost any meal.
Additional Tips for Flatbread Perfection
To ensure your garlic flatbreads turn out spectacularly every time, consider these five helpful tips:
- Flour Power & Hydration:
The amount of flour can vary slightly depending on humidity and the brand of flour. Start with the lower end of the flour measurement (3 ½ cups) and add more, a tablespoon at a time, only if the dough is excessively sticky after a few minutes of kneading. The dough should be soft and slightly tacky, but not so sticky that it’s unmanageable. Over-flouring can lead to tough flatbreads. Proper hydration is key to a soft, pliable dough. - Don’t Skimp on Kneading:
Kneading develops the gluten structure, which is crucial for the chewy texture and ability of the flatbreads to puff up. Whether using a stand mixer or your hands, ensure you knead for the recommended time until the dough is smooth and elastic. The “windowpane test” is a good indicator: a small piece of dough should stretch thin enough to see light through it without tearing easily. - Optimal Rising Environment:
Yeast thrives in warmth. If your kitchen is cool, you can create a warm spot for your dough to rise by placing the covered bowl in an oven that is turned off but has the oven light on. Alternatively, you can briefly preheat your oven to its lowest setting, then turn it OFF completely, and place the dough inside (ensure it’s not too hot, or it will kill the yeast). - Hot Pan is Key:
For those desirable puffy pockets and golden-brown spots, your skillet or griddle needs to be sufficiently hot before you place the dough on it. Medium-high heat is generally good. If the pan isn’t hot enough, the flatbreads will cook too slowly and can become dry and cracker-like rather than soft and chewy. If it’s too hot, they might burn on the outside before cooking through. Adjust heat as needed during cooking. - Customize Your Garlic & Herbs:
While fresh garlic is highly recommended for both the dough and the butter topping for the best flavor, you can adjust the amount to your preference. For a milder garlic flavor, you could roast the garlic cloves before mincing them. Feel free to experiment with other herbs in the garlic butter – a pinch of dried oregano, fresh rosemary, or thyme can add lovely complementary notes. A sprinkle of red pepper flakes in the butter can also add a nice kick.
Frequently Asked Questions (FAQ) About Garlic Flatbreads
Here are answers to some common questions you might have about making these homemade garlic flatbreads:
- Q: Can I make these flatbreads without yeast?
A: Yes, you can make a quicker, no-yeast version using baking powder as the leavening agent. For a similar quantity of flour (around 3 ½ cups), you would typically use about 2 to 2 ½ teaspoons of baking powder mixed in with the flour and salt. You would also likely incorporate about ½ cup of plain yogurt or milk into the dough along with the water and oil for tenderness. The texture will be slightly different – less chewy and more scone-like or biscuit-like – but still delicious. The rising times would be eliminated, significantly shortening the overall process. - Q: My dough isn’t rising. What did I do wrong?
A: Several factors could be at play:- Expired Yeast: Yeast has a shelf life. Always check the expiration date.
- Water Temperature: Water that is too hot (above 120°F/49°C) can kill the yeast. Water that is too cold won’t activate it effectively. Aim for lukewarm, around 105-115°F (40-46°C).
- Not Enough Time: Dough might need more time to rise, especially in a cooler environment.
- Too Much Salt/Sugar directly on Yeast: While sugar feeds yeast, too much, or salt added directly to the yeast before it’s mixed with flour, can hinder its activity. It’s best to dissolve yeast in water with a little sugar first.
- Q: How do I store leftover garlic flatbreads?
A: Store leftover flatbreads in an airtight container or a resealable plastic bag at room temperature for up to 2-3 days. For longer storage, you can freeze them. To freeze, let them cool completely, then stack them with parchment paper between each flatbread (to prevent sticking) and place them in a freezer-safe bag or container. They can be frozen for up to 2-3 months. - Q: How do I reheat frozen or leftover flatbreads?
A: To reheat:- Oven: Preheat your oven to 350°F (175°C). Wrap the flatbreads in foil (or place them on a baking sheet) and heat for 5-10 minutes, or until warmed through.
- Skillet: Reheat them in a dry skillet over medium-low heat for a minute or two per side.
- Microwave: Microwave for 15-30 seconds, but be aware this can sometimes make them a bit chewier or tougher if overdone. Wrapping in a damp paper towel can help.
If reheating from frozen, you can thaw them at room temperature first or reheat directly from frozen using the oven method (it will take a bit longer).
- Q: Can I use garlic powder instead of fresh garlic?
A: Yes, you can use garlic powder, though fresh garlic provides a more vibrant and nuanced flavor. If using garlic powder:- In the dough: Use about ¾ to 1 teaspoon of garlic powder instead of 3-4 fresh cloves.
- In the butter topping: Use about ½ to ¾ teaspoon of garlic powder instead of 3-4 fresh cloves.
Taste and adjust as needed. You might also consider adding a pinch of onion powder alongside the garlic powder for more depth if you’re not using fresh garlic. Remember that the flavor of garlic powder can intensify over time.
Homemade Garlic Flatbread Recipe
Ingredients
- For the Flatbread Dough:
- 3 ½ cups (approx. 420-450g) All-Purpose Flour, plus extra for dusting
- 1 teaspoon Granulated Sugar
- 1 packet (2 ¼ teaspoons or 7g) Active Dry Yeast
- 1 ½ cups (360ml) Warm Water (around 105-115°F or 40-46°C)
- ¼ cup (60ml) Olive Oil, plus extra for greasing and cooking
- 1 ½ teaspoons Fine Sea Salt
- 3–4 cloves Garlic, finely minced or grated
- For the Garlic Herb Butter Topping:
- ½ cup (113g) Unsalted Butter, melted
- 3–4 cloves Garlic, finely minced or grated
- ¼ cup fresh Parsley, finely chopped
- Pinch of Sea Salt Flakes (optional, for finishing)
Instructions
- Activate the Yeast (Proofing):
In a large mixing bowl or the bowl of a stand mixer, combine the warm water and granulated sugar. Sprinkle the active dry yeast over the top. Let it sit for 5-10 minutes until the mixture becomes foamy and frothy. This indicates the yeast is active and ready. If it doesn’t foam, your yeast may be old, or the water might have been too hot or too cold; you’ll need to start over with fresh yeast. - Combine Wet Ingredients:
Once the yeast is proofed, add the ¼ cup of olive oil and the 3-4 cloves of minced garlic (for the dough) to the yeast mixture. Give it a gentle stir. - Add Dry Ingredients & Mix:
In a separate medium bowl, whisk together the 3 ½ cups of all-purpose flour and 1 ½ teaspoons of fine sea salt. Gradually add this dry mixture to the wet ingredients in the large bowl.- If using a stand mixer: Attach the dough hook and mix on low speed until a shaggy dough begins to form.
- If mixing by hand: Use a sturdy wooden spoon or spatula to combine the ingredients until a shaggy dough forms.
- Knead the Dough:
- Stand Mixer: Increase the speed to medium-low and knead for 5-7 minutes. The dough should become smooth, elastic, and pull away from the sides of the bowl. If it’s too sticky, add a tablespoon of flour at a time. If too dry, add a teaspoon of water.
- By Hand: Turn the shaggy dough out onto a lightly floured surface. Knead for 8-10 minutes until the dough is smooth, elastic, and supple. It should spring back slowly when poked. Avoid adding too much extra flour, as this can make the flatbreads tough. A slightly tacky dough is okay.
- First Rise (Bulk Fermentation):
Lightly grease a large, clean bowl with a little olive oil. Form the kneaded dough into a ball and place it in the greased bowl, turning it once to coat the entire surface with oil. This prevents a skin from forming. Cover the bowl tightly with plastic wrap or a damp kitchen towel. Place the bowl in a warm, draft-free spot to rise for 1 to 1.5 hours, or until the dough has doubled in size. The ideal temperature is around 75-80°F (24-27°C). - Prepare the Garlic Herb Butter:
While the dough is rising, prepare the garlic herb butter topping. In a small bowl, combine the melted unsalted butter, 3-4 cloves of finely minced or grated garlic, and the finely chopped fresh parsley. Stir well and set aside. - Punch Down and Divide Dough:
Once the dough has doubled, gently punch it down to release the air. Transfer the dough to a lightly floured surface. Divide the dough into 8 equal pieces for medium-sized flatbreads, or 6 pieces for larger ones. You can use a kitchen scale for precision if desired. - Shape the Dough Balls:
Take each piece of dough and gently roll it into a smooth ball. Place the dough balls on the floured surface and cover them loosely with a clean kitchen towel or plastic wrap. Let them rest for 10-15 minutes. This “bench rest” allows the gluten to relax, making the dough easier to roll out. - Roll Out the Flatbreads:
Working with one dough ball at a time (keeping the others covered), place it on a lightly floured surface. Use a rolling pin to roll it out into a roughly circular or oval shape, about ⅛ to ¼ inch (3-6mm) thick. Don’t worry about perfect shapes; rustic is part of their charm. If the dough resists rolling and springs back too much, let it rest for another 5 minutes before trying again. - Cook the Flatbreads:
You have a couple of options for cooking:- Stovetop (Recommended for classic texture):
Heat a large, heavy-bottomed skillet (cast iron works wonderfully) or a griddle over medium-high heat. You want it hot enough that a drop of water sizzles and evaporates quickly. Do not add oil to the pan for cooking the bread itself if using a well-seasoned cast iron or good non-stick pan. If your pan tends to stick, you can brush it very lightly with olive oil.
Carefully place one rolled-out flatbread onto the hot skillet. Cook for 1-3 minutes per side, or until it puffs up in places and develops golden-brown spots. The exact time will depend on your stove’s heat and the thickness of your flatbread. You might see large bubbles form – this is good! - Oven/Grill Method (Alternative):
Preheat your oven with a pizza stone or baking steel inside to 500°F (260°C) or your grill to high heat. Carefully place flatbreads onto the hot stone/steel or directly on grill grates. Bake/grill for 2-4 minutes, flipping once, until puffed and lightly charred.
- Stovetop (Recommended for classic texture):
- Brush with Garlic Herb Butter and Serve:
As soon as each flatbread comes off the skillet or out of the oven/grill, immediately brush it generously with the prepared garlic herb butter. If desired, sprinkle with a tiny pinch of sea salt flakes for an extra pop of flavor and texture. - Keep Warm:
Stack the cooked and buttered flatbreads on a plate and cover them with a clean kitchen towel to keep them warm and soft while you cook the remaining dough. - Serve and Enjoy:
Serve the warm garlic flatbreads immediately. They are best enjoyed fresh!
Nutrition
- Serving Size: One Normal Portion
- Calories: 300-350