Ingredients
Scale
- For the Irresistible Pretzel Crust:
- 1 3/4 cups finely ground pretzels (leaving a little bit of texture): The star of the show! Pretzels provide the perfect salty counterpoint to the sweet filling. Using finely ground pretzels creates a delicate yet sturdy crust. Leaving a little bit of texture, as suggested, is key. You don’t want pretzel dust; you want small, noticeable pretzel pieces that offer a delightful crunch. For those who are gluten-free, readily available gluten-free pretzels can be substituted without compromising the taste or texture. Look for gluten-free pretzels that are similar in size and shape to traditional pretzels for the best results. The slightly salty and savory nature of pretzels is what makes this crust so unique and addictive, setting it apart from typical graham cracker or cookie crusts.
- 1 stick of vegan butter: Vegan butter acts as the binder for the pretzel crust, providing moisture and richness. It helps the pretzel crumbs come together and bake into a firm, golden-brown base. Make sure your vegan butter is cold when you start, and melt it just until liquid. Using a good quality vegan butter will enhance the overall flavor of the crust. There are many excellent vegan butter options available now, often made from blends of plant-based oils like coconut, shea, and sunflower. These butters are designed to mimic the texture and performance of dairy butter in baking, ensuring your pretzel crust is perfectly crisp and flavorful.
- 1/4 cup organic cane sugar: A touch of sweetness is needed to balance the saltiness of the pretzels and enhance the overall flavor profile of the crust. Organic cane sugar adds a subtle sweetness without being overpowering and dissolves beautifully into the melted butter, ensuring even distribution throughout the crust. You can adjust the amount slightly to your preference, but this amount provides a perfect balance.
- Optional: 1-2 tablespoons more melted vegan butter: Depending on the dryness of your pretzel crumbs, you might need a little extra melted vegan butter to bring the crust mixture together. The goal is to have a mixture that is moist and moldable, like wet sand. Start with 1 tablespoon and add another if needed, mixing well after each addition until you reach the desired consistency.
- For the Dreamy Peanut Butter Chocolate Filling:
- 1 14-ounce can of coconut cream: This is the secret ingredient that creates the incredibly creamy and decadent filling without any dairy! Coconut cream, not coconut milk, is crucial here. Coconut cream is the thick, solid part that rises to the top of a can of refrigerated full-fat coconut milk. Refrigerating the can overnight is highly recommended to ensure maximum separation and easy scooping of the cream. The richness of coconut cream provides the perfect base for the peanut butter and chocolate flavors, creating a luxurious mousse-like texture when whipped.
- 1 cup dairy-free dark chocolate (chopped): Dark chocolate adds a deep, intense chocolate flavor that complements the peanut butter beautifully. Using dairy-free dark chocolate ensures the pie remains vegan. Choose a good quality dark chocolate with a cocoa percentage you enjoy. Chopping the chocolate into small pieces helps it melt evenly and quickly when combined with the coconut cream. The bitterness of dark chocolate provides a wonderful contrast to the sweetness of the peanut butter and sugar, creating a complex and well-balanced flavor profile.
- 1/4 cup salted creamy natural peanut butter: Peanut butter is the heart of this filling, adding its signature nutty flavor and creamy texture. Using salted creamy natural peanut butter is recommended for the best flavor and consistency. “Natural” peanut butter usually refers to peanut butter made with just peanuts and salt, without added sugars or oils. The saltiness enhances the overall flavor of the pie and balances the sweetness. Creamy peanut butter is essential for a smooth, luscious filling.
- 1/4–1/2 cup organic icing/powdered sugar: Powdered sugar adds sweetness to the filling and helps to stabilize the whipped coconut cream, creating a light and airy mousse-like texture. Start with 1/4 cup and taste the filling after whipping. You can add more powdered sugar, up to 1/2 cup, depending on your preferred level of sweetness and the sweetness of your dark chocolate. Organic powdered sugar is a great option, but regular powdered sugar will also work perfectly.
- Optional: 2-3 tablespoons maple syrup (for extra sweetness and flavor depth): Maple syrup adds a touch of natural sweetness and a subtle caramel-like flavor that enhances the overall complexity of the filling. If you prefer a sweeter pie or want to add a deeper flavor dimension, a couple of tablespoons of maple syrup can be a wonderful addition. Start with 2 tablespoons and taste before adding more.
Instructions
- Prepare the Chocolate Ganache (or Mousse Base): This step needs to be done in advance as it requires chilling time. In a medium mixing bowl, combine the coconut cream and chopped dairy-free dark chocolate. You have two options for melting this mixture:
- Microwave Method: Microwave in 30-second increments, stirring well in between each interval. Continue microwaving and stirring until the chocolate is completely melted and the mixture is smooth. Be careful not to overheat the chocolate, as it can seize or burn.Saucepan Method: Alternatively, melt the mixture in a saucepan over medium-low heat. Stir constantly with a spatula or whisk to prevent the chocolate from sticking to the bottom of the pan and burning. Heat until the chocolate is fully melted and the mixture is smooth.
Once the chocolate and coconut cream are melted and smooth, whisk the mixture gently until fully incorporated. This ensures a homogenous and silky texture. Refrigerate the uncovered bowl for 2-3 hours, or even better, overnight. This chilling time is crucial for the mixture to firm up and develop the right consistency for whipping into a mousse-like filling. Leaving it uncovered helps prevent condensation from forming and diluting the mixture.
- Preheat Your Oven and Prepare the Crust: Preheat your oven to 325°F (162°C). This lower baking temperature ensures the pretzel crust bakes evenly without burning. While the oven is preheating, prepare the pretzel crust.
- Make the Pretzel Crust: In a medium mixing bowl, combine the finely ground pretzel meal, organic cane sugar, and melted vegan butter. Stir thoroughly with a fork or spatula until the mixture is evenly moistened and moldable. It should resemble wet sand and hold its shape when pressed together. If the mixture seems too dry and crumbly, add 1-2 tablespoons more of melted vegan butter, one tablespoon at a time, mixing well after each addition until you achieve the desired consistency.
- Press the Crust into the Pie Pan: Transfer the pretzel mixture to a 9-inch pie pan. Use your fingers or the back of a spoon to press the mixture evenly into the base of the pan and up the sides, creating a uniform crust. Make sure the crust is compacted firmly and evenly to prevent it from crumbling after baking. You can crimp the edges of the crust for a more decorative look if desired.
- Bake the Pretzel Crust: Bake the crust in the preheated oven for 12-14 minutes. Keep a close eye on it during the last few minutes of baking to prevent it from burning. The crust is done when it is firm to the touch and slightly browned at the edges. The baking time may vary slightly depending on your oven, so it’s always best to check for doneness visually and by touch.
- Cool the Crust Completely: Once baked, remove the pretzel crust from the oven and allow it to cool completely at room temperature. This is essential before adding the filling. Cooling allows the crust to firm up and prevents the filling from melting and becoming runny.
- Whip the Chocolate Filling: Once the chocolate mixture is thoroughly chilled and firm, it’s time to transform it into a light and airy mousse. Use a stand mixer or hand mixer on high speed to whip the chilled chocolate mixture for about 1 minute. Scrape down the sides of the bowl as needed to ensure everything is incorporated and whipped evenly. The mixture should lighten in color and increase in volume as it whips, becoming fluffy and mousse-like. Be careful not to overwhip, as it can become grainy.
- Incorporate the Peanut Butter and Sweeten (Optional): Add the salted creamy peanut butter to the whipped chocolate mixture. Mix on medium speed until fully incorporated and smooth. Taste the filling at this stage. If you prefer a sweeter pie, or want to add a deeper flavor, you can add 2-3 tablespoons of maple syrup and/or 3-5 tablespoons of organic powdered sugar as desired. Mix thoroughly after each addition and taste again until you reach your desired sweetness. Remember that the pretzel crust and chocolate ganache topping will also contribute to the overall sweetness of the pie.
- Assemble and Chill the Pie: Pour the whipped peanut butter chocolate filling into the cooled pretzel crust. Smooth the top of the filling with a spoon or spatula to create an even surface. Cover the pie loosely with plastic wrap to prevent it from absorbing odors in the refrigerator and to maintain its moisture. Chill the pie in the refrigerator for at least 2-3 hours, or preferably overnight, until the mousse filling is firm and set. This chilling time allows the filling to fully solidify and the flavors to meld together beautifully.
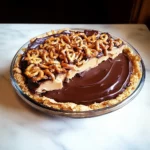
- Garnish and Serve: Before serving, you can garnish the pie with crushed pretzels, a peanut butter drizzle, chocolate shavings, or a combination of these for extra flair and visual appeal. Slice and serve chilled.
Nutrition
- Serving Size: one normal portion
- Calories: 450-550