Ingredients
Scale
- For the Tuna Salad:
- 2 cans (5 ounces / 142g each) high-quality tuna, packed in water or oil, thoroughly drained
- 1/3 cup (about 75g) good quality mayonnaise (adjust to your preferred creaminess)
- 1/4 cup (about 40g) finely diced celery (for that essential crunch)
- 2 tablespoons finely diced red onion (or shallot for a milder flavor)
- 1 tablespoon sweet pickle relish (optional, but adds a nice tang)
- 1 teaspoon Dijon mustard
- 1 tablespoon fresh lemon juice
- 1/4 teaspoon black pepper, freshly ground
- Pinch of salt (taste and adjust, as tuna and mayo can be salty)
- Optional additions: 1 tablespoon chopped fresh dill or parsley, a dash of hot sauce.
- For Assembling the Panini:
- 4 thick slices of good quality bread (sourdough, ciabatta, focaccia, or a sturdy artisan white bread work best)
- 4–6 slices of your favorite melting cheese (Cheddar, Provolone, Swiss, Monterey Jack, or a blend are excellent choices. Aim for about 2–3 oz / 55-85g per sandwich)
- 2 tablespoons unsalted butter, softened (or olive oil for brushing)
- Optional: Sliced ripe tomatoes (1-2 slices per sandwich)
Instructions
- Prepare the Tuna Salad:
- In a medium bowl, flake the thoroughly drained tuna with a fork. Ensure there are no large clumps and that any excess liquid is removed – this is key to preventing a soggy panini.
- Add the mayonnaise, diced celery, diced red onion, sweet pickle relish (if using), Dijon mustard, fresh lemon juice, black pepper, and salt.
- Gently mix all the ingredients until just combined. Be careful not to overmix, as this can make the tuna mushy. You want to retain some texture.
- Taste the tuna salad and adjust seasonings if necessary. You might want a little more mayo for creaminess, lemon juice for brightness, or pepper for a kick. If using fresh herbs or hot sauce, stir them in now.
- Cover the bowl and refrigerate for at least 15-30 minutes if you have time. This allows the flavors to meld together, resulting in a more delicious filling. This step isn’t strictly necessary if you’re short on time, but it does enhance the taste.
- Assemble the Paninis:
- Lay out your four slices of bread on a clean work surface.
- If using butter, lightly spread one side of each slice of bread with softened butter. This will be the outside of your panini, creating that beautiful golden-brown crust. If using olive oil, lightly brush it on.
- Flip two of the bread slices over (buttered-side down). These will be the bottom halves of your paninis.
- Evenly distribute the cheese slices over these two bread slices. You can use one type of cheese or a combination. For example, a slice of provolone for meltiness and a slice of sharp cheddar for flavor.
- Generously spoon half of the prepared tuna salad mixture onto each cheese-topped bread slice, spreading it evenly but leaving a small border around the edges to prevent too much spillage during cooking.
- If using sliced tomatoes, place 1-2 slices on top of the tuna salad.
- Top the tuna salad (and tomatoes, if using) with the remaining cheese slices. This “cheese on both sides” technique helps bind the panini together and ensures maximum meltiness.
- Place the remaining two slices of bread on top, buttered-side up. Gently press down to compact the sandwich slightly.
- Cook the Paninis:
- Using a Panini Press:
- Preheat your panini press according to the manufacturer’s instructions, usually to a medium or medium-high setting.
- Once preheated, carefully place the assembled paninis onto the press.
- Close the lid and cook for 4-7 minutes, or until the bread is golden brown and crispy with distinct grill marks, and the cheese is thoroughly melted and oozing. Cooking time will vary depending on your press and the thickness of your sandwich. Keep an eye on them to prevent burning.
- Using a Skillet (Griddle Pan or Frying Pan):
- If you don’t have a panini press, you can achieve similar results with a heavy-bottomed skillet or griddle pan.
- Heat the skillet over medium heat. You’ll know it’s ready when a drop of water sizzles and evaporates quickly.
- Carefully place the assembled paninis into the hot skillet (you may need to cook them one at a time depending on the size of your pan).
- Cook for 3-5 minutes per side. To get the “pressed” effect, place a heavy lid, another smaller (oven-safe) skillet, or a bacon press on top of the sandwiches. This helps the bread toast evenly and the cheese melt beautifully.
- Carefully flip the paninis using a wide spatula and cook for another 3-5 minutes on the other side, or until golden brown, crispy, and the cheese is fully melted.
- Using a Panini Press:
- Rest and Serve:
- Once cooked, carefully remove the paninis from the press or skillet and transfer them to a cutting board.
- Let them rest for a minute or two. This allows the molten cheese to set slightly, making them easier to cut and less likely to fall apart.
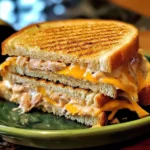
- Slice the paninis in half diagonally using a sharp serrated knife. Serve immediately while warm and gooey.
Nutrition
- Serving Size: One Normal Portion
- Calories: 650-850