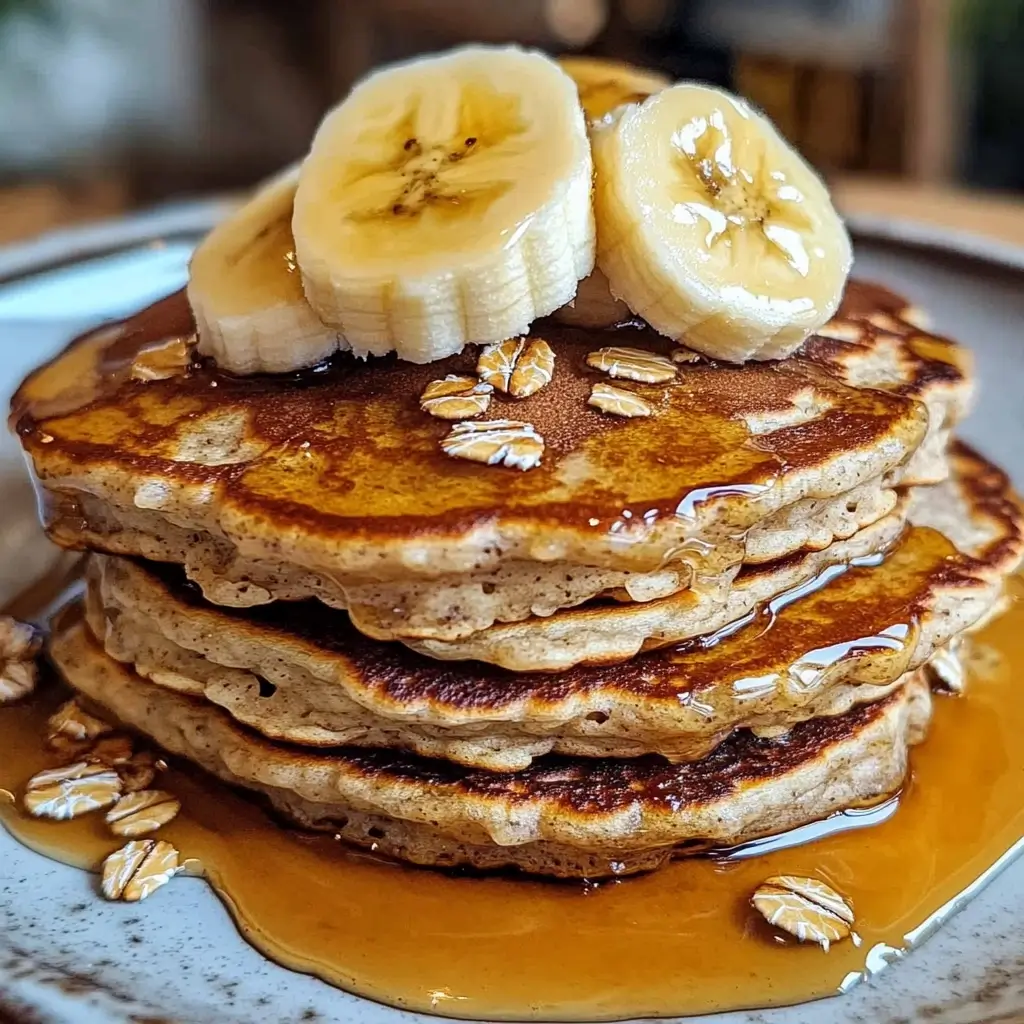
Waking up on a weekend morning, the aroma of freshly cooked pancakes wafting through the house is a universally cherished experience. But what if I told you that you could achieve that same delightful experience with a recipe that is not only incredibly simple but also remarkably healthy and caters to various dietary needs? As someone who’s always on the lookout for quick, nutritious, and delicious breakfast options, especially on busy weekdays or relaxed weekends, I stumbled upon this 3-Ingredient Vegan Banana Oatmeal Pancake recipe, and it has been a game-changer. My family, initially skeptical about vegan and gluten-free options, absolutely devoured these fluffy, naturally sweet pancakes. The kids love them topped with fresh berries and a drizzle of maple syrup, while my partner and I enjoy them with a dollop of almond butter and a sprinkle of cinnamon. What’s truly amazing is how effortlessly these pancakes come together, using ingredients you likely already have in your pantry. Forget complicated recipes with long ingredient lists and intricate steps. This recipe is all about simplicity and deliciousness, proving that healthy eating can be both easy and incredibly satisfying. If you’re seeking a breakfast that’s vegan, gluten-free, dairy-free, and refined sugar-free, yet bursting with flavor and delightful texture, then look no further. Let’s dive into the magic of these 3-Ingredient Vegan Banana Oatmeal Pancakes and discover how you can transform your breakfast routine!
Ingredients
At the heart of this incredibly simple yet satisfying pancake recipe lie just three core ingredients. Each ingredient plays a crucial role in creating the perfect texture, flavor, and nutritional profile of these vegan banana oatmeal pancakes. Let’s explore each one in detail, understanding why they are essential and how to choose the best quality for optimal results.
Ripe Bananas (2 Medium-Sized)
Bananas are not just the star ingredient in this recipe; they are the foundation upon which everything else is built. The ripeness of your bananas is paramount to the success of these pancakes. We’re not talking about slightly yellow bananas here; we’re aiming for spotty, brown-flecked bananas. Why is ripeness so crucial?
- Natural Sweetness: As bananas ripen, their starch content converts into sugars, primarily sucrose, fructose, and glucose. This natural sugar transformation is what provides the pancakes with their delightful sweetness, eliminating the need for any added refined sugars. The riper the banana, the sweeter your pancakes will be.
- Moisture and Binding: Ripe bananas are softer and contain more moisture. When mashed, they become almost creamy, contributing to the moist and tender texture of the pancakes. Furthermore, the pectin in ripe bananas acts as a natural binder, helping to hold the pancakes together without the need for eggs or gluten.
- Flavor Profile: Ripe bananas develop a richer, more complex flavor compared to their unripe counterparts. This enhanced banana flavor is a key characteristic of these pancakes, providing a naturally sweet and fruity note that is both comforting and delicious.
Choosing the Right Bananas: Look for bananas that are generously speckled with brown spots. A few brown spots indicate ripeness, while mostly brown bananas are overly ripe and might be too mushy. If your bananas are not quite ripe enough, you can expedite the ripening process. One quick trick is to place them in a paper bag with an apple or a ripe banana for a day or two. The ethylene gas released by these fruits will speed up the ripening of the bananas. Alternatively, if you need ripe bananas immediately, you can microwave unripe bananas for 15-20 seconds. This softens them and brings out their sweetness, although it’s not quite the same as naturally ripened bananas.
Nutritional Powerhouse: Beyond their functional role in the recipe, bananas are nutritional powerhouses. They are an excellent source of potassium, an essential electrolyte that supports heart health and muscle function. They are also rich in fiber, promoting digestive health and keeping you feeling full and satisfied. Bananas also contain vitamin B6, vitamin C, and various antioxidants, contributing to overall well-being.
Rolled Oats (1 Cup)
Rolled oats are the second essential ingredient, bringing texture, structure, and a wealth of nutritional benefits to these pancakes. While instant oats or steel-cut oats might come to mind, rolled oats are the ideal choice for this recipe due to their texture and cooking properties.
- Texture and Structure: Rolled oats, also known as old-fashioned oats, are oat groats that have been steamed and then rolled into flat flakes. This process partially cooks them, making them quicker to cook than steel-cut oats and providing a softer texture than oat groats. When blended, rolled oats break down to create a flour-like consistency that gives the pancakes their structure and slightly chewy texture. They provide substance without making the pancakes dense or heavy.
- Gluten-Free Option: For those following a gluten-free diet, it’s important to choose certified gluten-free rolled oats. While oats are naturally gluten-free, they are often processed in facilities that also handle wheat, barley, and rye, leading to potential cross-contamination. Certified gluten-free oats are processed and packaged in dedicated gluten-free facilities, ensuring they are safe for individuals with celiac disease or gluten sensitivities.
- Nutritional Benefits: Oats are a nutritional superstar, packed with fiber, particularly beta-glucan, a type of soluble fiber known for its cholesterol-lowering properties and ability to promote satiety. They are also a good source of complex carbohydrates, providing sustained energy release, and contain protein and essential minerals like manganese, phosphorus, magnesium, and zinc. Incorporating oats into your breakfast is a fantastic way to kickstart your day with sustained energy and essential nutrients.
Choosing the Right Oats: Opt for rolled oats that are fresh and have a pleasant, slightly nutty aroma. Avoid oats that smell stale or musty. For gluten-free pancakes, always look for certified gluten-free rolled oats. You can find them readily available in most supermarkets and health food stores.
Plant-Based Milk (1/4 Cup)
Plant-based milk is the final key ingredient, adding moisture and helping to bring the batter together to the perfect pourable consistency. With the rise in popularity of vegan and dairy-free diets, there is a plethora of plant-based milk options available. Each type of plant-based milk brings its own unique flavor and texture to the pancakes.
- Moisture and Consistency: Plant-based milk provides the necessary liquid to bind the dry ingredients (oats and mashed bananas) and create a batter that is pourable and cooks evenly. It helps to achieve the desired fluffy and tender texture of the pancakes.
- Variety of Options: You have a wide array of plant-based milk choices to experiment with, each offering slightly different flavors and textures:
- Almond Milk: A popular choice due to its mild, slightly nutty flavor and low calorie count. It adds a subtle sweetness and light texture to the pancakes.
- Soy Milk: A higher protein option compared to other plant-based milks. Soy milk has a creamy texture and a slightly richer flavor, which can enhance the overall taste of the pancakes.
- Oat Milk: Naturally creamy and slightly sweet, oat milk complements the oat flavor in the pancakes and adds a lovely richness. It’s also a good option for those with nut allergies.
- Coconut Milk (from a carton, not canned): Adds a subtle tropical flavor. Ensure you use the thinner carton variety, not the thick canned coconut milk, as the latter will make the batter too dense.
- Other Options: Rice milk (very mild and thin), cashew milk (creamy and slightly sweet), or even hemp milk can be used, each contributing a unique nuance to the flavor profile.
Choosing the Right Plant-Based Milk: Select a plant-based milk that you enjoy the flavor of and that aligns with your dietary preferences. Unsweetened varieties are generally preferred to control the overall sweetness of the pancakes, especially since the bananas already provide natural sweetness. Consider the texture and flavor profile you want to achieve when choosing your plant-based milk.
Optional Add-ins (For Customization)
While the 3-ingredient base is wonderfully simple and delicious on its own, you can easily customize these pancakes to suit your taste preferences and add extra layers of flavor and nutrition. Here are some delightful optional add-ins:
- Vanilla Extract (1/2 teaspoon): A touch of vanilla extract enhances the overall flavor profile, adding warmth and depth to the pancakes. It complements the banana and oat flavors beautifully.
- Cinnamon (1/2 teaspoon): Cinnamon brings a cozy, warm spice note that pairs perfectly with bananas and oats. It also adds a hint of sweetness and is known for its potential health benefits, including blood sugar regulation.
- Chia Seeds or Flaxseeds (1 tablespoon): For an extra boost of fiber and omega-3 fatty acids, add a tablespoon of chia seeds or ground flaxseeds to the batter. These seeds also help to thicken the batter slightly and add a pleasant nutty flavor.
- Other Spices: Experiment with other spices like nutmeg, cardamom, or ginger for different flavor variations.
- Cocoa Powder (1-2 tablespoons): For chocolate banana pancakes, add a tablespoon or two of unsweetened cocoa powder to the batter.
- Berries (1/2 cup): Fold in fresh or frozen berries like blueberries, raspberries, or chopped strawberries for added flavor, antioxidants, and a burst of juicy sweetness.
By understanding the role of each ingredient and exploring the optional add-ins, you can create your perfect batch of Vegan Banana Oatmeal Pancakes, tailored to your taste and nutritional needs.
Step-by-Step Instructions
Creating these delightful 3-Ingredient Vegan Banana Oatmeal Pancakes is remarkably simple and quick. Follow these step-by-step instructions to whip up a stack of fluffy, delicious pancakes in no time.
1. Prepare Your Ingredients
The first step is to gather all your ingredients and prepare them for blending.
- Bananas: Ensure your bananas are ripe – ideally spotty and soft. Peel the bananas and break them into chunks to make blending easier. If your bananas are not quite ripe enough, you can microwave them for 15-20 seconds to soften them slightly. This not only softens them but also helps to release their natural sweetness.
- Rolled Oats: Measure out 1 cup of rolled oats. If you are using certified gluten-free oats, ensure they are labeled as such.
- Plant-Based Milk: Measure out 1/4 cup of your chosen plant-based milk. Have a little extra milk on hand in case you need to adjust the batter consistency later.
- Optional Add-ins: If you are using any optional add-ins like vanilla extract, cinnamon, or chia seeds, measure them out and have them ready to add to the blender.
Having all your ingredients prepped and ready will streamline the pancake-making process, making it even faster and more efficient.
2. Blend the Batter
This is where the magic happens! Combine all the ingredients in a blender or food processor.
- Combine Ingredients: Place the banana chunks, rolled oats, and plant-based milk into your blender or food processor. Add any optional add-ins you are using at this stage as well.
- Blend Until Smooth: Blend the mixture until it forms a smooth, thick batter. Blend for about 30-60 seconds, or until all the oats are completely broken down and the batter is homogenous.
- Check Consistency: The batter should have a pourable consistency, similar to traditional pancake batter. It should be thick enough to hold its shape when poured onto the pan but thin enough to spread slightly.
- Adjust Consistency (If Needed): If the batter is too thick, add plant-based milk one tablespoon at a time, blending after each addition, until you reach the desired consistency. If the batter is too thin (which is less likely), you can add a tablespoon of oats to thicken it, and blend again.
- Rest (Optional): While not strictly necessary, allowing the batter to rest for 5-10 minutes can help the oats absorb more of the liquid, resulting in slightly thicker pancakes.
Pro Tip for Texture: If you prefer pancakes with a chunkier texture, instead of blending all the ingredients, mash the bananas with a fork in a bowl. Then, add the rolled oats and plant-based milk and mix by hand until just combined. This method will leave some oat texture in the pancakes.
3. Heat the Pan
Properly heating the pan is crucial for achieving evenly cooked, golden-brown pancakes that are not burnt or undercooked.
- Choose Your Pan: A non-stick skillet or griddle is ideal for making pancakes, as it minimizes sticking and the need for excessive oil. If you don’t have a non-stick pan, a well-seasoned cast iron skillet or a regular skillet will work, but you’ll need to use a little oil to prevent sticking.
- Heat Over Medium Heat: Place your skillet or griddle over medium heat. Medium heat is generally the sweet spot for pancakes – it’s hot enough to cook them through without burning the outside too quickly.
- Test the Heat: To check if the pan is hot enough, you can do a water droplet test. Flick a few drops of water onto the hot pan. If the water droplets sizzle and evaporate quickly, the pan is ready. If they just sit there or evaporate slowly, the pan is not hot enough yet.
- Add Oil (If Needed): If you are using a non-stick pan, you may not need any oil. However, for extra insurance against sticking or to add a touch of flavor, you can lightly grease the pan with a small amount of coconut oil, vegan butter, or cooking spray. If using a regular skillet, a thin layer of oil is recommended.
- Heat Evenly: Allow the pan to heat evenly for 1-2 minutes before adding the batter. This ensures that the pancakes cook uniformly across their surface.
4. Cook the Pancakes
Now it’s time to cook those beautiful pancakes!
- Pour the Batter: Once the pan is heated, pour 1/4 cup of batter onto the hot pan for each pancake. You can use a measuring cup or a spoon to portion the batter. Leave some space between each pancake so they have room to spread slightly.
- Cook First Side (2-3 Minutes): Cook the pancakes for 2-3 minutes on the first side, or until bubbles start to form on the surface and the edges begin to look set and lift slightly. These bubbles are a visual cue that the pancakes are cooking and air is being incorporated, contributing to their fluffiness.
- Flip Carefully: Once bubbles have formed and the edges are set, carefully flip the pancakes using a spatula. Slide the spatula under the pancake and flip it over in one smooth motion.
- Cook Second Side (1-2 Minutes): Cook the other side for another 1-2 minutes, or until golden brown and cooked through. The second side usually cooks faster than the first.
- Check for Doneness: To ensure the pancakes are cooked through, you can gently press on the center of a pancake. It should feel firm and spring back slightly. You can also insert a toothpick into the center; it should come out clean.
- Avoid Pressing Down: Resist the urge to press down on the pancakes with a spatula while they are cooking. Pressing down will deflate them and make them dense rather than fluffy.
5. Serve and Enjoy
The final and most rewarding step is to serve and savor your freshly cooked Vegan Banana Oatmeal Pancakes!
- Transfer to a Plate: As each batch of pancakes is cooked, transfer them to a plate. You can stack them up to keep them warm while you cook the remaining batter.
- Serve Warm: These pancakes are best enjoyed warm, right off the pan.
- Add Your Favorite Toppings: Get creative with your toppings! Fresh fruit, maple syrup, nut butter, vegan yogurt, or a sprinkle of cinnamon are all fantastic choices. See the “How to Serve” section below for more topping ideas.
- Enjoy Immediately: Serve and enjoy your delicious, healthy, and easy-to-make Vegan Banana Oatmeal Pancakes immediately!
Following these step-by-step instructions will guide you to pancake perfection every time. The simplicity of this recipe is truly remarkable, making it a perfect choice for busy mornings, weekend brunches, or any time you crave a healthy and satisfying treat.
Nutrition Facts
(Approximate values per serving – assuming recipe makes about 6 medium pancakes, and serving size is 2 pancakes)
- Servings: 3 (2 pancakes per serving)
- Calories per serving: Approximately 250-300 kcal
- Total Fat: 5-8g
- Saturated Fat: 1-2g
- Unsaturated Fat: 4-6g
- Cholesterol: 0mg
- Sodium: 10-50mg (depending on plant-based milk)
- Total Carbohydrates: 45-55g
- Dietary Fiber: 8-10g
- Sugars: 15-20g (naturally occurring from bananas and oats)
- Protein: 5-7g
Nutritional Highlights:
- High in Fiber: Thanks to the rolled oats and bananas, these pancakes are a great source of dietary fiber, promoting digestive health, satiety, and stable blood sugar levels.
- Source of Potassium: Bananas are rich in potassium, an essential electrolyte for heart health and muscle function.
- Vegan and Dairy-Free: Suitable for vegan and dairy-free diets, providing a plant-based protein and calcium source (depending on the plant-based milk used).
- Gluten-Free (if using certified gluten-free oats): Naturally gluten-free when made with certified gluten-free rolled oats, making them a great option for those with gluten sensitivities or celiac disease.
- Refined Sugar-Free: Naturally sweetened by ripe bananas, eliminating the need for added refined sugars.
- Relatively Low in Fat: While containing some healthy fats, these pancakes are relatively low in total fat, especially saturated fat.
Note: Nutritional values are estimates and can vary based on specific ingredients used, serving size, and any added toppings.
Preparation Time
- Prep Time: 5 minutes (gathering ingredients, peeling bananas, measuring)
- Cook Time: 10-15 minutes (blending batter, heating pan, cooking pancakes)
- Total Time: 15-20 minutes
These Vegan Banana Oatmeal Pancakes are incredibly quick to prepare, making them an ideal breakfast option for busy mornings or when you need a fast yet nutritious meal. The simple ingredient list and straightforward instructions ensure that you can have a stack of fresh, delicious pancakes ready in under 20 minutes from start to finish.
How to Serve
These versatile pancakes are delicious on their own, but they truly shine when paired with a variety of toppings and accompaniments. Here are some delightful ways to serve your Vegan Banana Oatmeal Pancakes:
- Fresh Fruit:
- Berries: Strawberries, blueberries, raspberries, blackberries – add a burst of freshness, sweetness, and antioxidants.
- Sliced Bananas: Enhance the banana flavor with extra banana slices.
- Peaches or Nectarines: Sliced or grilled, these stone fruits add a summery sweetness.
- Apples or Pears: Sautéed with cinnamon for a warm and comforting topping.
- Syrups & Sweeteners:
- Maple Syrup: A classic pancake topping, providing a rich, natural sweetness.
- Agave Nectar: A vegan alternative to honey, with a mild sweetness.
- Date Syrup: Made from dates, offering a deeper, caramel-like sweetness and added fiber.
- Fruit Compotes or Jams: Homemade or store-bought, fruit compotes add concentrated fruit flavor and sweetness.
- Nut Butters & Spreads:
- Peanut Butter: Classic and satisfying, adds protein and healthy fats.
- Almond Butter: A milder, slightly sweeter alternative to peanut butter.
- Cashew Butter: Creamy and subtly sweet, pairs well with bananas.
- Sunflower Seed Butter: A nut-free option, great for those with allergies.
- Tahini: For a more unique and savory-sweet twist.
- Vegan Yogurt & Cream:
- Coconut Yogurt: Creamy and slightly tangy, adds a tropical touch.
- Soy Yogurt or Almond Yogurt: Provides a cooling and creamy contrast to the warm pancakes.
- Vegan Whipped Cream: For a decadent treat, top with vegan whipped cream.
- Crunchy Toppings:
- Chopped Nuts: Walnuts, pecans, almonds, hazelnuts – add texture and healthy fats.
- Seeds: Chia seeds, flaxseeds, sunflower seeds, pumpkin seeds – boost nutrition and add a subtle crunch.
- Granola: Sprinkle granola for extra texture and flavor.
- Spices & Flavors:
- Cinnamon: A simple sprinkle enhances the warm flavors.
- Nutmeg or Cardamom: For a more exotic spice note.
- Cocoa Nibs or Vegan Chocolate Chips: For a touch of chocolate indulgence.
- Savory Options (Less Traditional, but Fun!):
- Avocado Slices: For a healthy and creamy savory topping.
- Sautéed Spinach or Greens: Add a side of greens for a more balanced meal.
Serving Occasions:
- Breakfast/Brunch: Perfect for a quick weekday breakfast or a leisurely weekend brunch.
- Snack: A healthy and satisfying snack option.
- Dessert: Can be served as a light dessert with sweet toppings.
Get creative and experiment with different combinations to find your favorite way to enjoy these versatile Vegan Banana Oatmeal Pancakes!
Additional Tips for Perfect Pancakes
To ensure your Vegan Banana Oatmeal Pancakes turn out perfectly every time, here are five additional tips to keep in mind:
- Use Truly Ripe Bananas: As emphasized earlier, the ripeness of your bananas is key. Overripe, spotty bananas are sweeter, mash easier, and provide the best flavor and moisture for these pancakes. Don’t be afraid of bananas with brown spots – they are pancake perfection!
- Don’t Over-Blend the Batter: Blend the batter just until smooth. Over-blending can develop the gluten in the oats (even though oats are gluten-free, they contain avenin, a protein similar to gluten, which can be affected by over-mixing), potentially making the pancakes tougher. Blend until just combined for the best texture.
- Adjust Batter Consistency as Needed: Pancake batter consistency is crucial. If your batter seems too thick (it should be pourable but not watery), add a tablespoon of plant-based milk at a time until you reach the desired consistency. If it’s too thin, add a tablespoon of oats to thicken it. Remember, slight variations in banana and oat size can affect the batter consistency.
- Preheat the Pan Properly: Ensure your pan is heated to the right temperature before adding the batter. Medium heat is generally ideal. If the pan is too hot, the pancakes will burn on the outside before cooking through. If it’s too cool, they might become pale and not cook evenly. Test the heat with a water droplet as mentioned in the instructions.
- Resist Pressing Down While Cooking: Avoid pressing down on the pancakes with a spatula while they are cooking. This will deflate them and make them dense. Let them cook undisturbed until bubbles form and the edges are set, then flip gently.
By following these extra tips, you’ll be well on your way to consistently making flawless and fluffy Vegan Banana Oatmeal Pancakes.
Frequently Asked Questions (FAQ)
Here are five frequently asked questions about Vegan Banana Oatmeal Pancakes:
Q1: Can I use instant oats or steel-cut oats instead of rolled oats?
A: Rolled oats are the best choice for this recipe due to their texture and cooking properties. Instant oats are too finely processed and may result in a mushy batter. Steel-cut oats are too coarse and require longer cooking time, and will not blend smoothly in the batter. If you only have instant oats, you can try using slightly less plant-based milk to compensate for their finer texture, but rolled oats are highly recommended for optimal results.
Q2: Can I use water instead of plant-based milk?
A: While you can technically use water, plant-based milk adds creaminess, flavor, and a slight richness to the pancakes that water cannot provide. Plant-based milk also contributes to a more tender texture. For the best flavor and texture, using plant-based milk (almond, oat, soy, etc.) is highly recommended. If you must use water, consider adding a touch more vanilla extract or cinnamon to enhance the flavor.
Q3: How do I make these pancakes even fluffier?
A: To maximize fluffiness:
* Don’t over-blend the batter: Over-blending can make the pancakes tougher.
* Don’t press down while cooking: Pressing down deflates them.
* Use medium heat: Cooking at the right temperature ensures they cook through without becoming dense.
* Consider adding a tiny pinch of baking powder (optional): Although not strictly necessary for a 3-ingredient recipe, a tiny pinch (1/4 teaspoon) of baking powder can add a bit of extra lift for even fluffier pancakes.
Q4: Can I freeze these pancakes for later?
A: Yes, these pancakes freeze beautifully! Allow the cooked pancakes to cool completely. Then, stack them with parchment paper in between each pancake to prevent sticking. Place them in a freezer-safe bag or container and freeze for up to 2-3 months. To reheat, you can toast them in a toaster, microwave them briefly, or reheat them in a skillet over low heat until warmed through.
Q5: Can I add protein powder to these pancakes?
A: Yes, you can add protein powder to boost the protein content. Start by adding 1-2 tablespoons of your favorite vegan protein powder (vanilla or unflavored works well) to the batter and blend. You may need to add a little extra plant-based milk to adjust the batter consistency, as protein powder can thicken the batter. Be mindful that some protein powders can alter the texture slightly, so experiment to find what works best for you.
These FAQs should address common queries and help you troubleshoot any questions you might have while making these delightful Vegan Banana Oatmeal Pancakes. Enjoy your pancake adventures!
Print
Vegan Banana Oatmeal Pancakes Recipe
Ingredients
Ripe Bananas (2 Medium-Sized)
Bananas are not just the star ingredient in this recipe; they are the foundation upon which everything else is built. The ripeness of your bananas is paramount to the success of these pancakes. We’re not talking about slightly yellow bananas here; we’re aiming for spotty, brown-flecked bananas. Why is ripeness so crucial?
- Natural Sweetness: As bananas ripen, their starch content converts into sugars, primarily sucrose, fructose, and glucose. This natural sugar transformation is what provides the pancakes with their delightful sweetness, eliminating the need for any added refined sugars. The riper the banana, the sweeter your pancakes will be.
- Moisture and Binding: Ripe bananas are softer and contain more moisture. When mashed, they become almost creamy, contributing to the moist and tender texture of the pancakes. Furthermore, the pectin in ripe bananas acts as a natural binder, helping to hold the pancakes together without the need for eggs or gluten.
- Flavor Profile: Ripe bananas develop a richer, more complex flavor compared to their unripe counterparts. This enhanced banana flavor is a key characteristic of these pancakes, providing a naturally sweet and fruity note that is both comforting and delicious.
Choosing the Right Bananas: Look for bananas that are generously speckled with brown spots. A few brown spots indicate ripeness, while mostly brown bananas are overly ripe and might be too mushy. If your bananas are not quite ripe enough, you can expedite the ripening process. One quick trick is to place them in a paper bag with an apple or a ripe banana for a day or two. The ethylene gas released by these fruits will speed up the ripening of the bananas. Alternatively, if you need ripe bananas immediately, you can microwave unripe bananas for 15-20 seconds. This softens them and brings out their sweetness, although it’s not quite the same as naturally ripened bananas.
Nutritional Powerhouse: Beyond their functional role in the recipe, bananas are nutritional powerhouses. They are an excellent source of potassium, an essential electrolyte that supports heart health and muscle function. They are also rich in fiber, promoting digestive health and keeping you feeling full and satisfied. Bananas also contain vitamin B6, vitamin C, and various antioxidants, contributing to overall well-being.
Rolled Oats (1 Cup)
Rolled oats are the second essential ingredient, bringing texture, structure, and a wealth of nutritional benefits to these pancakes. While instant oats or steel-cut oats might come to mind, rolled oats are the ideal choice for this recipe due to their texture and cooking properties.
- Texture and Structure: Rolled oats, also known as old-fashioned oats, are oat groats that have been steamed and then rolled into flat flakes. This process partially cooks them, making them quicker to cook than steel-cut oats and providing a softer texture than oat groats. When blended, rolled oats break down to create a flour-like consistency that gives the pancakes their structure and slightly chewy texture. They provide substance without making the pancakes dense or heavy.
- Gluten-Free Option: For those following a gluten-free diet, it’s important to choose certified gluten-free rolled oats. While oats are naturally gluten-free, they are often processed in facilities that also handle wheat, barley, and rye, leading to potential cross-contamination. Certified gluten-free oats are processed and packaged in dedicated gluten-free facilities, ensuring they are safe for individuals with celiac disease or gluten sensitivities.
- Nutritional Benefits: Oats are a nutritional superstar, packed with fiber, particularly beta-glucan, a type of soluble fiber known for its cholesterol-lowering properties and ability to promote satiety. They are also a good source of complex carbohydrates, providing sustained energy release, and contain protein and essential minerals like manganese, phosphorus, magnesium, and zinc. Incorporating oats into your breakfast is a fantastic way to kickstart your day with sustained energy and essential nutrients.
Choosing the Right Oats: Opt for rolled oats that are fresh and have a pleasant, slightly nutty aroma. Avoid oats that smell stale or musty. For gluten-free pancakes, always look for certified gluten-free rolled oats. You can find them readily available in most supermarkets and health food stores.
Plant-Based Milk (1/4 Cup)
Plant-based milk is the final key ingredient, adding moisture and helping to bring the batter together to the perfect pourable consistency. With the rise in popularity of vegan and dairy-free diets, there is a plethora of plant-based milk options available. Each type of plant-based milk brings its own unique flavor and texture to the pancakes.
- Moisture and Consistency: Plant-based milk provides the necessary liquid to bind the dry ingredients (oats and mashed bananas) and create a batter that is pourable and cooks evenly. It helps to achieve the desired fluffy and tender texture of the pancakes.
- Variety of Options: You have a wide array of plant-based milk choices to experiment with, each offering slightly different flavors and textures:
- Almond Milk: A popular choice due to its mild, slightly nutty flavor and low calorie count. It adds a subtle sweetness and light texture to the pancakes.
- Soy Milk: A higher protein option compared to other plant-based milks. Soy milk has a creamy texture and a slightly richer flavor, which can enhance the overall taste of the pancakes.
- Oat Milk: Naturally creamy and slightly sweet, oat milk complements the oat flavor in the pancakes and adds a lovely richness. It’s also a good option for those with nut allergies.
- Coconut Milk (from a carton, not canned): Adds a subtle tropical flavor. Ensure you use the thinner carton variety, not the thick canned coconut milk, as the latter will make the batter too dense.
- Other Options: Rice milk (very mild and thin), cashew milk (creamy and slightly sweet), or even hemp milk can be used, each contributing a unique nuance to the flavor profile.
Instructions
1. Prepare Your Ingredients
The first step is to gather all your ingredients and prepare them for blending.
- Bananas: Ensure your bananas are ripe – ideally spotty and soft. Peel the bananas and break them into chunks to make blending easier. If your bananas are not quite ripe enough, you can microwave them for 15-20 seconds to soften them slightly. This not only softens them but also helps to release their natural sweetness.
- Rolled Oats: Measure out 1 cup of rolled oats. If you are using certified gluten-free oats, ensure they are labeled as such.
- Plant-Based Milk: Measure out 1/4 cup of your chosen plant-based milk. Have a little extra milk on hand in case you need to adjust the batter consistency later.
- Optional Add-ins: If you are using any optional add-ins like vanilla extract, cinnamon, or chia seeds, measure them out and have them ready to add to the blender.
Having all your ingredients prepped and ready will streamline the pancake-making process, making it even faster and more efficient.
2. Blend the Batter
This is where the magic happens! Combine all the ingredients in a blender or food processor.
- Combine Ingredients: Place the banana chunks, rolled oats, and plant-based milk into your blender or food processor. Add any optional add-ins you are using at this stage as well.
- Blend Until Smooth: Blend the mixture until it forms a smooth, thick batter. Blend for about 30-60 seconds, or until all the oats are completely broken down and the batter is homogenous.
- Check Consistency: The batter should have a pourable consistency, similar to traditional pancake batter. It should be thick enough to hold its shape when poured onto the pan but thin enough to spread slightly.
- Adjust Consistency (If Needed): If the batter is too thick, add plant-based milk one tablespoon at a time, blending after each addition, until you reach the desired consistency. If the batter is too thin (which is less likely), you can add a tablespoon of oats to thicken it, and blend again.
- Rest (Optional): While not strictly necessary, allowing the batter to rest for 5-10 minutes can help the oats absorb more of the liquid, resulting in slightly thicker pancakes.
Pro Tip for Texture: If you prefer pancakes with a chunkier texture, instead of blending all the ingredients, mash the bananas with a fork in a bowl. Then, add the rolled oats and plant-based milk and mix by hand until just combined. This method will leave some oat texture in the pancakes.
3. Heat the Pan
Properly heating the pan is crucial for achieving evenly cooked, golden-brown pancakes that are not burnt or undercooked.
- Choose Your Pan: A non-stick skillet or griddle is ideal for making pancakes, as it minimizes sticking and the need for excessive oil. If you don’t have a non-stick pan, a well-seasoned cast iron skillet or a regular skillet will work, but you’ll need to use a little oil to prevent sticking.
- Heat Over Medium Heat: Place your skillet or griddle over medium heat. Medium heat is generally the sweet spot for pancakes – it’s hot enough to cook them through without burning the outside too quickly.
- Test the Heat: To check if the pan is hot enough, you can do a water droplet test. Flick a few drops of water onto the hot pan. If the water droplets sizzle and evaporate quickly, the pan is ready. If they just sit there or evaporate slowly, the pan is not hot enough yet.
- Add Oil (If Needed): If you are using a non-stick pan, you may not need any oil. However, for extra insurance against sticking or to add a touch of flavor, you can lightly grease the pan with a small amount of coconut oil, vegan butter, or cooking spray. If using a regular skillet, a thin layer of oil is recommended.
- Heat Evenly: Allow the pan to heat evenly for 1-2 minutes before adding the batter. This ensures that the pancakes cook uniformly across their surface.
4. Cook the Pancakes
Now it’s time to cook those beautiful pancakes!
- Pour the Batter: Once the pan is heated, pour 1/4 cup of batter onto the hot pan for each pancake. You can use a measuring cup or a spoon to portion the batter. Leave some space between each pancake so they have room to spread slightly.
- Cook First Side (2-3 Minutes): Cook the pancakes for 2-3 minutes on the first side, or until bubbles start to form on the surface and the edges begin to look set and lift slightly. These bubbles are a visual cue that the pancakes are cooking and air is being incorporated, contributing to their fluffiness.
- Flip Carefully: Once bubbles have formed and the edges are set, carefully flip the pancakes using a spatula. Slide the spatula under the pancake and flip it over in one smooth motion.
- Cook Second Side (1-2 Minutes): Cook the other side for another 1-2 minutes, or until golden brown and cooked through. The second side usually cooks faster than the first.
- Check for Doneness: To ensure the pancakes are cooked through, you can gently press on the center of a pancake. It should feel firm and spring back slightly. You can also insert a toothpick into the center; it should come out clean.
- Avoid Pressing Down: Resist the urge to press down on the pancakes with a spatula while they are cooking. Pressing down will deflate them and make them dense rather than fluffy.
5. Serve and Enjoy
The final and most rewarding step is to serve and savor your freshly cooked Vegan Banana Oatmeal Pancakes!
- Transfer to a Plate: As each batch of pancakes is cooked, transfer them to a plate. You can stack them up to keep them warm while you cook the remaining batter.
- Serve Warm: These pancakes are best enjoyed warm, right off the pan.
- Add Your Favorite Toppings: Get creative with your toppings! Fresh fruit, maple syrup, nut butter, vegan yogurt, or a sprinkle of cinnamon are all fantastic choices. See the “How to Serve” section below for more topping ideas.
- Enjoy Immediately: Serve and enjoy your delicious, healthy, and easy-to-make Vegan Banana Oatmeal Pancakes immediately!
Nutrition
- Serving Size: One Normal Portion
- Calories: 250-300 kcal
- Sugar: 15-20g
- Sodium: 10-50mg
- Fat: 5-8g
- Saturated Fat: 1-2g
- Unsaturated Fat: 4-6g
- Carbohydrates: 45-55g
- Fiber: 8-10g
- Protein: 5-7g
- Cholesterol: 0mg