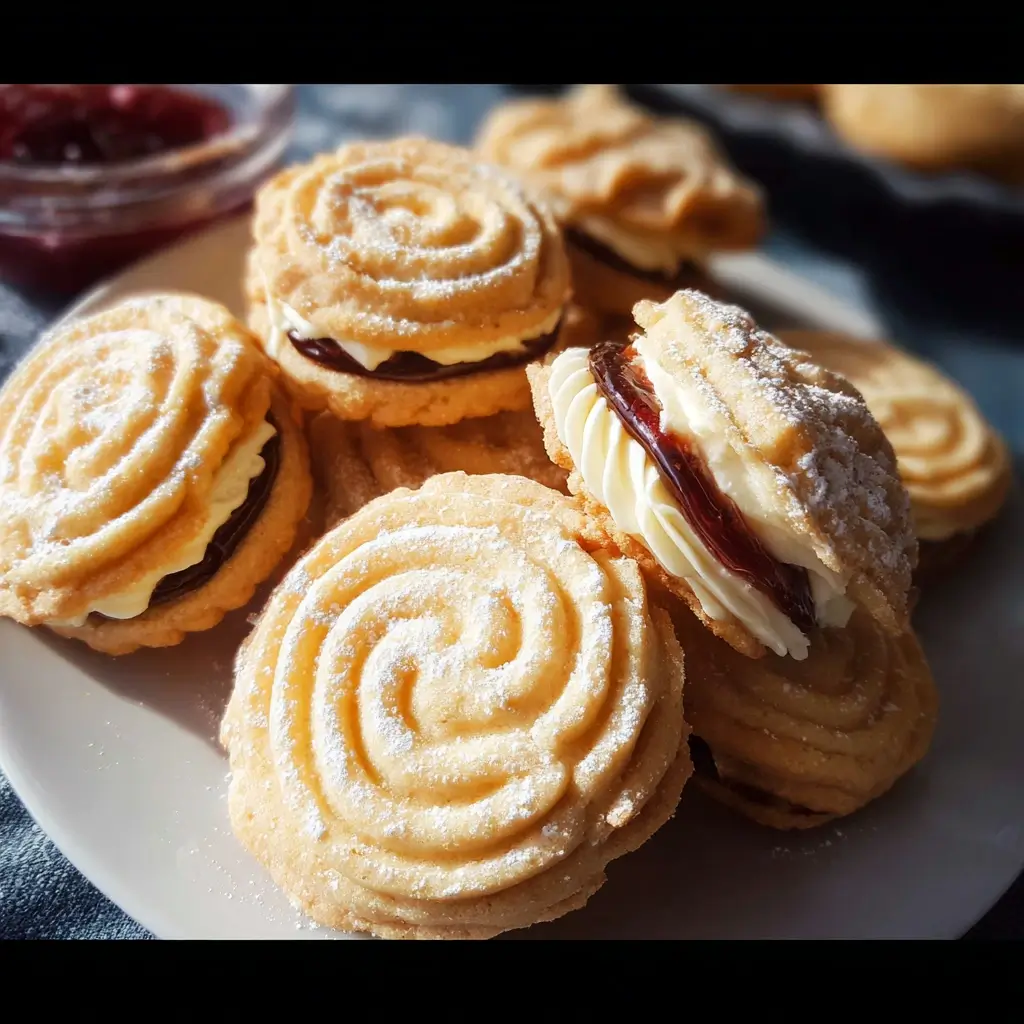
Of all the classic British bakes that evoke a sense of pure, unadulterated comfort, the Viennese Whirl holds a special place in my heart. The first time I successfully baked a batch, I felt like I had unlocked a secret level in the world of home baking. I brought them to a family gathering, arranged delicately on a vintage plate, and watched as eyes widened. My notoriously hard-to-please father-in-law took one bite, closed his eyes for a moment, and simply said, “Now that is a proper biscuit.” That was it. That was the highest praise imaginable. These aren’t just cookies; they are an experience. They are the star of an afternoon tea, the perfect partner to a hot cup of Earl Grey, and a testament to the magic that happens when butter, sugar, and flour come together in perfect harmony. The moment you bite through the two ethereally light, buttery shortbread swirls, feeling them melt on your tongue, and reach the sweet, velvety vanilla buttercream and the sharp tang of raspberry jam, you understand why they are so beloved. They look impossibly elegant and intricate, but I promise you, with this detailed guide, you’ll find they are surprisingly straightforward and immensely rewarding to create in your own kitchen. This recipe is more than just a set of instructions; it’s your comprehensive guide to mastering the iconic Viennese Whirl, ensuring a perfect, melt-in-your-mouth result every single time.
The Ultimate Viennese Whirls Recipe
This recipe has been tested and refined to produce the most delicate, crumbly, and flavorful Viennese Whirls. The key lies in the right balance of ingredients and the correct technique, particularly when it comes to the dough’s consistency for piping.
Ingredients
Understanding the role of each ingredient is the first step towards baking perfection. This isn’t just a list; it’s the blueprint for that signature texture and taste.
For the Viennese Shortbread Biscuits (Makes approx. 20-24 individual swirls, for 10-12 filled biscuits):
- 250g (1 cup + 2 tbsp) Unsalted Butter: This is the star of the show. It must be at room temperature—soft enough that a finger press leaves an indent, but not so soft that it’s greasy or melting. This precise temperature is crucial for both creaming and for the dough being pipeable. Using unsalted butter allows you to control the final salt content of the biscuits.
- 50g (⅓ cup + 1 tbsp) Icing Sugar (Powdered Sugar): Icing sugar, not granulated, is essential. Its fine texture dissolves completely into the butter, creating a smooth, tender crumb without any graininess. It also helps prevent the biscuits from spreading too much.
- 225g (1 ¾ cups + 1 tbsp) Plain Flour (All-Purpose Flour): This provides the main structure for the biscuits. Be sure to measure it accurately, either by weight (recommended for baking) or by using the spoon-and-level method if using cups.
- 25g (3 tbsp) Cornflour (Cornstarch): This is the secret weapon for that melt-in-the-mouth texture. Cornflour has no gluten. By replacing some of the plain flour with it, you reduce the overall gluten development in the dough, which results in an incredibly short, crumbly, and delicate biscuit. Do not skip this!
- 1 tsp High-Quality Vanilla Extract: Vanilla complements the buttery flavour beautifully. Opt for a good quality extract or vanilla bean paste over artificial essence for a richer, more authentic taste.
For the Vanilla Buttercream and Jam Filling:
- 100g (½ cup minus 1 tbsp) Unsalted Butter: As with the biscuit dough, this must be properly softened to room temperature to achieve a light, fluffy, and lump-free buttercream.
- 200g (1 ½ cups + 2 tbsp) Icing Sugar (Powdered Sugar): This provides the sweetness and structure for the buttercream. Sifting it is highly recommended to avoid any small, stubborn lumps.
- ½ tsp High-Quality Vanilla Extract: For flavouring the buttercream.
- 1-2 tbsp Milk or Double Cream: This is used to adjust the consistency of the buttercream. Add it one tablespoon at a time until you reach a perfectly smooth and pipeable texture. The amount you need can vary depending on the temperature of your butter and kitchen.
- 4-5 tbsp Good-Quality Raspberry Jam: The quality of your jam makes a huge difference. A good preserve with a high fruit content will provide a much-needed tartness to cut through the richness of the butter in the biscuits and the cream. A seedless variety is traditional and provides a smoother eating experience.
Instructions: A Step-by-Step Guide to Perfection
Follow these detailed instructions carefully. We’ve broken the process down into manageable stages to ensure you feel confident and achieve a professional-looking result.
Part 1: Making the Pipeable Biscuit Dough
- Prepare Your Equipment: Preheat your oven to 180°C (160°C Fan / 350°F / Gas Mark 4). Line two large baking sheets with non-stick baking parchment. If you want perfectly uniform biscuits, you can use a pencil and a 5cm (2-inch) cookie cutter to draw circles on the parchment paper (on the underside, so the pencil doesn’t touch the dough), leaving at least 2 inches of space between them. This will be your piping guide.
- Cream the Butter and Sugar: In a large mixing bowl, or the bowl of a stand mixer fitted with the paddle attachment, place the softened unsalted butter and the icing sugar. Start on a low speed to combine them without creating a sugar cloud, then increase to medium-high. Cream them together for a good 3-4 minutes. The mixture should become very pale, light, and fluffy. This step incorporates air, which is vital for the light texture of the whirls. Scrape down the sides of the bowl once or twice to ensure everything is evenly mixed.
- Combine the Dry Ingredients: In a separate medium bowl, sift together the plain flour and the cornflour. Sifting is not just about removing lumps; it aerates the flours and helps them combine more evenly, contributing to a lighter final product.
- Incorporate the Flours: Add the sifted flour mixture and the vanilla extract to the creamed butter and sugar. Mix on a very low speed, just until the flour is incorporated and a soft dough forms. It’s crucial not to overmix at this stage. Overmixing will develop the gluten in the flour, resulting in a tough biscuit rather than a short, crumbly one. The final dough should be very soft, smooth, and easily pipeable.
Part 2: Piping and Baking the Whirls
- Prepare the Piping Bag: Prepare a piping bag fitted with a large open star nozzle (a Wilton 1M or 2D is perfect for this). Spoon the soft biscuit dough into the piping bag. Don’t overfill the bag; working with half the dough at a time is much more manageable.
- Pipe the Whirls: Holding the piping bag vertically about half an inch above your prepared baking sheet, apply steady pressure. Starting from the centre of your guide-circle, pipe a tight spiral outwards until you fill the 5cm (2-inch) circle. End the swirl with a little flick to create a neat finish. Repeat for the remaining dough, ensuring you leave ample space between whirls as they will spread slightly.
- The Crucial Chill: Place the baking sheets with the piped whirls into the refrigerator to chill for at least 30 minutes (or up to an hour). This is arguably the most important step to prevent the biscuits from spreading into flat, shapeless discs in the oven. Chilling solidifies the butter, helping the whirls hold their beautiful piped shape during baking.
- Bake to Pale Perfection: Transfer the chilled baking sheets directly into the preheated oven. Bake for 13-15 minutes. The whirls are ready when they are a very pale, light golden colour around the edges but still pale in the centre. You are not looking for a deep golden brown. Over-baking will make them hard and crunchy, and you will lose that signature melt-in-the-mouth quality.
- Cool Completely: Remove the baking sheets from the oven and let the biscuits cool on the sheets for 5-10 minutes. They will be very delicate at this point. After 10 minutes, carefully transfer them using a palette knife or spatula to a wire rack to cool completely. They must be 100% cool before you attempt to fill them, otherwise the buttercream will melt instantly.
Part 3: Making the Filling and Assembling
- Prepare the Vanilla Buttercream: While the biscuits are cooling, make the filling. In a mixing bowl, beat the softened butter with an electric mixer until it’s smooth and creamy. Sift in the icing sugar and add the vanilla extract. Start mixing on the lowest speed until the sugar is incorporated, then increase the speed to high and beat for 3-5 minutes until the buttercream is extremely light, pale, and fluffy. If it seems too stiff, add the milk or cream one tablespoon at a time until you reach a soft, easily spreadable or pipeable consistency.
- Assemble the Viennese Whirls: Match the cooled biscuits into pairs of similar size and shape. Spoon your raspberry jam into a small bowl and give it a stir to loosen it. On the flat side of one biscuit in a pair, spread or pipe a small teaspoon of raspberry jam in the centre.
- Pipe the Buttercream: You can either spoon the buttercream on or, for a more professional finish, transfer the buttercream to a piping bag (you can use the same star nozzle or a small round one). Pipe a generous ring of buttercream around the jam on the same biscuit.
- Create the Sandwich: Gently place the second biscuit on top, flat side down, and press ever so slightly to sandwich them together, causing the filling to just peek out from the sides. Be very gentle as the biscuits are delicate.
- Final Flourish (Optional): For a classic bakery look, you can lightly dust the finished Viennese Whirls with a little extra icing sugar just before serving.
Nutrition Facts
- Servings: This recipe makes approximately 10-12 assembled Viennese Whirls.
- Calories Per Serving: Approximately 350-400 kcal per assembled whirl.
Disclaimer: The nutritional information provided is an estimate and can vary based on the specific ingredients and brands used.
Preparation Time
- Active Preparation Time: 30 minutes
- Chilling Time: 30 minutes
- Baking Time: 13-15 minutes
- Cooling & Assembly Time: 30 minutes
- Total Time: Approximately 1 hour 45 minutes
How to Serve Your Viennese Whirls
These elegant biscuits deserve a presentation that matches their quality. Here are a few ways to serve them:
- The Quintessential Afternoon Tea: This is the natural habitat of the Viennese Whirl.
- Arrange them on the top tier of a classic three-tiered cake stand.
- Serve alongside finger sandwiches (cucumber and cream cheese, egg and cress, smoked salmon), freshly baked scones with clotted cream and strawberry jam, and a selection of other small cakes and pastries.
- Pair with a pot of freshly brewed tea, such as Earl Grey, English Breakfast, or Darjeeling.
- A Simple, Elegant Coffee Break: You don’t need a full afternoon tea to enjoy these.
- Serve one or two whirls on a beautiful saucer next to a cup of high-quality coffee or a frothy cappuccino.
- The buttery biscuit is the perfect counterpoint to a slightly bitter espresso or a smooth latte.
- As a Sophisticated Dessert:
- Serve a single Viennese Whirl alongside a scoop of vanilla bean ice cream or a dollop of fresh, unsweetened whipped cream.
- Garnish the plate with a few fresh raspberries or a drizzle of raspberry coulis to echo the flavour of the jam filling.
- For Gifting and Special Occasions:
- Viennese Whirls make a wonderful homemade gift.
- Line a beautiful biscuit tin or a cardboard gift box with parchment paper.
- Carefully arrange the whirls in a single layer (stacking can cause them to break) and tie the box with a ribbon. They are perfect for holidays, birthdays, or as a thank-you present.
Additional Tips for Flawless Viennese Whirls
- The Temperature of Your Butter is Non-Negotiable: I cannot stress this enough. If your butter is too cold, your dough will be too stiff to pipe. If it’s too warm and greasy, the dough will be too slack and the biscuits will spread into puddles in the oven. “Room temperature” means it should be soft enough to easily cream, around 18-20°C (64-68°F).
- Piping Practice Makes Perfect: If you’re new to piping, don’t be discouraged. The dough is very forgiving. You can practice piping a few whirls onto a spare piece of parchment paper. If you’re not happy with them, just scrape the dough back into the piping bag and try again. Consistent pressure and a steady hand are key.
- Don’t Rush the Cooling: Attempting to fill warm biscuits is a recipe for disaster. The heat will melt the buttercream, creating a greasy, sliding mess. It’s also when the biscuits are at their most fragile. Be patient and wait until they are completely cool to the touch before you even think about assembling them.
- Jam Management: If your raspberry jam is particularly runny, it can make the biscuits soggy over time. To prevent this, you can either buy a thicker, high-quality “preserve,” or you can gently heat your jam in a small saucepan for a few minutes to thicken it slightly. Let it cool completely before using. The buttercream border also acts as a “dam” to hold the jam in place.
- Storage Savvy: Viennese Whirls are best enjoyed on the day they are made for the ultimate texture. However, they can be stored. Store them in an airtight container at room temperature for up to 3 days. The unfilled, cooled biscuit shells can be stored in an airtight container for up to 5 days, or even frozen for up to a month. You can then fill them just before serving for the freshest taste and texture.
Frequently Asked Questions (FAQ)
1. Why did my Viennese Whirls spread out and go flat in the oven?
This is the most common issue and almost always comes down to two things: butter temperature or lack of chilling. If your butter was too soft and greasy when you made the dough, or if your kitchen is very warm, the dough will be too slack. The second, and most likely, culprit is skipping or rushing the chilling step. Chilling the piped dough for at least 30 minutes is essential to solidify the butter, which helps the biscuits hold their intricate piped shape as they bake.
2. What is the best piping tip (nozzle) to use for Viennese Whirls?
The classic look is achieved with a large open star nozzle. A Wilton 1M is the most popular and creates beautiful, deep ridges. A Wilton 2D (a closed star tip) also works well and creates a slightly different, more ruffled swirl. The key is to use a large tip; a small one will be very difficult to pipe this thick dough through and won’t give the iconic look.
3. Can I make Viennese Whirls ahead of time? Can I freeze them?
Yes, you can! For the best results, bake the biscuit shells and allow them to cool completely. Store them in an airtight container at room temperature for up to 5 days. You can then make the filling and assemble them on the day you wish to serve them. You can also freeze the un-filled biscuit shells. Place them in a single layer on a baking sheet to freeze solid, then transfer them to a rigid, airtight container. They can be frozen for up to a month. Thaw at room temperature before filling. Freezing already assembled whirls is not recommended as the jam can make the biscuits soggy upon thawing.
4. Can I use a different flavour of jam or filling?
Absolutely! This recipe is a fantastic base for experimentation. While raspberry is classic, try using a good quality strawberry, apricot, or blackcurrant jam. For the filling, you could swap the vanilla for a different extract like almond or lemon. You could even fill them with lemon curd for a zesty twist, or a rich chocolate ganache for a more decadent version.
5. My shortbread dough is too stiff to pipe. What did I do wrong and how can I fix it?
This usually happens if your butter was too cold to begin with, or if you’ve over-chilled the dough before piping it. The dough should be soft and yielding. If it’s too stiff, your best bet is to let the piping bag sit at room temperature for 10-15 minutes to allow the butter to soften slightly. You can gently knead the bag with your hands to help warm it up. If the dough was made with cold butter, you may need to transfer it back to the mixer and beat it for a minute to soften, but be careful not to overwork it.
Viennese Whirls Recipe
Ingredients
For the Viennese Shortbread Biscuits (Makes approx. 20-24 individual swirls, for 10-12 filled biscuits):
- 250g (1 cup + 2 tbsp) Unsalted Butter: This is the star of the show. It must be at room temperature—soft enough that a finger press leaves an indent, but not so soft that it’s greasy or melting. This precise temperature is crucial for both creaming and for the dough being pipeable. Using unsalted butter allows you to control the final salt content of the biscuits.
- 50g (⅓ cup + 1 tbsp) Icing Sugar (Powdered Sugar): Icing sugar, not granulated, is essential. Its fine texture dissolves completely into the butter, creating a smooth, tender crumb without any graininess. It also helps prevent the biscuits from spreading too much.
- 225g (1 ¾ cups + 1 tbsp) Plain Flour (All-Purpose Flour): This provides the main structure for the biscuits. Be sure to measure it accurately, either by weight (recommended for baking) or by using the spoon-and-level method if using cups.
- 25g (3 tbsp) Cornflour (Cornstarch): This is the secret weapon for that melt-in-the-mouth texture. Cornflour has no gluten. By replacing some of the plain flour with it, you reduce the overall gluten development in the dough, which results in an incredibly short, crumbly, and delicate biscuit. Do not skip this!
- 1 tsp High-Quality Vanilla Extract: Vanilla complements the buttery flavour beautifully. Opt for a good quality extract or vanilla bean paste over artificial essence for a richer, more authentic taste.
For the Vanilla Buttercream and Jam Filling:
- 100g (½ cup minus 1 tbsp) Unsalted Butter: As with the biscuit dough, this must be properly softened to room temperature to achieve a light, fluffy, and lump-free buttercream.
- 200g (1 ½ cups + 2 tbsp) Icing Sugar (Powdered Sugar): This provides the sweetness and structure for the buttercream. Sifting it is highly recommended to avoid any small, stubborn lumps.
- ½ tsp High-Quality Vanilla Extract: For flavouring the buttercream.
- 1–2 tbsp Milk or Double Cream: This is used to adjust the consistency of the buttercream. Add it one tablespoon at a time until you reach a perfectly smooth and pipeable texture. The amount you need can vary depending on the temperature of your butter and kitchen.
- 4–5 tbsp Good-Quality Raspberry Jam: The quality of your jam makes a huge difference. A good preserve with a high fruit content will provide a much-needed tartness to cut through the richness of the butter in the biscuits and the cream. A seedless variety is traditional and provides a smoother eating experience.
Instructions
Part 1: Making the Pipeable Biscuit Dough
- Prepare Your Equipment: Preheat your oven to 180°C (160°C Fan / 350°F / Gas Mark 4). Line two large baking sheets with non-stick baking parchment. If you want perfectly uniform biscuits, you can use a pencil and a 5cm (2-inch) cookie cutter to draw circles on the parchment paper (on the underside, so the pencil doesn’t touch the dough), leaving at least 2 inches of space between them. This will be your piping guide.
- Cream the Butter and Sugar: In a large mixing bowl, or the bowl of a stand mixer fitted with the paddle attachment, place the softened unsalted butter and the icing sugar. Start on a low speed to combine them without creating a sugar cloud, then increase to medium-high. Cream them together for a good 3-4 minutes. The mixture should become very pale, light, and fluffy. This step incorporates air, which is vital for the light texture of the whirls. Scrape down the sides of the bowl once or twice to ensure everything is evenly mixed.
- Combine the Dry Ingredients: In a separate medium bowl, sift together the plain flour and the cornflour. Sifting is not just about removing lumps; it aerates the flours and helps them combine more evenly, contributing to a lighter final product.
- Incorporate the Flours: Add the sifted flour mixture and the vanilla extract to the creamed butter and sugar. Mix on a very low speed, just until the flour is incorporated and a soft dough forms. It’s crucial not to overmix at this stage. Overmixing will develop the gluten in the flour, resulting in a tough biscuit rather than a short, crumbly one. The final dough should be very soft, smooth, and easily pipeable.
Part 2: Piping and Baking the Whirls
- Prepare the Piping Bag: Prepare a piping bag fitted with a large open star nozzle (a Wilton 1M or 2D is perfect for this). Spoon the soft biscuit dough into the piping bag. Don’t overfill the bag; working with half the dough at a time is much more manageable.
- Pipe the Whirls: Holding the piping bag vertically about half an inch above your prepared baking sheet, apply steady pressure. Starting from the centre of your guide-circle, pipe a tight spiral outwards until you fill the 5cm (2-inch) circle. End the swirl with a little flick to create a neat finish. Repeat for the remaining dough, ensuring you leave ample space between whirls as they will spread slightly.
- The Crucial Chill: Place the baking sheets with the piped whirls into the refrigerator to chill for at least 30 minutes (or up to an hour). This is arguably the most important step to prevent the biscuits from spreading into flat, shapeless discs in the oven. Chilling solidifies the butter, helping the whirls hold their beautiful piped shape during baking.
- Bake to Pale Perfection: Transfer the chilled baking sheets directly into the preheated oven. Bake for 13-15 minutes. The whirls are ready when they are a very pale, light golden colour around the edges but still pale in the centre. You are not looking for a deep golden brown. Over-baking will make them hard and crunchy, and you will lose that signature melt-in-the-mouth quality.
- Cool Completely: Remove the baking sheets from the oven and let the biscuits cool on the sheets for 5-10 minutes. They will be very delicate at this point. After 10 minutes, carefully transfer them using a palette knife or spatula to a wire rack to cool completely. They must be 100% cool before you attempt to fill them, otherwise the buttercream will melt instantly.
Part 3: Making the Filling and Assembling
- Prepare the Vanilla Buttercream: While the biscuits are cooling, make the filling. In a mixing bowl, beat the softened butter with an electric mixer until it’s smooth and creamy. Sift in the icing sugar and add the vanilla extract. Start mixing on the lowest speed until the sugar is incorporated, then increase the speed to high and beat for 3-5 minutes until the buttercream is extremely light, pale, and fluffy. If it seems too stiff, add the milk or cream one tablespoon at a time until you reach a soft, easily spreadable or pipeable consistency.
- Assemble the Viennese Whirls: Match the cooled biscuits into pairs of similar size and shape. Spoon your raspberry jam into a small bowl and give it a stir to loosen it. On the flat side of one biscuit in a pair, spread or pipe a small teaspoon of raspberry jam in the centre.
- Pipe the Buttercream: You can either spoon the buttercream on or, for a more professional finish, transfer the buttercream to a piping bag (you can use the same star nozzle or a small round one). Pipe a generous ring of buttercream around the jam on the same biscuit.
- Create the Sandwich: Gently place the second biscuit on top, flat side down, and press ever so slightly to sandwich them together, causing the filling to just peek out from the sides. Be very gentle as the biscuits are delicate.
- Final Flourish (Optional): For a classic bakery look, you can lightly dust the finished Viennese Whirls with a little extra icing sugar just before serving.
Nutrition
- Serving Size: One Normal Portion
- Calories: 350-400