Ingredients
- 2 Ripe Bananas: The star of the show, ripe bananas are not just about sweetness. They provide the natural base for this pudding, lending a creamy texture and that unmistakable banana flavor we all love. The ripeness is key here; the riper the banana, the sweeter and easier it will be to mash, resulting in a smoother pudding. Those brown spots you often see on banana peels are actually indicators of peak ripeness and sweetness! Beyond flavor and texture, bananas are packed with potassium, an essential electrolyte, and fiber, contributing to the pudding’s overall health benefits.
- Choosing the Right Bananas: Look for bananas that are mostly yellow with brown speckles. Avoid bananas that are still green, as they will be harder to mash and less sweet. Overripe bananas, with mostly brown peels, can also be used but might make the pudding a bit too sweet and intensely banana-flavored for some palates.
- Potential Substitutions: While bananas are central to this recipe, if you’re adventurous or have dietary restrictions, you could experiment with other fruits for a different flavor profile. Consider using:
- Avocado: For an ultra-creamy and less sweet pudding. You might need to add a bit more sweetener if you choose avocado.
- Mango: For a tropical twist. Ripe mangoes will provide sweetness and a smooth texture similar to bananas.
- Pumpkin Puree: Especially during fall, pumpkin puree can create a delicious and spiced chia pudding. You’ll definitely want to add spices like cinnamon and nutmeg if using pumpkin.
- Sweet Potato Puree: Similar to pumpkin, sweet potato puree adds a creamy texture and subtle sweetness. It also pairs well with warm spices.
- Applesauce: Unsweetened applesauce can be used, but it will be less creamy and more liquidy. You might need to adjust the amount of milk accordingly and potentially increase the chia seeds for a thicker consistency.
- 1/4 Cup Chia Seeds: These tiny black seeds are nutritional powerhouses and the magic ingredient that transforms liquid into pudding. Chia seeds are hydrophilic, meaning they absorb many times their weight in liquid. When soaked in almond milk (or any liquid), they swell and create a gel-like consistency, giving chia pudding its signature texture. Beyond their gelling abilities, chia seeds are packed with omega-3 fatty acids, fiber, protein, and antioxidants. They contribute significantly to the pudding’s health benefits, promoting satiety and digestive health.
- Types of Chia Seeds: You’ll typically find black or white chia seeds. Nutritionally, they are very similar. Black chia seeds are more common and what you’ll likely find in most stores. White chia seeds have a slightly milder flavor and can be visually less noticeable in lighter-colored puddings. Either type will work perfectly in this recipe.
- Potential Substitutions: While there isn’t a direct substitute for chia seeds in terms of creating the same pudding-like texture through gelling, you could consider:
- Flaxseeds (Ground): Ground flaxseeds also have gelling properties, although not as pronounced as chia seeds. If substituting, use ground flaxseeds and be aware that the texture might be slightly different and potentially less firm. Use roughly the same amount as chia seeds and adjust liquid as needed. Flaxseeds also have a nuttier flavor.
- Oat Flour: While not a direct gelling agent, oat flour can thicken liquids. You would need to cook oat flour slightly to activate its thickening properties, which deviates from the no-cook nature of chia pudding. This would significantly alter the recipe and is not a recommended direct substitution for texture.
- Agar Agar Powder: Agar agar is a vegan gelling agent derived from seaweed. It requires heating to activate and sets into a firmer jelly-like consistency than chia seeds. Using agar agar would create a different type of pudding, more akin to a jelly or panna cotta, and is not a direct substitute for the texture chia seeds provide.
- 2 Cups Almond Milk (or any plant-based milk): Almond milk provides the liquid base for the chia seeds to absorb and create the pudding. Its mild, slightly nutty flavor complements the banana without overpowering it. However, the beauty of this recipe lies in its versatility – you can easily use any plant-based milk you prefer or have on hand.
- Plant-Based Milk Options:
- Soy Milk: Offers a creamy texture and a good source of protein, similar to dairy milk in consistency.
- Oat Milk: Known for its creamy and slightly sweet flavor, oat milk is a popular choice for its texture and neutral taste. It will result in a richer and creamier pudding.
- Coconut Milk (Canned, Light or Full-Fat): Adds a distinct coconut flavor. Full-fat coconut milk will create a very rich and creamy pudding. Light coconut milk will be lighter in calories and less intensely coconut-flavored.
- Cashew Milk: Naturally creamy and slightly sweet, cashew milk is a good option for a smoother pudding.
- Rice Milk: Thinner in consistency and slightly sweeter than other plant-based milks. It might result in a less creamy pudding and potentially require a bit more chia seeds for thickening.
- Hemp Milk: Has a slightly nutty and earthy flavor. It is also a good source of omega-3 and omega-6 fatty acids.
- Dairy Milk: While the recipe is designed to be plant-based, you can absolutely use dairy milk (cow’s milk) if you prefer or don’t have plant-based milk available. The consistency and texture of the pudding will be similar.
- Plant-Based Milk Options:
- 1 tsp Vanilla Extract: Vanilla extract enhances the overall flavor profile, adding warmth and depth. It complements both the banana and the milk, creating a more rounded and delicious pudding. Pure vanilla extract is preferred for the best flavor, but vanilla essence can also be used as a more budget-friendly alternative.
- Vanilla Bean Paste: For an even more intense vanilla flavor and those beautiful flecks of vanilla bean, consider using vanilla bean paste. Use about 1 teaspoon of paste as a substitute for vanilla extract.
- Vanilla Powder: Vanilla powder is made from dried vanilla beans and offers a concentrated vanilla flavor. Use about 1/2 teaspoon of vanilla powder as a substitute for 1 teaspoon of extract.
- Substitutions (Non-Vanilla): If you don’t have vanilla or want to experiment with different flavors, consider:
- Almond Extract: Adds a nutty and slightly sweet flavor. Use sparingly, as almond extract is stronger than vanilla extract. Start with 1/2 teaspoon.
- Maple Extract: Complements the maple syrup and adds a richer, caramel-like note.
- Cinnamon: Adds warmth and spice, especially delicious if using pumpkin or sweet potato puree as a banana substitute.
- Nutmeg: Another warm spice that pairs well with banana and adds a touch of complexity.
- Lemon or Orange Zest: For a brighter, citrusy flavor.
- 1 tbsp Maple Syrup (optional): Maple syrup adds a touch of sweetness to the pudding. The ripeness of the bananas will contribute natural sweetness, so the maple syrup is optional, especially if you prefer a less sweet pudding or are watching your sugar intake. Maple syrup also adds a subtle caramel-like flavor that enhances the overall taste.
- Sweetener Alternatives: If you prefer not to use maple syrup, or want to explore other sweeteners, consider:
- Agave Nectar: A vegan sweetener with a neutral flavor and slightly thinner consistency than maple syrup.
- Honey: Not vegan, but a natural sweetener with a distinct floral flavor. Use sparingly as honey is sweeter than maple syrup.
- Dates (Medjool Dates, Pitted): For a natural and fiber-rich sweetener. You can blend 1-2 Medjool dates with the banana and milk mixture for sweetness and added caramel notes.
- Stevia or Monk Fruit Sweetener: For sugar-free options. Use according to package instructions as these sweeteners are very potent.
- Coconut Sugar: A less refined sugar with a caramel-like flavor. Use the same amount as maple syrup.
- Brown Sugar: Adds a molasses-like flavor. Use the same amount as maple syrup.
- Sweetener Alternatives: If you prefer not to use maple syrup, or want to explore other sweeteners, consider:
- A Pinch of Salt: A seemingly small addition, but salt plays a crucial role in enhancing the flavors of all the other ingredients. It balances the sweetness and brings out the nuances of the banana, vanilla, and maple syrup (if used). Just a pinch is enough to make a noticeable difference.
- Types of Salt: Regular table salt, sea salt, or kosher salt can be used. If using flaky sea salt, you might want to use a slightly larger pinch.
Instructions
- In a bowl, mash the bananas until smooth.
- Why Mash Smoothly? Mashing the bananas smoothly is key to achieving a creamy and lump-free pudding. Larger chunks of banana might not fully incorporate into the pudding and can result in an uneven texture.
- Best Tools for Mashing:
- Fork: A simple fork works perfectly well for mashing ripe bananas.
- Potato Masher: If you have one, a potato masher can make the job even quicker and easier, especially if you’re making a larger batch.
- Whisk (Firm Wire Whisk): A firm wire whisk can also be used to mash bananas, especially if they are very ripe.
- Tips for Easier Mashing:
- Ensure your bananas are truly ripe. They should be soft to the touch and easily mashed with a fork.
- If you’re using slightly less ripe bananas, you can microwave them for 15-30 seconds (with the peel on, but pricked with a fork) to soften them slightly before mashing.
- Smoothness Level: Aim for a relatively smooth mash. A few very small lumps are okay, but try to eliminate any large chunks for the best texture.
- Add almond milk, vanilla, maple syrup (if using), and salt to the mashed bananas. Mix well.
- Layering Ingredients: Adding the wet ingredients (milk, vanilla, maple syrup) to the mashed bananas helps to further break down any remaining lumps and create a smoother base for the chia seeds.
- Mixing Thoroughly: Ensure you mix these ingredients well with the mashed bananas. You want a homogenous mixture before adding the chia seeds so that the flavor is evenly distributed throughout the pudding.
- Taste Test (Optional): At this stage, you can taste the mixture and adjust the sweetness. If you prefer a sweeter pudding, add a bit more maple syrup or your chosen sweetener. Remember that the flavor will mellow slightly after chilling and the chia seeds will absorb some of the sweetness.
- Stir in chia seeds until evenly distributed.
- Even Distribution is Crucial: The key to preventing clumping and ensuring all chia seeds hydrate properly is to distribute them evenly throughout the banana-milk mixture.
- Stirring Technique: Use a whisk or a fork to vigorously stir the chia seeds into the mixture. Make sure to reach the bottom and sides of the bowl to incorporate all the seeds.
- Visual Check: Look closely to ensure there are no clumps of chia seeds sitting at the bottom of the bowl. The seeds should be dispersed throughout the liquid.
- Let the mixture sit for 5 minutes, then stir again to prevent clumping.
- The Initial Gelling Process: Chia seeds start to absorb liquid very quickly. Letting the mixture sit for 5 minutes allows the initial gelling process to begin.
- Why Re-stir? Even with thorough initial stirring, chia seeds can sometimes settle at the bottom and clump together as they start to hydrate. Re-stirring after 5 minutes helps to break up any clumps and redistribute the seeds, ensuring a smoother and more consistent pudding texture.
- Importance of this Step: Don’t skip this re-stirring step! It’s vital for preventing clumping and achieving the desired smooth texture of your chia pudding.
- Cover and refrigerate for at least 2 hours or overnight.
- Refrigeration Time: The minimum refrigeration time is 2 hours, but ideally, refrigerating overnight (or for at least 4-6 hours) is recommended for the best texture. This allows the chia seeds ample time to fully hydrate and create a thick and pudding-like consistency.
- Covering is Essential: Covering the bowl prevents the pudding from absorbing odors from the refrigerator and also prevents a skin from forming on the surface. Use an airtight container or plastic wrap to cover the bowl tightly.
- Overnight Advantage: Refrigerating overnight is incredibly convenient as it allows you to prepare the pudding ahead of time, making it perfect for a quick breakfast or snack the next day. The texture also tends to improve with longer chilling time, becoming even thicker and more pudding-like.
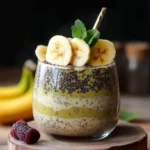
- Serve chilled, topped with fresh fruit or nuts if desired.
- Serving Temperature: Chia pudding is best served chilled. The cold temperature enhances the refreshing quality and texture of the pudding.
- Topping Ideas (Detailed in “How to Serve” section): The beauty of chia pudding is its versatility as a blank canvas for toppings. Get creative with fresh fruits, nuts, seeds, granola, nut butter, spices, and more! Toppings add flavor, texture, and visual appeal to your banana chia pudding.
Nutrition
- Serving Size: One Normal Portion
- Calories: 150
- Fat: 7g
- Carbohydrates: 27g
- Fiber: 6g
- Protein: 4g